XSplit is Better for Single-PC Streamers: The HUD

In this news series of blog posts, we’ll attempt to shed some light on new or unknown features that can help improve your live streaming, whether it be audio/video quality, or simply the management of your stream and more efficient processes.

To kick things off, I want to tell you about our latest and most innovative feature yet: the In-Game HUD for streaming. As gamers, you are all probably familiar with what a HUD is, but what does it mean in the context of XSplit Broadcaster? In short, it’s the ultimate stream management solution. It makes things so much easier, especially for single-monitor streamers and might even prevent some neck pain (we are not doctors and cannot guarantee this statement, please consult a real doctor if you encounter physical or mental pain from streaming).

In Game HUD for streaming

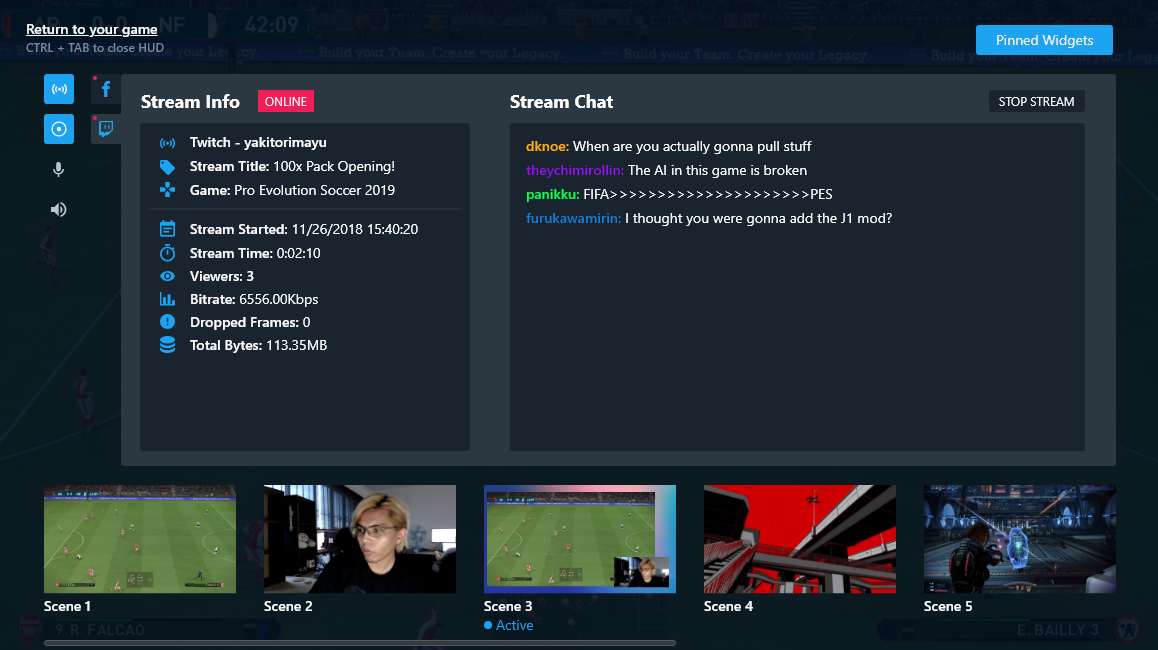
If you’ve used XSplit Gamecaster before, you might be familiar with the concept of our HUD streaming technology. How it works is by setting up a hotkey, you are able to trigger an overlay of widgets and stream info that will allow you to manage various settings of your live stream without leaving your game screen. Please note though that our HUD is to be used with Game Source.

Here is a list of all the neat features you can access from the HUD:

  • Start/Stop Streaming on the go (Currently under renovation, our designers are making it look fresh)
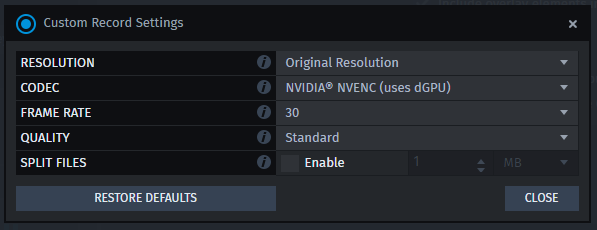
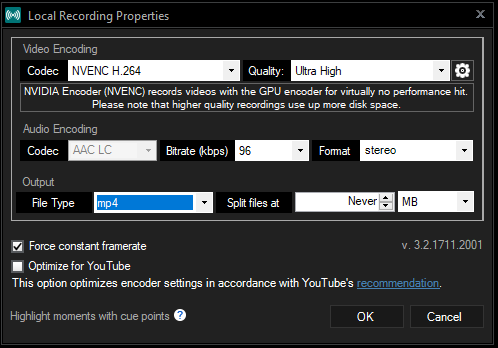
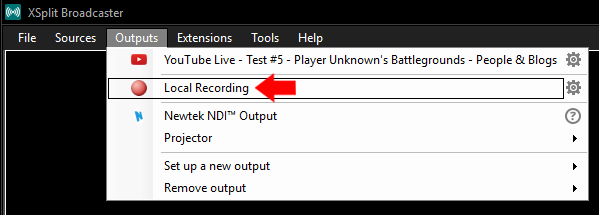
  • Recording options to get those sweet YouTube VODs
  • Adjusting audio levels when chat is blasting those TTS donations or that pesky Apex Lobby screen
  • Preview scenes and switch seamlessly (check your browser display beforehand…)
  • Pin and manage widgets such as Stream Status and FPS, Chat, stream info such as frames dropped, bitrate, viewers, etc.

XSplit HUD Pin and Manage Widgets

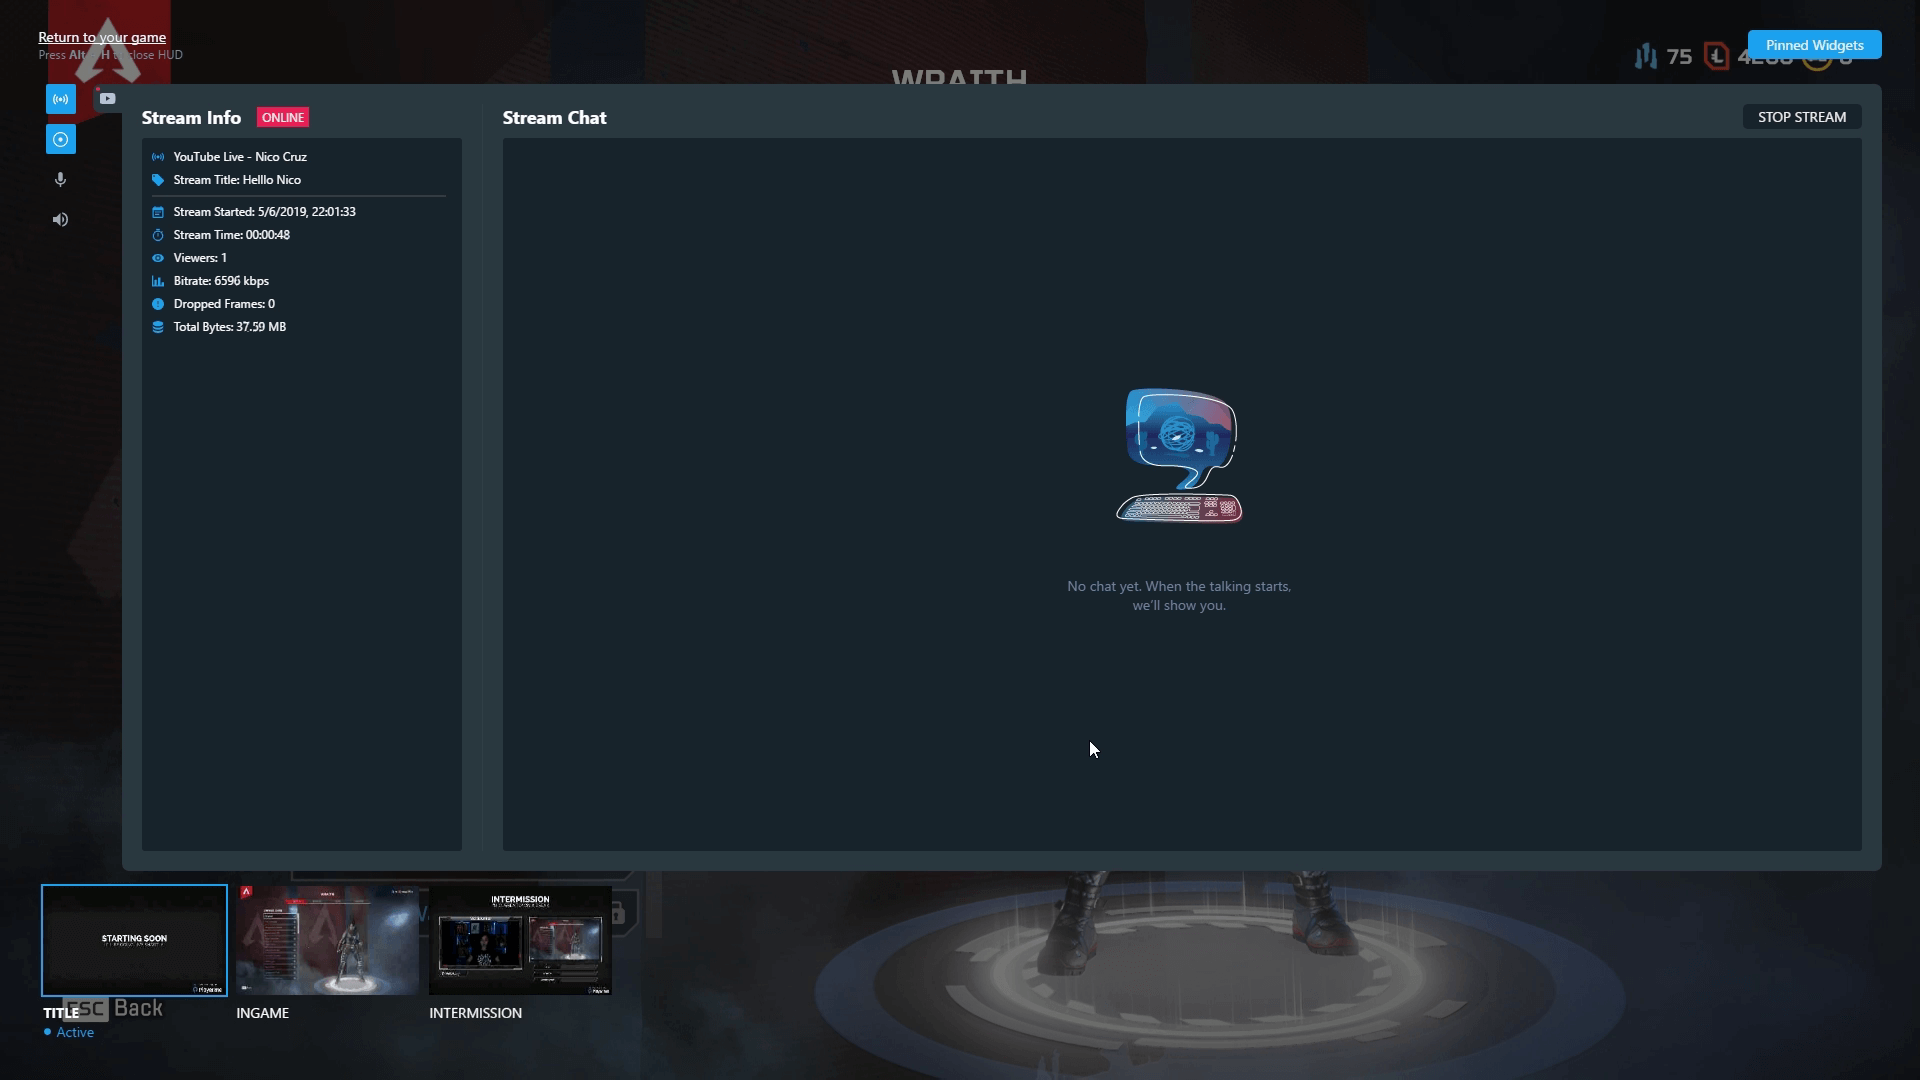
It goes without saying that all this information will be laid on top of your game screen and it will only be visible to yourself. You can drag your widgets wherever you like depending on what game you’re playing and set opacity and fade timers so you get an occasional pop-up to make sure you don’t miss any vital info.

XSplit Stream HUD

The inspiration behind our stream HUD was really to give single-monitor streamers a fast and easy solution to start streaming simple gameplay without a complex setup. And I can say that as a non-PC gamer myself and not your techiest guy out there, I got told off for streaming a bit too much when “testing” the product… I mean, I want to chase the dream too! But I digress.

For more seasoned streamers that may not see the benefit in the HUD, well, let me just say there are various reasons why you should use it, even if you have 4 ultra-wide monitors with 8K resolution. Other than your simple Start/Stop functions available at hand, pinned widgets are always helpful when you’re not in the midst of a heavy gunfight and just wanna take a quick look at chat without risking a stiff neck. Scene transitions are super easy to execute and can help you visualize your scene before switching, much like our Preview Editor that already exists. This will be even better when coupled with the other improvements we made with sources and scenes in general.

All in all, it’s true that none of these are new breaking features. But the way we’ve built the HUD to consolidate all of them is. This is the first step towards building a new gen of XSplit tools we envision, and we’ve only just begun.

Picking Your First Facecam

One of the cornerstones of streaming is seeing the player’s reactions. Viewers love to see people react to jump scares, thrilling victories and even crushing defeats. Thankfully you don’t have to break the bank to get an amazing looking facecam. This article will cover the variety of options available for selecting a facecam for YouTube or Twitch depending on your budget.

Budget/Entry Level

If you have a very limited budget, you can actually turn your cell phone into a facecam. Purchase the NDI camera app for iOS or Android and make sure your phone is connected to the same router as your streaming PC. Start output from the NDI Camera app on your phone. In XSplit Broadcaster go to add source > streams > NewTek NDI streams and select the stream coming from your phone.

If you have a small budget for a facecam, then the Logitech C922 is a great option. The Logitech C922 is small enough to be placed on top of your computer monitor or mounted on a tripod. You can output 1080p 30fps video or 720p 60fps if you plan to pair your webcam with gameplay. XSplit Broadcaster has worked with Logitech to optimize the performance of Logitech cameras. Once you have added a Logitech camera to XSplit Broadcaster, right click on the camera to see the profiles to optimize the camera for frame rate or exposure.

Logitech HD Pro Webcam C920

If you wish to add blur effect to your Logitech camera to look like an expensive DSLR camera, you can use XSplit VCam! It is included with an XSplit premium license. Simply launch XSplit VCam and select the Logitech camera as the source. Set the blur settings to your liking and add XSplit VCam as the camera source in XSplit Broadcaster.

XSplit VCam Logitech Camera

The next big leap requires a capture card. The general requirements for a capture card are minimal input latency and the ability to capture at least 1080p60fps via HDMI. USB 3.0 and PCIE capture cards tend to fit these requirements.

Once you have selected a capture card, it is time to decide what type of cameras you want to use. If you’re looking for a depth of field effect, it is recommended to use a DSLR or Mirrorless camera along with a lens that has a minimum aperture of 3.5.

There are some important features you need to check for when purchasing a DSLR or Mirrorless camera. Most importantly you need to check if the camera has a clean HDMI output. This setting will prevent the settings on your camera from displaying on your capture card feed. It is also important to check if there is an AC adaptor available for your camera or you will need to constantly charge batteries. You will also need a tripod to mount your camera on.

Another option is buying a camcorder instead of a camera. Consumer camcorders can be budget friendly and give amazing image quality. Regardless of which type of camera you use, people will only be able to see your face clearly if you are well lit. While dedicated lights work best, if you don’t have the budget use whatever you can to light your face, like desk lamps or room lights.

Be sure to always remember when your facecam is on to avoid any embarrassing moments ending up on the internet. A tip is to always remember to have a webcam cover or lens cap around for whenever you are going offline.

Once you have selected your camera, you can use it with XSplit Broadcaster. This will allow you to create a screen recorder with your facecam. XSplit Broadcaster allows you to add a variety of sources like a capture card for console gameplay, or recording your PC gameplay with game source.

What kind of facecam will you use for your content? Let us know in the comments!

Improving your Live Stream Audio Quality

Do you want to know how to improve your live stream audio quality? A lot of streamers struggle to get this right at the start of their streaming journey. Audio can be the easiest and most complicated part of your streaming setup.

In the above video, we’re going to give you some general tips to improve your stream audio and highlight some XSplit Broadcaster specific features that can help with creating amazing audio. We’ll also go through equipment guidelines to help you pick out the best microphone for streaming.

If you’re too lazy to read on, watch the video above and remember the following pointers:

  1. To improve audio quality, you must choose the best streaming microphone for your setup, if you can afford it. Definitely Cardioid. Dynamic if noise surrounds you (eg. Shure SMB7), Condenser if you have a quiet room (eg. Blue Yeti).
  2. Reduce background noise through mic placement and group loop isolators for the electrical buzz
  3. Use XSplit Broadcaster Audio Preview to check audio mix level. Go to Tools > Settings > Audio and check all your devices output volume
  4. If you have repeated sounds such as alerts, you can right-click the source and select “stream only” as stream output so that only your viewers hear it
  5. XSplit Broadcaster’s Per Scene Audio Extension allows you to manage audio across scenes as well as crossfading for smooth transitions
  6. Bump up that Audio Bitrate in Stream Settings

The first and crucial choice you have to make is to choose your microphone. For a limited budget, you’ll have to use any microphone available. It can be the built-in microphones in your PC, gaming headset, or webcam.

If you have a budget, the first to improve the quality of your live stream audio is purchasing a cardioid microphone. We recommend choosing cardioid microphones, these have a polar pattern that is best suited for picking up your voice. Cardioid Microphones can be either condenser or dynamic microphones. For simplicity’s sake, if you wish to limit background noise, use a dynamic cardioid microphone like a Shure SMB7, but if you have a quiet streaming space, you can use a condenser microphone like a Blue Yeti.

Cardioid microphones are available as traditional microphones. These can be used with a mixer and as USB devices. Some cardioid microphones require phantom power to output audio to a mixer. These are best used with a stable stand or mount.

Even with the best streaming microphone, you’ll still have to make sure to reduce background and electrical noise. To lessen background noise, place your microphone where the polar pattern is directed to your voice. Try to avoid noise entering this area. Electrical noise tends to come from ground loops which can result in a buzzing or humming type sound in your stream audio. The most cost-efficient method is to use group loop isolator devices. While it is good to put isolators on any incoming signals to your mixer, the most important place to use these are from your mixer to whatever input you have on your PC.

Now that you have a clean audio signal, let’s make sure all of your audio levels are set correctly. During a stream, the beginning is used to adjust the audio levels. You can take out the guesswork by using the audio preview function inside XSplit Broadcaster. Go to tools, then settings, and click on the audio tab. You can set any available playback devices as your audio preview. The audio preview will give you the final mix of all your audio sources. This is also useful if you add any elements to your streams like another microphone or a new alert with audio.

Speaking of alerts, any sources that generate audio can take advantage of the stream the only option for audio. When you right-click on a source with audio, you’ll see an option for stream output. If you select stream only, the audio from the source will only be output to the stream. This is useful if you don’t want to repeatedly hear the sounds of web-based alerts.

XSplit Broadcaster also has the per scene audio extension, for managing audio levels between scenes. To use the per scene audio extension, you will need to install it from the plugin store found in the extensions menu. Once the extension is open, add your scenes and adjust the audio levels for each scene as you’d like. You can even enable crossfading for smoother transitions between scenes.

One last tip is to be sure to increase the audio bitrate in your streaming settings.

We hope we’ve helped you improve your stream’s audio. If you have any additional audio tips, be sure to leave them in the comments or share them with us on social media.

Common Mistakes Streamers Make Pt. 1

We’ve discussed in previous posts how to set up and improve your live stream. Today we’re going to focus on some common mistakes that can be made while broadcasting from a live streaming app like XSplit Broadcaster!

Lots of buffering. 

A common complaint a lot of new streamers and more established ones get is “I’m getting a lot of buffering!” or “lag!” from the chat. While sometimes it can be put down to the viewers personal connection, when everyone is saying it, something may be wrong! While broadcasting at 4K 60FPS can be awesome, a lot of people can’t stream that. We recommend stepping down to 720p if this is an issue. In XSplit Broadcaster, this can be changed in the top right corner.

resolution setting

Also, be sure to check your bitrate, a higher bitrate can mean a smoother image but it can lead to the same problems. In XSplit Broadcaster head to the Outputs menu and click the cog next to your channel name. From here you can raise or lower the bitrate and see what works best for you and your viewers!

bitrate setting

Audio levels.

“The game is too loud!” “You’re too loud!” can be other common complaints and in XSplit broadcaster this can be easily remedied without the aid of an external mixer. Head to settings, then audio and turn on Audio Preview. This will feed you all the sound going out to your broadcast, which will make monitoring and adjusting all the easier!

audio preview setting

This will also fix another common problem, starting the stream with your microphone muted!

Too Much on ScreenWe love a good overlay but sometimes people can fill up the screen with far too many gifs, words, images and all sorts! Keep it simple, what do people need to know? What is aesthetically pleasing while at the same time communicating something to the viewer? Our solution, hit up https://player.me and get yourself an overlay which combines everything in one simple link you can paste in to XSplit Broadcaster (or any live streaming app) as a source! Simple, elegant, powerful, it’s the player.me way!

Do you have any other common mistakes you see streamers making? Let us know and we can find a fix for them in part two!

How to Record Gameplay with XSplit

XSplit applications can do more than just stream. Did you know that both XSplit Broadcaster and Gamecaster can record gameplay? Here’s how to do it:

Recording Gameplay with Gamecaster

1. Settings

Click the “Settings” tab on the top menu, and from there you’ll find “Record Settings” on the right. By default, the settings are set to automatic. This means that all your settings are optimized based on your hardware. And, if you want to customize your settings, select Custom.

Gamecaster record settings
Gamecaster custom record settings

Resolution – This allows you to set the resolution you record your gameplay at. The higher the resolution you pick, the more upload bandwidth and CPU usage are required.

Codec – The available codecs will be dependent on your PC’s hardware. x264 is the recommended codec, provided that your CPU can handle it.

Framerate – Choose between 30 and 60 FPS. Higher FPS uses more resources.

Quality – Choose among Standard, High, Very High, and Ultra High. The higher the quality, the better your recording will look but the file size will also be bigger.

Split – You can split your recording files by either time or size.

For more information on the specifics of these settings, check this video out.

2. Starting Your Recording

To begin recording your gameplay, start up your game and then press ‘CTRL+Tab’ to launch the XSplit Gamecaster overlay.

XSplit Gamecaster record overlay

Click on Record to start recording. You’ll see a small notification on the upper left side of your screen to let you know you’re recording.

small recording icon notification

3. Finding Your Files

On XSplit Gamecaster, find your recordings by clicking on, aptly enough, “Recordings.”

XSplit Gamecaster recordings

In there, you’ll find all your clips, and see details like the date recorded, the format, the video length, and the file size.

From there, you’ll be able to rename or delete your clips or share them directly on YouTube, Facebook, Twitter, or Player.me .

Recording Gameplay with XSplit Broadcaster

Make sure you’re using the latest version of XSplit Broadcaster to get the best performance possible.

1. Settings

For the resolution and framerate, those settings can be adjusted from the upper right-hand corner of XSplit Broadcaster.

XSplit Broadcaster resolution settings

With XSplit Broadcaster, you can fully customize your resolutions and framerates. Again, you have to keep in mind that the larger the resolution and the higher the framerate, the larger your file size will become.

To adjust more properties, click on Outputs from the top menu. Then click on the setting icon that is next to “Local Recording.”

XSplit Broadcaster outputs menu
XSplit Broadcaster local recording properties

From there, you’ll be able to change the video codec, the quality of the video, the audio bitrate, the audio format, the output file type, and file splitting. For more information, check out this video.

2. Add a Game Source

XSplit Broadcaster adding video source

To specify what game you’re recording, you have to add a video source. If your game runs on OpenGL or DirectX 9 – 12, add a video source by clicking “Sources” on the top menu and select “Game capture,” then either select your game or pick “Auto Detect.”

Alternatively, if your game doesn’t run on OpenGL or DirectX 9 – 12, you can select Screen Capture instead.

For more details on this, check out the XSplit Broadcaster Manual.

3. Start Recording

To begin your recording of the game, go to “Outputs” from the top menu, and click on Local Recording.

XSplit Broadcaster local recording menu

To stop recording, click on that again.

4. Finding Your Files

To find your recordings, click on “Tools” from the top menu. In the dropdown, select “Recordings.”

XSplit Broadcaster recordings

That will open a window where you’ll be able to delete, rename, or upload your file.

And there you go! That’s how you record your games via XSplit Gamecaster and XSplit Broadcaster. Simple, right? Now, go out there,  play some games and record them using XSplit.

Questions? Write us in the comments section below and we’ll be sure to respond.

How to Use Macros in XSplit Broadcaster

Macros are a powerful new feature in XSplit Broadcaster 3.3. Macros allow you to set up a variety of automated actions that can be triggered in a variety of ways. In the guide, we’ll show you some examples of how you can use Macros to expand your production capabilities.

Using Macros to Set Per Scene Transitions

If you’re a  fan of using various transitions and stingers between your scenes, you can streamline this process using macros. Select “On key press” as your event and select your hotkey. For the first action select “set scene transition”  and choose your transition or stinger for the scene. Next, add the “Switch to scene” transition and pick the scene you wish to apply the transition to. Now when you use the hotkey, you’ll switch to the scene with your preferred transition.

Automating a broadcast

If you’re looking to set up an automated broadcast, say running a greatest hits show with pre-recorded clips, macros make this easy to set up. This setup will require setting up various macros that will work in conjunction with each other. For the first macro, set “on scheduled time” as the event and select the time you wish for your stream to start. Next, add an action to “start/stop broadcast” and select the channel you will stream to, and select start. Now add an action to “switch to scene” that will play the first recorded clip in your broadcast.

Now you will create another macro where the event is “when a media source stops” and select the video file from the scene you select in the first macro. Add another action to switch to the scene for the next video in the broadcast. You can duplicate this macro over and over for however many files you have in your broadcast. For the ending of the broadcast, create a macro with “when a media source stops” as the event and select the scene with the last video in your broadcast. Add an action to stop your broadcast and congratulations you’ve set up your own automatic broadcast!

IRL Broadcasting

The production quality of IRL streams has grown by leaps and bounds over the last year. Many people have built custom backpacks that stream to RTMP servers that can be used in conjunction with streaming software to add their favorite streaming widgets. The problem that arises is that it can be hard to access a PC while streaming to shut off streaming software. Macros can be used to alleviate this pain point. First, create a macro with “when a stream source goes online/offline”  as the event. Next, select the scene and RTMP or RTSP source and select online. For the action, select start broadcast and choose the channel you will be streaming to.

Since IRL streaming depends on cellular signals, you will have temporary interruptions of service which will affect the stream feed. To prevent your stream from constantly going offline, setup up your going offline macro the same way as the online macro, but add a wait action before the stop broadcast action. The stream will only end if the stream is offline longer than the wait period. That’s all there is to automating IRL Broadcasting with macros

Toggling Sources Via Hotkey

One of the most requested features by users is the ability to toggle their sources via hotkey, but this is now possible with macros. Start by setting the event action to “on key press” and selecting your hotkey. For action pick “set source visibility”, select the source you wish to toggle, and set the action to toggle visibility. Make sure to enable the event listener and you’re ready to go.

Streamlining Advanced XSplit Presentations

Macros allow you to group a variety of actions in a production so that operations can be as easy as one click. For example, when running video ads, it is very easy to miss the cue of when to switch scenes at the end of the ad or muting microphone audio so that casters don’t speak over the video. To automate this add a macro and select “When a media source stops” and select the scene and your video ad. Then add an action “switch to scene” to choose the scene you’d like to switch to when the ad finishes. You can use this in conjunction with the per scene audio extension to ensure the microphone input from casters is muted.

This was just a small sample of the possibilities with Macros. We encourage experimentation and if you’ve created some cool macros make sure to share them with us on social media! Happy streaming #XSplitFamily!

Improving your XSplit Experience with NewTek NDI

The latest update to XSplit Broadcaster and XSplit Gamecaster 2.8 includes some important improvements for our NewTek NDI integration. We now support NDI inputs and outputs with audio and alpha channel for video. We’ve also made a variety of stability improvements for NDI sources.

What is NewTek NDI?

NDI is NewTek’s new protocol that can allow software and hardware to interact with each other via LAN.

Why would I use NewTek NDI?

While NewTek NDI may seem like a complex feature, it can actually be used in a variety of situations by both new and experienced broadcasters. This article will outline some use cases for NDI, both simple and complex.

Using NewTek NDI to create Multiplayer Gameplay Content

One of the common requests we’ve received in the past is an easy way to allow players to display multiplayer gaming sessions with their friends. As long as you have a router with open ethernet ports, this can be easily achieved with NewTek NDI!

Say you have a friend over to play Overwatch with, and you want to share both your screens on your stream. If you are connected to the same LAN network, have your friend open up XSplit Gamecaster and go to the settings tab. In the settings tab, check the “Enable NewTek NDI Output” box.

XSplit Gamecaster settings tab enabling NewTek NDI Output box
On another PC, launch XSplit Broadcaster and go to Sources > Other > NewTek NDI Stream and select the broadcast from your friend’s PC.

XSplit Broadcaster Sources NewTek NDI Stream
Now arrange your scene as you like and create multiplayer content with your friends!

multiplayer gameplay content using NewTek NDI

Using NewTek NDI to connect XSplit Broadcaster with NewBlueFX Titler Live Broadcast

One of the biggest benefits to NewTek NDI is that it allows XSplit Broadcaster users to gain access to a wide array of high end production software. One of great piece of software is NewBlueFX’s Titler Live Broadcast. Titler Live Broadcast allows you to easily create dynamic 3D graphics similar to what you see during sports broadcasts with scoreboards and lower thirds. Using NewTek NDI, you can easy bring your Titler Live Broadcast graphics and animations in your XSplit Broadcaster scene.

First, make sure to enable the NewTek NDI output in Titler Live Broadcast. Go to Settings -> Device and select the NDI option.

enabling NewTek NDI output in Titler Live Broadcast

Now add the NDI output from Titler Live Broadcast to XSplit Broadcaster. Go to Sources > Other > NewTek NDI stream and select the machine that is running Titler Live Broadcast.
adding NDI output from Titler Live Broadcast to XSplit Broadcaster

Once you have positioned Titler Live Broadcast’s NDI output on your scene, anything you display in Titler Live Broadcast will appear in XSplit Broadcaster.

Titler Live Broadcast in XSplit Broadcaster

And that’s how easy it is to use different applications with XSplit Broadcaster via NDI. There are countless of other ways you can use NewTek NDI with XSplit Broadcaster. Make sure to follow XSplit’s social media for more NewTek NDI guides and you can read more about NewTek NDI here.

How To Add Custom RTMP in XSplit Broadcaster

Adding your own custom RTMP is very easy using XSplit Broadcaster. All you have to do is click on Broadcast >> Edit Channels >> Add >> Custom RTMP.  You will be shown with this interface.

Custom RTMP XSplit

If you are using 3rd party streaming service, the service provider will typically have information on how to set up your broadcast using a predefined RTMP URL and stream name for channels assigned to you.

See it in action!

Using the Silence Detection Feature in XSplit

Welcome to the XSplit Workshop. A feature series where we provide tips to help you get the most out of your broadcast.

This edition will explore one of lesser known features of XSplit Broadcaster: Microphone silence detection!

Introduction

Microphone silence detection is a useful tool for those who want to limit the amount of background noise in their live stream or local recording audio. The general idea is that the microphone is auto-muted while the mic audio is below a set threshold after a set period of time.

Setup

You can setup silence detection by clicking the Tools tab and selecting Settings. In the Settings window, click on the audio tab. Click on the check box next to silence detection to active it and to adjust the settings.
xsplit silence detection
Quick fact: 1000 milliseconds (ms) = 1 second.

Settings – Threshold

The first setting is the threshold which has a value range of 1-128. You can think of the threshold as a sort of guard or gateway that has certain requirements for incoming audio from the microphone to be passed through to your stream or recording. When the incoming audio does not reach the threshold level, then the microphone will be muted (this is also dependent on the silence period, but more on that later). When the incoming audio surpasses the threshold level then the microphone will be un-muted and audio will pass through to the live stream or local recording for as long as the audio remains above the threshold level.

Setting a high threshold level is recommend for those who have a great deal of background noise. Some items that fall under this category are mechanical keyboards, fans, external music devices, or those who speak at high volume. This can also help user with omnidirectional microphones, which tend to catch a lot of background noises. Setting a low threshold level is those who have a small amount of background noise. Some examples of this are people who might be soft spoken or want to hide light keyboard presses from coming through the stream audio.

Settings – Silence Period

The second setting is for the silence period which has a wide value range. The silence period is measured in milliseconds (1000 milliseconds equals 1 second). The silence period refers to the period after the last sound was picked up before a period of “silence”. It’s the period that needs to occur before the microphone is auto-muted even if the threshold limit is not met.

Setting a low value for the silence period is useful for those who want to eliminate background noise quickly. Perhaps you had to set a high threshold level due to level of background noise and you want to speak directly into the mic and then cut out the background noise when you’ve finished speaking. Setting a high value for the silence period is useful for those who do not want their audio to be cut too quickly. An example of this is a user who likes to take brief pauses while they speak. If this user set the silence period too low, their audio could seem choppy or disjointed due to the constant muting and un-muting of the microphone.

That does it for the Silence Detection tutorial. We recommend users experiment with their silence detection settings until they find the perfect settings. If you have any further issues with silence detection after reading this tutorial, please write our support team at xsplit.com/support.