How to Record Gameplay with XSplit

XSplit applications can do more than just stream. Did you know that both XSplit Broadcaster and Gamecaster can record gameplay? Here’s how to do it:

Recording Gameplay with Gamecaster
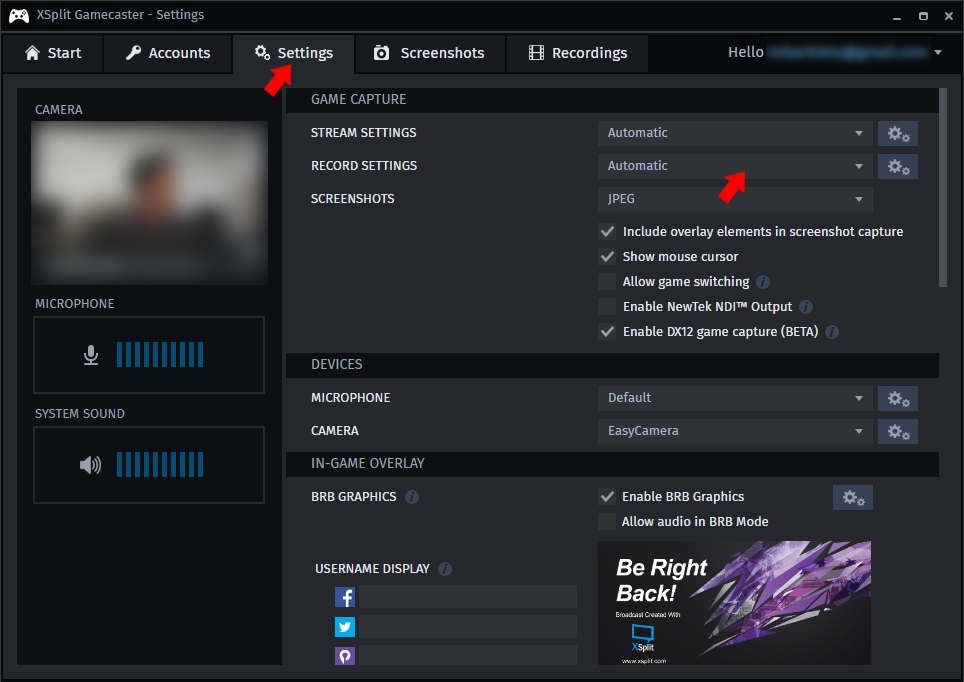
1. Settings

Click the “Settings” tab on the top menu, and from there you’ll find “Record Settings” on the right. By default, the settings are set to automatic. This means that all your settings are optimized based on your hardware. And, if you want to customize your settings, select Custom.

Gamecaster record settings
Gamecaster custom record settings

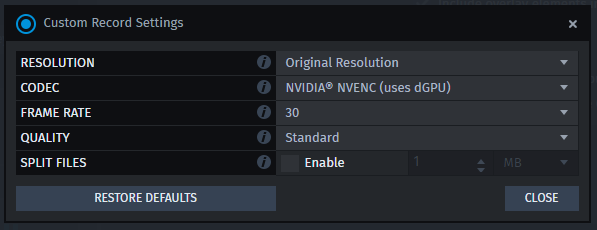
Resolution – This allows you to set the resolution you record your gameplay at. The higher the resolution you pick, the more upload bandwidth and CPU usage are required.

Codec – The available codecs will be dependent on your PC’s hardware. x264 is the recommended codec, provided that your CPU can handle it.

Framerate – Choose between 30 and 60 FPS. Higher FPS uses more resources.

Quality – Choose among Standard, High, Very High, and Ultra High. The higher the quality, the better your recording will look but the file size will also be bigger.

Split – You can split your recording files by either time or size.

For more information on the specifics of these settings, check this video out.

2. Starting Your Recording

To begin recording your gameplay, start up your game and then press ‘CTRL+Tab’ to launch the XSplit Gamecaster overlay.

XSplit Gamecaster record overlay

Click on Record to start recording. You’ll see a small notification on the upper left side of your screen to let you know you’re recording.

small recording icon notification

3. Finding Your Files

On XSplit Gamecaster, find your recordings by clicking on, aptly enough, “Recordings.”

XSplit Gamecaster recordings

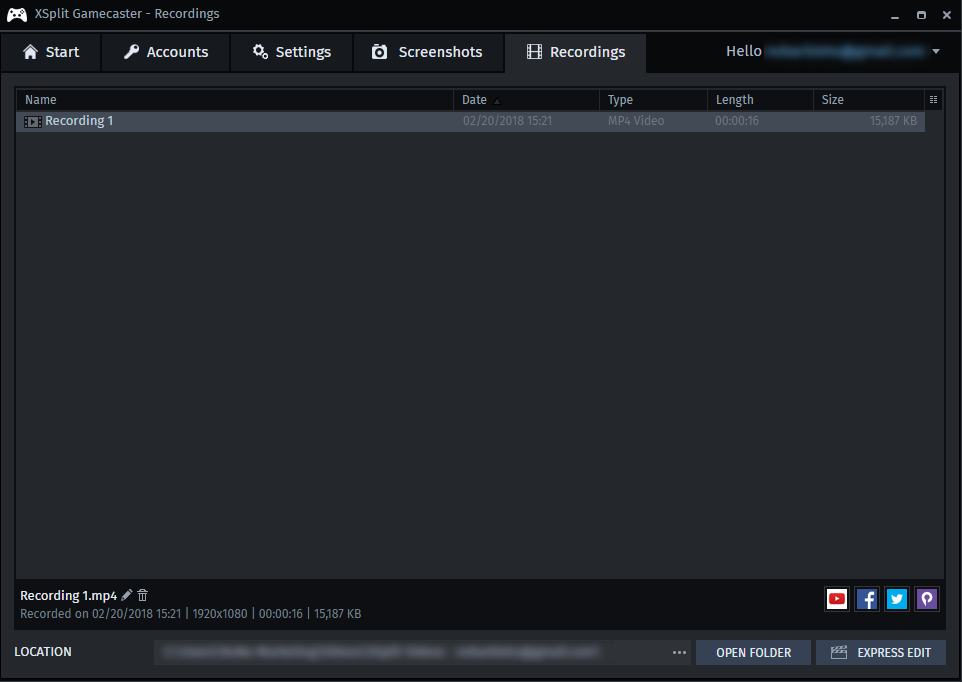
In there, you’ll find all your clips, and see details like the date recorded, the format, the video length, and the file size.

From there, you’ll be able to rename or delete your clips or share them directly on YouTube, Facebook, Twitter, or Player.me .

Recording Gameplay with XSplit Broadcaster

Make sure you’re using the latest version of XSplit Broadcaster to get the best performance possible.

1. Settings

For the resolution and framerate, those settings can be adjusted from the upper right-hand corner of XSplit Broadcaster.

XSplit Broadcaster resolution settings

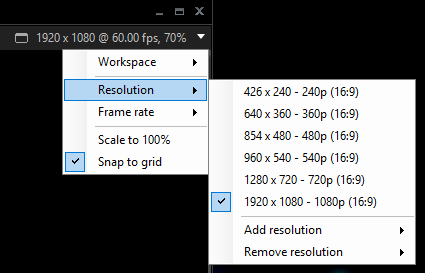
With XSplit Broadcaster, you can fully customize your resolutions and framerates. Again, you have to keep in mind that the larger the resolution and the higher the framerate, the larger your file size will become.

To adjust more properties, click on Outputs from the top menu. Then click on the setting icon that is next to “Local Recording.”

XSplit Broadcaster outputs menu
XSplit Broadcaster local recording properties

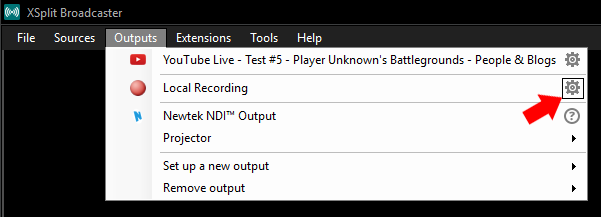
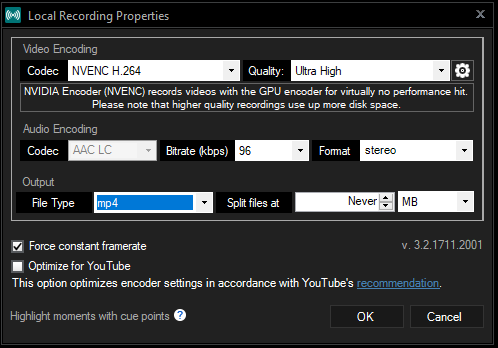
From there, you’ll be able to change the video codec, the quality of the video, the audio bitrate, the audio format, the output file type, and file splitting. For more information, check out this video.

2. Add a Game Source

XSplit Broadcaster adding video source

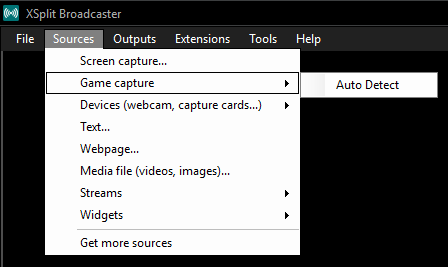
To specify what game you’re recording, you have to add a video source. If your game runs on OpenGL or DirectX 9 – 12, add a video source by clicking “Sources” on the top menu and select “Game capture,” then either select your game or pick “Auto Detect.”

Alternatively, if your game doesn’t run on OpenGL or DirectX 9 – 12, you can select Screen Capture instead.

For more details on this, check out the XSplit Broadcaster Manual.

3. Start Recording

To begin your recording of the game, go to “Outputs” from the top menu, and click on Local Recording.

XSplit Broadcaster local recording menu

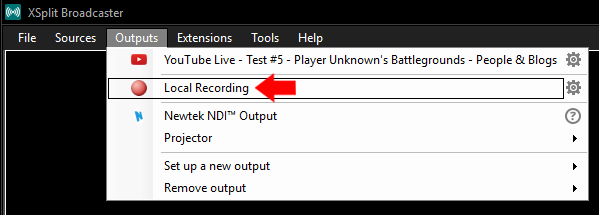
To stop recording, click on that again.

4. Finding Your Files

To find your recordings, click on “Tools” from the top menu. In the dropdown, select “Recordings.”

XSplit Broadcaster recordings

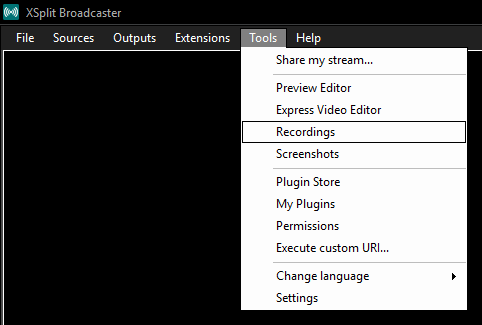
That will open a window where you’ll be able to delete, rename, or upload your file.

And there you go! That’s how you record your games via XSplit Gamecaster and XSplit Broadcaster. Simple, right? Now, go out there,  play some games and record them using XSplit.

Questions? Write us in the comments section below and we’ll be sure to respond.

How to Use Macros in XSplit Broadcaster

Macros are a powerful new feature in XSplit Broadcaster 3.3. Macros allow you to set up a variety of automated actions that can be triggered in a variety of ways. In the guide, we’ll show you some examples of how you can use Macros to expand your production capabilities.

Using Macros to Set Per Scene Transitions

If you’re a  fan of using various transitions and stingers between your scenes, you can streamline this process using macros. Select “On key press” as your event and select your hotkey. For the first action select “set scene transition”  and choose your transition or stinger for the scene. Next, add the “Switch to scene” transition and pick the scene you wish to apply the transition to. Now when you use the hotkey, you’ll switch to the scene with your preferred transition.

Automating a broadcast

If you’re looking to set up an automated broadcast, say running a greatest hits show with pre-recorded clips, macros make this easy to set up. This setup will require setting up various macros that will work in conjunction with each other. For the first macro, set “on scheduled time” as the event and select the time you wish for your stream to start. Next, add an action to “start/stop broadcast” and select the channel you will stream to, and select start. Now add an action to “switch to scene” that will play the first recorded clip in your broadcast.

Now you will create another macro where the event is “when a media source stops” and select the video file from the scene you select in the first macro. Add another action to switch to the scene for the next video in the broadcast. You can duplicate this macro over and over for however many files you have in your broadcast. For the ending of the broadcast, create a macro with “when a media source stops” as the event and select the scene with the last video in your broadcast. Add an action to stop your broadcast and congratulations you’ve set up your own automatic broadcast!

IRL Broadcasting

The production quality of IRL streams has grown by leaps and bounds over the last year. Many people have built custom backpacks that stream to RTMP servers that can be used in conjunction with streaming software to add their favorite streaming widgets. The problem that arises is that it can be hard to access a PC while streaming to shut off streaming software. Macros can be used to alleviate this pain point. First, create a macro with “when a stream source goes online/offline”  as the event. Next, select the scene and RTMP or RTSP source and select online. For the action, select start broadcast and choose the channel you will be streaming to.

Since IRL streaming depends on cellular signals, you will have temporary interruptions of service which will affect the stream feed. To prevent your stream from constantly going offline, setup up your going offline macro the same way as the online macro, but add a wait action before the stop broadcast action. The stream will only end if the stream is offline longer than the wait period. That’s all there is to automating IRL Broadcasting with macros

Toggling Sources Via Hotkey

One of the most requested features by users is the ability to toggle their sources via hotkey, but this is now possible with macros. Start by setting the event action to “on key press” and selecting your hotkey. For action pick “set source visibility”, select the source you wish to toggle, and set the action to toggle visibility. Make sure to enable the event listener and you’re ready to go.

Streamlining Advanced XSplit Presentations

Macros allow you to group a variety of actions in a production so that operations can be as easy as one click. For example, when running video ads, it is very easy to miss the cue of when to switch scenes at the end of the ad or muting microphone audio so that casters don’t speak over the video. To automate this add a macro and select “When a media source stops” and select the scene and your video ad. Then add an action “switch to scene” to choose the scene you’d like to switch to when the ad finishes. You can use this in conjunction with the per scene audio extension to ensure the microphone input from casters is muted.

This was just a small sample of the possibilities with Macros. We encourage experimentation and if you’ve created some cool macros make sure to share them with us on social media! Happy streaming #XSplitFamily!