XSplit Features You May Not Know About

XSplit is a pretty robust tool. It’s easy to use from the get-go, but if you dig a little deeper, you’re going to find that it has way more to offer than what may be immediately obvious.


Stingers

One of the most effective ways of improving the overall production quality of your broadcast is to add stinger transitions. Even if you don’t know how to make one yourself, you could always use the stinger creator in XSplit with GIFs.

To make a stinger with a GIF, you first have to change the file extension of your GIF from .gif to .mov. You may need to adjust folder settings on Windows to make it file extension names visible and editable. Once you have a .mov file, add it to the XSplit stinger creator. You’ll have to set the transition point or length of the stinger based on how long the .gif is. Click convert and then test it out until you’re happy with it.


Favorite Transitions

One of the most overlooked features is the “favorite transitions system.” If you’re running an eSports production or just have a ton of transitions, favoriting various transitions lets you access them by right clicking scenes rather than picking them out of a dropdown menu. It just makes everything faster.


Presentation Packager

The XSplit Presentation Packager makes it easy to transport your streaming configurations from one PC to another. Super handy for when you stream when you travel or your streaming venue changes from event to event.

The presentation package extensions packages all your image and video files along with your presentation into a .zip file.

Save it on a thumb drive and you’re good to go. Use this in junction XSplit streaming settings cloud saves and you’ll be able to broadcast from practically anywhere.


Elgato Stream Deck

If you’re an Elgato Stream Deck user, then you’ll be happy to know that it works very well with XSplit. We’ve worked closely with Elgato to offer a wide variety of controls for the stream deck. In addition to standard scene switching and streaming controls, you can also toggle sources and mute/unmute audio sources.


Adaptive Bitrates

Everyone experiences bandwidth fluctuations while streaming, and it can be quite the challenge to adjust bitrate settings on the fly while gaming and having to restart your stream can lead to viewer loss.

Instead, you should just enable adaptive bitrate. Enabling it removes the frustration as the bitrate will automatically adjust to your available bandwidth and keep your stream live and lag-free.

To enable adaptive bitrate, simply go into your extra encoding settings for video.


24/7 Support

Being an XSplit user means you get access to our support team, on hand to answer your questions 24/7. If you need help with anything, just drop them a line.
How to Stream to YouTube Live Using XSplit

YouTube Live is blowing up and is becoming quite a popular live streaming platform. People have been carving out their core audience on YouTube Live, just like they would on Mixer or Twitch.

Streaming to YouTube Live using XSplit is crazy easy. Here’s how to do it.

First, you would need to set up your scenes and settings on XSplit Broadcaster or Gamecaster to your liking. If this is your first time setting them up, there are tutorials over here.

Once you’ve got all your scenes, settings, and alerts set up the way you like it, you want to connect XSplit to YouTube Live.

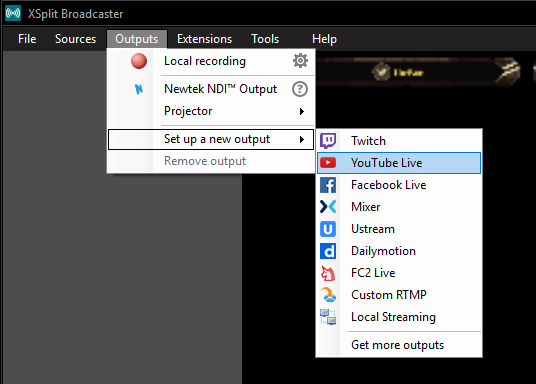
  1. Click on Outputs, scroll down to “Start a new output” and select YouTube Live.

XSplit Broadcaster YouTube Live Set-up

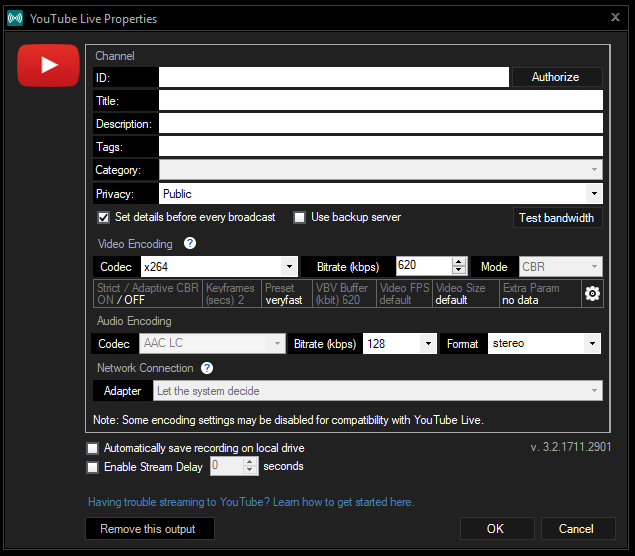
2. This screen will pop up. Go ahead and click “Authorize”

XSplit Broadcaster YouTube Live Properties

3. That will pop open a Google log-in interface. Sign in with your YouTube email and password. If you’ve enabled two factor authentication, Google will ask for that second confirmation.

XSplit Broadcaster YouTubeLive Authentication and Permissions

4. After signing in, you will need to allow XSplit to access certain things on your YouTube account. Don’t worry, it’s completely safe and secure.

XSplit Access to YouTube Account Permissions

5. All your channel details will automatically get filled in by YouTube Live based on your settings but you could just go ahead and change them right on the interface below.

YouTube Live Properties Change Settings

6. At this point, you’re pretty much all set. But there are a couple things you need to check.

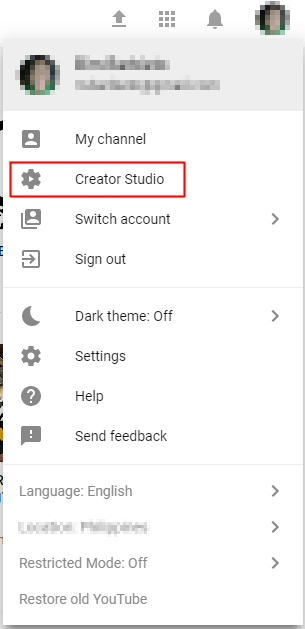
You have to make sure that streaming to YouTube Live is enabled on your channel. To do that, simply go to YouTube, click on your user icon, and click on Creator Studio.

YouTube Creator Studio

Click on Channel Settings and make sure Live Streaming is enabled. Before you can go start your broadcast on YouTube Live though, you’ll need to go over a few more options like DVR and changing latency settings.

YouTube Channel Settings

YouTube Broadcast Event

And that’s it! You’re good to go!

There are a ton of other options you can play around with like the video below. Make sure to check us out on YouTube because we’ve got a ton of other tutorials there that might help you out.

Good luck and have fun streaming!


XSplit Tutorial Videos 2018

Do you know the ins and outs of the XSplit apps? Whether you’re an expert or someone who’s just starting out, there’s always something new to learn.

XSplit Broadcaster and Gamecaster, on the surface, are designed to be intuitive. If you dig deeper into it, you’ll quickly find that there are capabilities and features that you should really be taking advantage of.

Check out all of our tutorials and step up your XSplit game.

The tutorial playlist covers everything from how setting up and getting started all the way to advanced production techniques.

Got any questions? Let us know in the comments below. And if you’re still having trouble, get in touch with our support team. They’re available to help you out 24/7.

XSplit leaving Steam February 28

Hey there XSplit Family,

To all our XSplit Steam users, we just wanted to let you know that we will be removing the XSplit Steam page as well as its Premium license DLC. We are very pleased with the feedback and support received so far by the community however, we want to focus our efforts on our main site xsplit.com to ensure the best product and support possible. Thus, XSplit will be leaving Steam on the 28th of February.

What? But I already paid for XSplit on Steam!?

Fret not Premium subscription holders! Your monthly payments have been cancelled and for your troubles, you will receive a 12 month Premium license to make up for it. No love for the Free version users? We’ll send you folks a 3 Month license. Yes, we love you too.

I don’t even know my XSplit account info, is it my Steam login?

When logging in on xsplit.com, if you don’t know your account details, simply click “forgot password” to receive your info by mail.

Should you need any further assistance, please feel free to reach out to us on https://www.xsplit.com/support.

Last but not least, we really want to thank Devolver Digital for working with us on this project, it was a fun ride and look forward to our many future collaborations!

As always folks, we hope your streaming adventures keep going strong.

Getting Started: What You Need To Get Streaming

This is Part 1 of an on-going and constantly updating series looking at what you need to start and stay streaming.

Getting Started - What You Need To Get Streaming

Streaming has become easier than ever with technology and streaming software being simpler and more accessible, if we do say so ourselves. There are some key things you will want to get going and right here in part one of our how to stream series we’re going to cover tech.

You can go ham with tech, spend thousands, surround yourself with monitors, cameras and microphones and have a broadcast set up stronger than some large film productions. You can, but do you need to? Not really.

First things you will need is a solid internet connection (we would say around a 5 MB/S upload speed) and a PC that can handle streaming (check our streaming software minimum/recommended system requirements for XSplit Broadcaster and XSplit Gamecaster.

Next, you will want some streaming software and, well, we’re pretty fond of XSplit Broadcaster and Gamecaster. We will go over what’s different and why you may want one over the other in a future blog but here are the basics; Gamecaster is the simplest way to get started with all the features you need. Broadcaster powers some of the biggest streams you see online and is full of more pro features.

Second, you’ll want a webcam. These days you can get a very solid USB webcam that can capture in 1080p and even have a solid microphone built in for an affordable price. Plug and play, recognised by our software and ready to go. Check out our list of hardware partners for some recommendations.

That can be all you need, people will see you, hear you and be able to see a video game you’re playing on your PC. if you want to broadcast a console you’ll want a capture card. Again, these are more affordable and high tech than ever with very simple set up processes. We’d recommend something external with USB 3.0 (this puts the gameplay you’re capturing on your screen with almost zero latency). Again, you can check out our hardware partners linked above for some recommendations.

From this base, you’re good to go! You can get online, broadcast gameplay, creative, talk shows or whatever you like!

Stay tuned for more tips on how to make your stream even better.