Everyone knows and loves the old logo, it’s iconic and has been with us since 2014 so why change it, you might be asking? Aside from naturally wanting aesthetic improvements, a lot has changed with XSplit since that time. Our overall focus has gradually shifted especially during the last couple of years with newly-released products and some upcoming ones.
Fun fact: Not many people know that XSplit wasn’t originally created with gamers in mind. When the first XSplit product was launched in 2009, it was more of a productivity suite aimed at helping people share content with others in the form of screenshots, short videos with annotations, etc.
Long story short, XSplit Broadcaster eventually became widely known as a live streaming and recording software that was embraced by gamers, and the rest was history. While the previous logos were not super explicit, they still communicated content creation and sharing throughout its evolution.
The last logo stayed for a while undergoing minor revisions. Our product portfolio began to grow to the point where XSplit was no longer just about Broadcaster. Our markets had expanded outside of gaming and content creation. Last year was the pinnacle when the interest in XSplit VCam skyrocketed as more and more people worked from home. Other people have started using XSplit Broadcaster as well for other purposes like online meetings and webinars.
We’ve come full circle, once again serving the productivity and the general workforce market. And while gaming will always continue to be ingrained in our identity, the need for tools and applications that will help people face the ‘new normal’ has been stronger than ever, and we know we can deliver!
At this point, we know there’s no delaying the inevitable, and the time is now to reveal our new logo (unless you’ve seen it at the top there, but hey, we like to build suspense).
The new XSplit
This new logo better encapsulates, thanks to the work of our designer Diana Chanco, what and where we are as a brand and slots in nicely with our existing and future products. More importantly, it looks more refined and flexible to scale easily in various applications which cannot be always said with our old logo.
In addition, we will be retiring SplitmediaLabs corporate website and consolidating all communications, updates, and job postings through the XSplit brand. Be sure to stay tuned for more updates in 2021! We hope you like it.
If version 4.0 was about introducing big new features, this update focuses more on enhancements of existing features, handy quality of life improvements, and tons of bug fixes. That’s not to say there’s nothing new and exciting in this update though and if we’re being honest, we think there’s just as much here!
What’s new in XSplit 4.1
If watching a video isn’t your thing and you prefer reading text, here’s a quick summary of all the goodies in this update.
Scene Presets Manager – Organize your presentation by adding multiple presets to your scene.
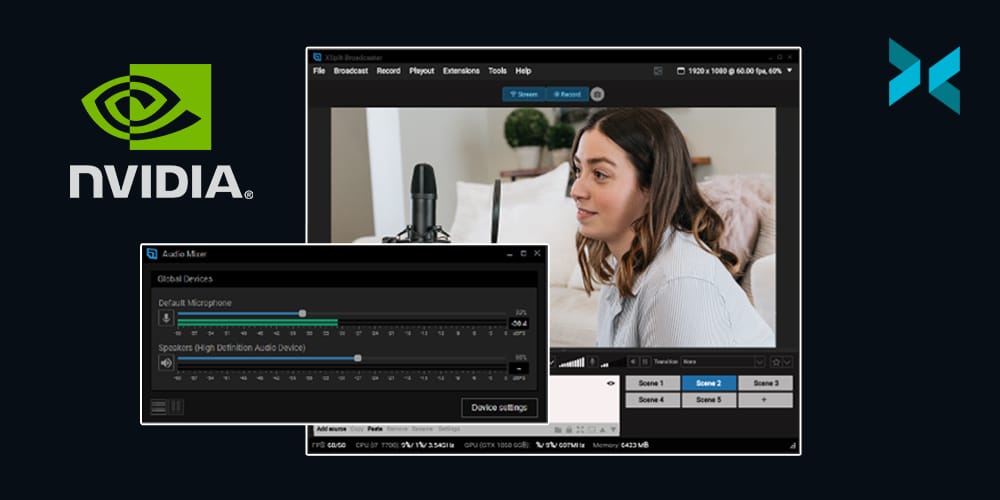
New and improved audio engine – Add as many microphones and playback devices as you want, and tweak them individually as you see fit.
NVIDIA Noise Removal – With the NVIDIA Audio Effects SDK for RTX GPUs, you can apply their noise removal directly to your microphone device.
Overhauled text source plugin – Everything is now done easier than ever with the updated plugin while still retaining its customizability.
Virtual camera scene selection – You can now specify what scene is outputting to the virtual camera.
HDR 10-bit input support for Elgato – Added support for 10-bit HDR input which is converted to 8-bit.
New License type – Only using Broadcaster and nothing else? There is now a Broadcaster-only Premium license!
Better in-app customer support experience – Exceptional support has been our priority ever since and in this update, we’ve made in-app customer support more intuitive than ever.
Dark Theme – The UI has had a lick of paint including a brand new dark theme.
Bug fixes – Any version update won’t be complete without a ton of bug fixing. This one’s got plenty! You can refer to the release notes for the full details.
You can download and install the latest version at xsplit.com/broadcaster, or go to Help >> Check for Updates from inside the XSplit Broadcaster app.
Quick shout out to our PTR warriors who have been helping us test all of these new things and ensuring the product that comes out to the general public is ready for prime time! If you want to be part of that awesome group, go check out our PTR page and join our Discord server.
We’re looking forward to hearing back your thoughts on this update, while also preparing for PTR 4.2 ?
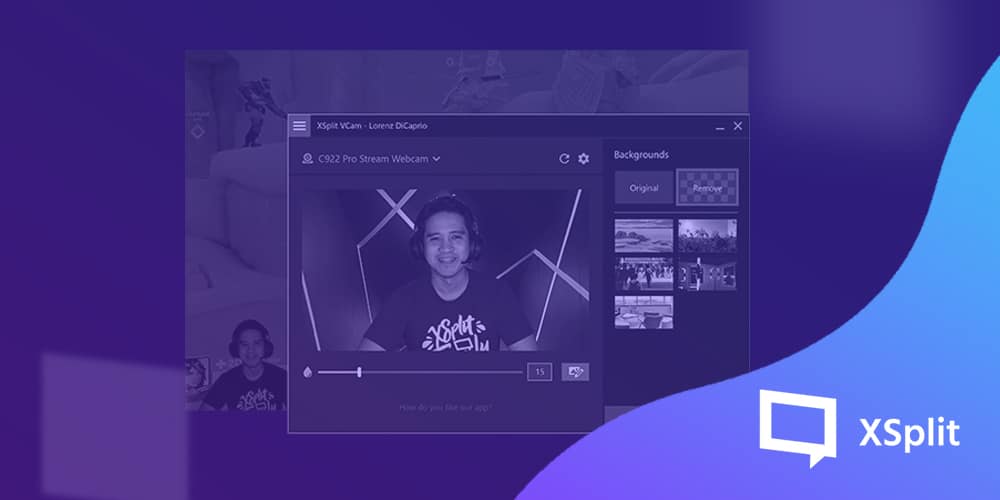
Following the success of VCam 2.0, VCam 2.1 brings more quality of life improvements and bug fixes in our latest update which you can install through the app or by downloading from the VCam page. Let’s briefly go through what’s new in this one.
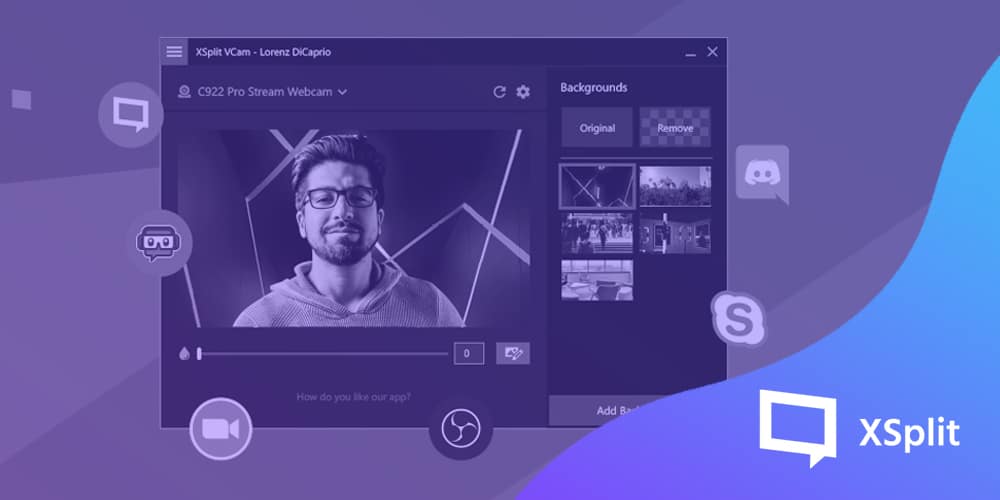
Custom watermark
The ability to add foreground images to a webcam feed is a highly requested feature and we can see why! Custom watermarks in VCam 2.1 can not only enhance your professional look but also provides value to your overall presentation as you can use it to demonstrate something without needing to add another application to the mix. We’ve covered this in greater detail in this blog post.
Pause camera feed
The need for a quick break is sometimes inevitable whether you need to use the bathroom, answer an important phone call, or just rearrange yourself. Currently, the two options are to turn your webcam feed off temporarily, or just disappear which can be argued as looking a little unprofessional. Now, with VCam 2.1, you have a third option; pausing your camera feed! Here’s how it works
Hue & saturation adjustments
In our last update, we introduced background adjustment tools that afforded users the flexibility to set themselves up exactly how they wanted to look on camera. Hue and saturation adjustments are a step up on this as you’ll be able to make quick changes on the fly if you are in a lighting condition that is less than ideal. Here’s how you can set it up in VCam 2.1.
Bug fixes in VCam 2.1
Like any update, we’ve fixed a bunch of bugs and quirks that have been reported from the previous versions. Most notable are the following fixes:
Auto-exposure on camera reload being forced
NVIDIA GeForce RTX 3070 is not set as the primary hardware acceleration from calibration. Acceleration resets to automatic after selecting RTX 3070.
Settings cannot be accessed when there is no available camera source
Computers with multiple network adapters and special characters in computer name may not show the mobile camera feed
If you have any questions or feedback, let us know in the comments section below. You can also chat with us through our social channels @xsplit and our Discord community at discord.gg/xsplit. Finally, if you have any features you would like to request, you can submit them through the VCam request page here!
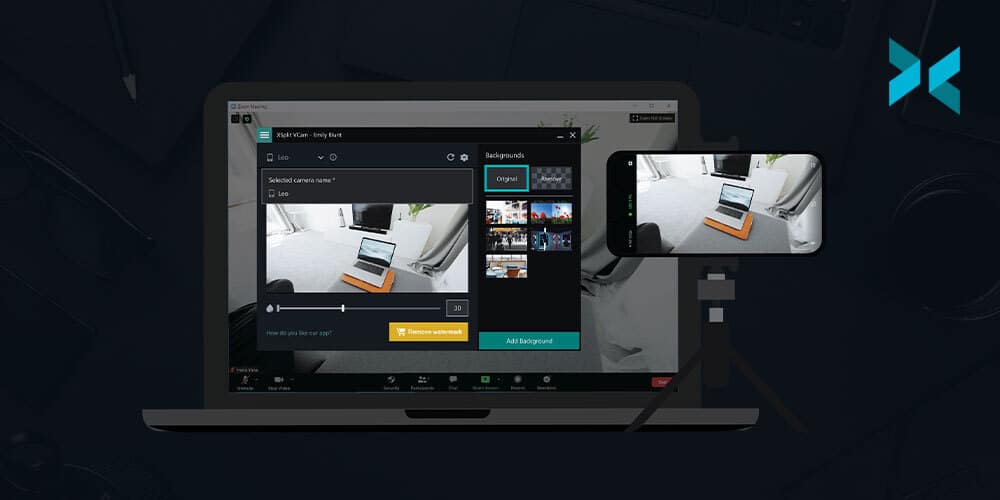
Adding custom watermarks to a webcam feed is a highly requested feature so it was nice to finally roll it out in our recent VCam update. In layman’s terms, this functionality enables you to add a foreground image on top of the actual webcam background of your choice.
But maybe you’re asking, what am I going to be using it for, or what’s the need for it? You have come to the right place as this is exactly what the blog post is about!
Before we continue, make sure you’re on the latest version of XSplit VCam so you can access this feature (available to Premium users only). You can either download the updated version here or update straight from the app.
Display your title and company logo
This is perhaps the most common use of the feature. Displaying a label of your title with your company logo is especially useful if you’re in a large video conference with many external people. It makes things more formal and gives your webcam feed that professional vibe.
But this is not limited to the corporate workforce! As a content creator, this can easily translate to having your profile URLs and logo as part of your webcam feed which means you no longer need to set it up separately from the webcam source itself.
Enhance your background
The watermark is essentially a foreground element, mostly serving its purpose as a lower-third however you can actually also use it as a complimentary piece that can enhance your background.
One of the many users who requested this mentioned needing to superimpose a virtual desk or microphone as having one is a requirement for their calls. Voila! This can easily be done with VCam’s custom watermark.
The same principle applies if you want to make your background more aesthetically pleasing. Say you want to add some elements that will perfectly complement your background. That can also be achieved with this feature.
Demonstrate an object
Another useful way you can use this is if you want to demonstrate something by making it part of the background but you don’t physically have it. Sure, you can provide a link in your chat section but that’s not nearly as interactive as having it beside you.
Remember, custom watermarks also support mp4 video files so you are not just limited to images here! Say you want to walk them through a quick video, that is possible to and it’s just a part of that same webcam feed. No need to switch webcam sources or upload the video externally and share the link, you can play it right there in your webcam feed!
Make fun stuff
We’ve mostly talked about work stuff so far but we know a good chunk of VCam’s usage revolves around personal communication with friends and family members. So let’s bring in the fun stuff!
During our periodic company-wide meetings, some of my more creative colleagues were never shy of coming into the meeting room looking as wacky as they can!
XSplit VCam is used in many different industries so I’m pretty sure there are another half dozen use cases that people can take advantage of with this feature. I’d love to hear how you’re using this in the comments section below. Don’t hesitate to attach a screenshot as well so the community can have something to draw inspiration from!
It’s an exciting day for us here as we are unveiling the newest member of the family, XSplit Connect: Webcam. Available for both Android and iOS devices, Connect: Webcam is a free companion app for XSplit VCam designed to allow your smartphone to be used as a wireless webcam.
Aside from that, it also utilizes the same VCam technology which allows you to enjoy all its features, most notably superior background detection, removal, and replacement.
Why use your phone as a webcam?
It’s no secret that most built-in webcams have terrible overall quality. There are some good external webcams that you can buy but chances are you already own a smartphone that has a higher quality camera than your built-in one. This is why there’s plenty of solutions available that do that but none of them comes close to what XSplit Connect: Webcam does.
Getting started with Connect: Webcam
Having XSplit VCam installed on your computer is a prerequisite so make sure you get the latest version here. Download the Connect: Webcam mobile app that is suitable for your smartphone OS. You can get the Android version on the Play Store and the iOS version on the App Store.
Once installed, start the app on your phone, allow all the permissions requested and you should be good to go. Make sure both your computer and your mobile phone are on the same internet connection.
Once the mobile app is connected, you will see your smartphone as an additional camera source in XSplit VCam. Select that source and you’re good to go! The mobile app has some basic lighting settings if you want to modify that. There is also an option to use either the front or rear camera of your phone.
Looking ahead
Our team is working hard in making Connect: Webcam the best it can be and we’ll make sure to keep you posted on any new developments and upcoming features in the pipeline.
This is our first app under the ‘Connect’ suite, a line focused on improving the general productivity of our users. We can’t really disclose much at the moment but there are more to come in the near future so stay tuned!
We’re super excited about the XSplit Connect: Webcam and we hope you are too! Give it a try and share your thoughts in the comments section below.
Doing remote presentations from home is a part of the new normal. Whether you’re presenting to colleagues at work, or to a prospective client through video conferencing, it’s important everything is set up well and you have all the tools needed at your disposal.
We’ve covered some of that in this working from home article but today, we’re going to be discussing the new Google Slides plugin in XSplit Broadcaster and how it can make your next remote presentation much easier than it is now.
Install the plugin from the store
This plugin is only available starting from version 4.0. Make sure to update to the latest version if you’re using an older version.
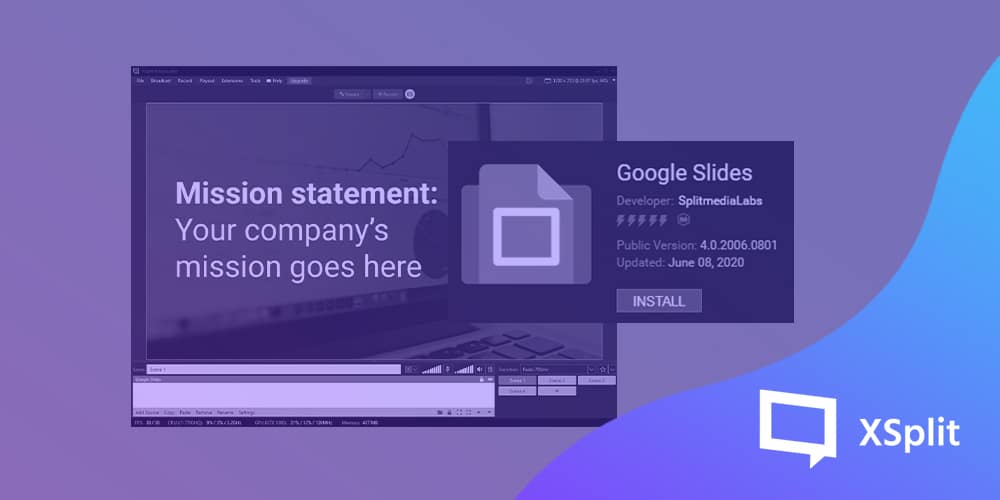
To install the Google Slides plugin, click Add source, then ‘Find more sources’ to open the plugin store. scroll down to the aforementioned plugin and hit ‘Install’.
Once installed, go to Add Sources >> General Widgets >> Google Slides. Paste the link of your presentation file, hit ‘Go’ and you’re set!
Make sure your Google Slides presentation permission is set so anybody with the link can view it. It can’t be added to XSplit Broadcaster as a source if viewing is restricted.
You might be asking how this is different from just adding the source as a webpage. The most obvious difference is you are not in present mode when you just add it as a page. Adding it as a source not only displays it in full screen but it makes it an immediately easier viewing experience without having to navigate a webpage to give your presentation!
With the Google Slide source, everything is locked to your presentation file so you don’t really have to worry about accidentally clicking anything that would ruin your presentation.
Setting up your remote presentation
Now that you have your Google Presentation added as a source, it’s time to set up the rest which is going to depend on your use case. What you’re going to be presenting will determine the type of scenes and sources that you’ll need to make.
We have some example presentation template that you can download either inside the application or here.
When you have everything ready, go to your video conferencing tool of choice and make sure the camera is set to ‘XSplit Broadcaster’ so the feed is fetching directly from the active scene in the application.
Do quick multiple test calls, play around with your Google Slides presentation, switch scenes until you’re confident that everything is working as intended. Just like with anything, preparation is key in having a successful remote presentation so do not skip this step.
The beauty of this is you can make it as simple and straightforward as you want but you can also enhance as you see fit.
While only showing Google Slides is probably enough for most people, adding a webcam feed of yourself definitely makes the presentation feel more personal, hence I recommend finding a small place in your presentation to put it. Use alongside VCam and hide your webcam background effortlessly to complete that professional vibe.
We hope the information we’ve provided is helpful and takes some stress out of making presentations from the comfort of your home. Make sure to always update to the latest version of XSplit Broadcaster to get the absolute best results. Follow us @xsplit on social media and check around our blog for informative articles like this.
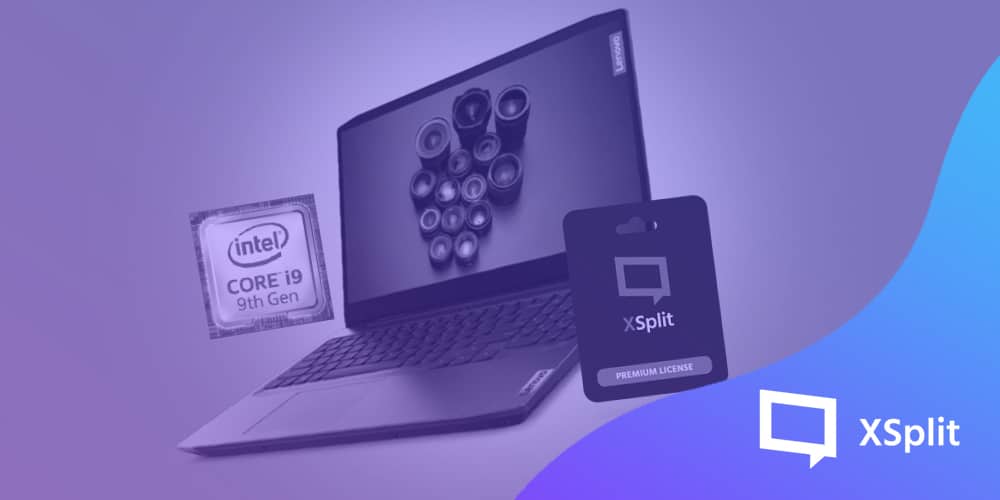
XSplit VCam is the ultimate background removal tool and the release of version 2.0 has further solidified that. Powered by the Intel® OpenVINO™ toolkit and accelerated by Intel® Deep Learning Boost, XSplit VCam is the perfect app whether for remote work purposes, or content creation. But don’t just take our word for it, go check this out to hear what people are saying about the latest update.
To celebrate this milestone, we’ve partnered with Intel and Lenovo to bring you a sweet giveaway where you can win a Lenovo Ideapad Creator 5 and an XSplit Premium lifetime license.
The mechanics are simple, all you need to do to become eligible is to fill out your details so you can be contacted if you are one of the two lucky winners! Are you ready? Head on to create.intel.com/xsplit to get started.
What is Intel® OpenVINO™?
OpenVino is a toolkit based on a convolutional neural network that facilitates a deep learning model from a framework and deployment using an inference engine onto Intel hardware. You can learn more about that and how it works here.
This toolkit powers VCam’s machine learning capabilities that allow the app to continuously improve its AI detection over time. This, along with some of our recent optimizations, allows for superior background removal and replacement performance compared to the competition as we’ve detailed here.
If for whatever reason you’re still using the old version of XSplit VCam, it’s a MUST that you update to version 2.0. If you love the previous version, you’ll love the latest version even more!
Background removal used to be something that can only be achieved with a set of equipment and a suitable studio setup. That was fine and all because the application is for professional production environments such as newscasting, motion pictures, and TV work. Anything but casual basically.
With content creation coming more into play, it became apparent that removing backgrounds (known as chroma keying) had to be easier. Simply put, very few people can’t afford to have their own studio space, green screen, and a bunch of lighting, to name just a few!
With great demand comes innovation resulting in various applications like our very own XSplit VCam, bringing exceptional background removal and replacement with the click of a button.
Early Solutions
VCam came into the market in 2018 but applications that promised background removal existed before that. As a matter of fact, XSplit Broadcaster had chroma key capabilities in as early as its beta period and the same can be said to similar applications such as Wirecast and Open Broadcaster Software.
It was far from ideal still back then as those apps only provide you the functionality to “remove your background” but only once you have everything set up correctly. That means you still needed to have a green screen, a ton of lights, and not wearing a green shirt (though this led to a lot of unintentional comedy in the early days!). It wasn’t easy but at least the tools were getting easier to use!
Even with some gradual improvements each year, it was clear a lot of people just didn’t want to put up with the work. Perhaps all they wanted was to flick a switch that removes their background, get a screenshot and that was it. Using a streaming app to finetune a setting by adjusting sliders and still not get a guarantee they’d be getting what they want was just too complicated.
Standalone apps for background removal
With enough demand, background removal software has naturally morphed into its own thing. Standalone apps such as Chromacam and Tridef have come into play while websites that offer the same service but just focusing on static images also started cropping up.
It didn’t take that long for people to really embrace chroma keying their background and it, later on, became a necessity for content creation. The need for background removal didn’t just remain in live streaming as a huge market for video conferencing and online business presentations showed up.
Applications outside of content creation
The use case for background removal started with professional video production work and grew into casual content, mostly video games. It did not stop there. With people being forced to work from home, it became an even bigger necessity for remote work and video conferencing since most people simply didn’t have that same luxury of having a dedicated office space at home.
Fast forward to today, top web conferencing services such as Zoom, Skype & Microsoft Teams have added built-in background removal that can be accessed with a click of a button. Pretty convenient, but is the quality there?
Why should you still use VCam then?
Three things. A far superior background removal AI, better customization options, and more optimized experience both for you and your CPU. 🙂
That’s not to say the built-in solutions from those web conferencing apps aren’t useful. They very much are especially if you just want the bare minimum and don’t want to install a separate background removal app like VCam.
But with the need for background removal becoming long-term because of the pandemic, I’d argue that investing in a superior app is the right way to go.
Don’t just take my word for it. Here’s a quick video that demonstrates how VCam fares with the competition.
Without elaborating too much on technicalities, XSplit VCam relies heavily on the machine learning model that enables the application to continuously improve over time.
Side note: Intel produced an informative whitepaper on the subject of intelligent and real-time video background removal which mentions VCam. Definitely check it out if you’re curious about how that works.
Remember, there are plenty of variables to consider when it comes to how a user’s webcam looks. From lighting to the cat sitting on the bed behind you. So while perfection may seem far fetched when all is said and done, all this data allows VCam to continue getting better.
And that gives me the perfect opportunity to segue into the latest XSplit VCam update that you definitely should give a try if you haven’t yet. Boasting an even better AI detection and flexible adjustment options, VCam 2.0 takes the best background removal software and makes it even better. Learn more about it in this blog post.
Where does that leave us?
All of these innovations, in addition to having more companies trying to have some form of background removal and replacement integrated into their own software, is a big win for consumers. From the early days where it’s simply not accessible, to now where it’s become easy to use, the future is bright when it comes to advancements that can be made here.
That also means we should work harder to remain on top of the game for background removal. Not that we have a problem with that. 🙂
With the 2.0 update bringing a much better background removal detection and flexible background adjustment options, XSplit VCam takes the best background removal software and makes it even better. You can update through the app or download the installer from the VCam page while we elaborate more on these new features and what it means for you below.
Improved Background Removal
Before this update, XSplit VCam was already widely regarded as the industry-leading standard for background removal but it doesn’t mean there’s no room to get better. The key feature here is the adaptive filtering option that gives better segmentation of your hands, hair, and objects (e.g. headphones and microphones) as demonstrated in the video.
Background configuration
What’s the use of a funny background GIF or video if you’re not perfectly integrated into it? With the added flexibility to configure your background, you can now easily line up your images exactly as you want, zoom, pan left and right, up and down, flip it around and change the brightness or contrast. We have a separate blog post on these new background adjustment tools.
Calibration and Automatic Settings
We made improvements here by letting VCam select the best primary and secondary device for acceleration on your machine. This ensures you’re getting the best possible experience right out of the gate without the need to fidget through the settings!
Additionally, the option to select a secondary device for hardware acceleration helps VCam’s performance further by reducing its resource usage.
VCam hardware driver
When you update to version 2.0, it also includes a hardware driver for VCam which allows it to be used as a webcam for an even wider variety of software. The most notable would be Webex and Windows Store applications.
If you’re previously having problems with VCam not showing up in your conference or camera software, this driver should fix all of that.
I’m sure it goes without saying but there’s also a ton of bug fixes and usability improvements in this update that will make the overall experience better. Here are the full release notes for more details.
We’d love to hear your thoughts on this update so make sure to sound off on the comments section below.
Microphones are essential peripherals not just for content creation but also in our everyday lives. Whether you’re using it to conduct video conference calls for work, podcasts, or even just doing regular calls with your loved ones, there’s no denying how they’ve become a necessity for most of us.
The focus in this blog post, though, is content creation, which is a group that mostly includes streamers, YouTubers, podcasters, and so on. We’ll touch upon how you can determine which microphone is best for your needs as well as make some general recommendations on the best option for the various price brackets.
Determining the intended use case for the microphone helps in narrowing down your list. If you’re going to be moving a lot, then you need something small for better flexibility. Perhaps a lapel microphone clipped on your shirt would be ideal?
On the other hand, if your room doesn’t have the best soundproofing, you can settle for a dynamic microphone with a suitable polar pattern so you can block out some excess noise.
If you’re looking for the opposite and want to capture as many sound frequencies as possible, then a condenser microphone is your friend. Those are the things that you need to give some consideration to narrow down the list.
Once you’ve determined the specific application, the next step is figuring out how much you’re willing to spend on it.
Budget
A lot of people wanting to upgrade their microphone think they need to shell out hundreds of dollars to do that. That depends on what you’re starting with. If you’re just using your laptop’s onboard microphone or your webcam’s microphone, the cost to upgrade shouldn’t be much unless the aim is to go for the best of the best.
Otherwise, there’s just a lot of good options out there in the sub hundred dollar range, so you don’t need to spend that much.
Different types of microphones
We mentioned some types of microphones above, but in case they sound foreign to you, this is where we’ll be able to expound on them more. Do take note the categorization of microphones vary but for simplicity’s sake, we’re going to be classifying them in the most identifiable way.
Headset – This one probably needs no explanation, but this is the most practical option if you want to minimize the number of equipment that you’re buying. We’ve listed some of the best streaming headsets available today, so you may want to check that out.
Dynamic – Perhaps the most flexible option because you can pretty much use it for any applications, doesn’t need external power while being relatively inexpensive. They are also not as sensitive, which means it’s a good option if you don’t have soundproofing in your area.
Condenser – If you’ve been watching a lot of content creators, it’s highly likely they’re using a condenser microphone. This type of microphone is the opposite of dynamic microphones because it’s highly sensitive and often needs phantom power to work. Those minor ‘inconveniences’ are rewarded by a more precise recording that is perfect for vocals and acoustic instruments.
Ribbon – Ribbon mics are a type of dynamic microphone that utilizes a thin corrugated strip of metal between magnets as opposed to a diaphragm that is attached to a moving coil on a more traditional dynamic microphone.
Ribbon mics are even more sensitive than condenser mics, but in return, you get the most amount of detail without harshness or distortion. Not really recommended if you’re just starting, but if you obsess on having the best sound quality and have the money to spare, then definitely give this a careful consideration.
Lavalier/Lapel – This is the microphone if you require movements since you can easily clip it to your shirt. Its most significant advantage is the form factor because once you have it in a perfect position, you can just forget about it.
This type of microphone is most suitable in public speaking applications where some movements may be needed, and hands-free operation is a must.
Best microphones for content creation
Sub $100
Blue Snowball
This compact but robust USB microphone has everything you need to get into high-quality audio recording without spending a fortune. This small condenser microphone even includes a stand and works plug-and-play so you can get recording right away. Check out the Blue Snowball here.
Rode SmartLav+
This omnidirectional lavalier microphone easily plugs into devices that support a 3.5mm jack. This means it has the added flexibility of being used in mobile devices while still retaining support for computers. The best thing about these types of microphones is they are so tiny, making them perfect for recordings on-the-go. Check out the Rode SmartLav+ here.
$100 – $300
Blue Yeti X
Blue Yeti is arguably the most recommended microphone for content creators and a good reason. But we feel the more recent Yeti X packs more value by having more condensers, better bit depth, and sampling rate resulting in a fuller and better overall sound.
Even then, it’s hard to go wrong with either of them, so your budget will ultimately dictate which one is better. Check out the Blue Yeti X here.
Elgato Wave 3
Elgato has been making hardware for content creators since its inception, so it’s no surprise their latest microphone is a big hit. Aside from the high-quality microphone that sounds warm and full, the Wave 3 also has virtual mixing software that allows you to adjust your mix to up to eight additional audio channels. Check out the Elgato Wave 3 here.
Audio-Technica AT-2020
If you’re looking into an entry-level XLR microphone, the AT2020 is one of the popular options available and deservedly so. The AT2020 is built like a tank while still managing to have a small form-factor, and more importantly, the sound quality it produces is exceptional.
This type of microphone requires an audio interface that provides 48V of phantom power, so that’s something to keep in mind. Check out the Audio-Technica AT-2020 here.
$300 or more (Sky’s the limit)
The options at this price point are, without a doubt, an overkill, especially if you’re just getting started or don’t have a reason to upgrade. As mentioned, the cheaper options discussed above are perfect for most content creators, but if you’re looking for the next best option, you’re not going to go wrong with the microphones listed below.
Shure SM7B
The Shure SM7B is a wildly popular dynamic microphone that is often used in professional environments. It is highly regarded for its warm tone and full frequency response for accurate reproduction, making it perfect for various ranges of recording.
It’s also built to last thanks to its rugged construction that allows for its reliability over a long period. Check out the Shure SM7B here.
Electro-Voice RE20
The RE20 is a large-diaphragm dynamic microphone that utilizes a patented Variable D designed to control the mic’s proximity effect. What this means is unlike most mics, you can be very close to the source without having to worry about losing any clarity.
Aside from content creation and broadcasting, this microphone is also often used by sound engineers as an instrument microphone for mastering and mixing purposes. Check out the Electro-Voice RE20 here.
The best microphone for you
Choosing the best microphone for your needs as a content creator is an essential step, whether you’re starting from scratch or looking to upgrade what you currently have. It can be a daunting task, especially with so many options to choose from, but once you have determined your specific needs and preferences, the list should become more narrow.
Finally, XSplit Broadcaster has advanced microphone settings that can help enhance the experience and overall quality of the audio. Most microphones for streaming, even the ones not mentioned above, will work just fine and fit into whatever workflow you have for creating your content.
We hope this article helped you decide what microphone to get for your needs. If you’re already using one that you’re happy with and that is not on the list, we’d love to hear about it! Sound off in the comments section below!