자영업 또는 직장인 모두 우리가 본래 경험했던 일반적인 업무 환경은 일부 제한되어 있는 상태입니다. 이런식으로 가다가는 온라인으로 비즈니스를 확장해야 할 수도 있습니다. 예를 들어 신입 사원들에게 온라인으로 인수인계를 진행 한다던가 아니면 바이어들에게 프레젠테이션을 보여준다던가 해야 하셨을겁니다. 상황이 어떻던, 아래 공유할 꿀팁을 활용하여 더욱 생산성 있는 온라인 비즈니스를 시도 해보시기 바랍니다.
발표를 하는 입장에서, 직접 사람들과 대면하던지 또는 온라인 비대면 방식으로 진행하던지, 성공적인 결과를 위한 가장 중요한 요소는 진정성을 가진 소통입니다. 정말로 획기적인 제안이라 할지라도 소통의 방식이 타당치 못하면 무용지물이 될 수 있습니다. 특히나 원격으로 진행 되었을 경우 소통이 원할하지 못했을 경우 최소한 사람 대 사람의 숨결이나 의사를 상대방이 잘 느끼지 못하는 것 도 사실입니다. 예를 들어 커피를 대접한다거나 잔잔한 농담거리를 주고 받지도 못 하는 환경이기 때문입니다.
준비가 철저했다면 자기소개부터 눈에 띄게 발표 하는 것이 중요하다고 생각합니다. 아무런 소개도 없이 바로 발표 자료로 넘어간다면 상대방 역시 당황스러울 수 있습니다. 초반에는 충분히 상대방과 교류하며 공통점을 찾는 다거나 최소한 간략한 소개는 반드시 필요합니다. 베테랑 비즈니스인 이라고 해도 누구나 처음 보는 상대를 대할때는 긴장하는 법 입니다. 게다가 발표 시간에는 내가 주인공이기 때문에 이 시간을 빌려 내 매력을 최대한 발산하는 것도 전략이 될 수 있습니다.
중요한 비즈니스 회의를 할 때는 가능한 아는 대부분의 온라인 서비스 및 도구를 활용하시는 것이 추후에 편리해 질 것 입니다. 새로운 기술이나 도구를 사용하면서 상대방에게 어필을 할 수 있으며 나 또한 자신감이 생길 수 있습니다. 물론 이러한 도구들을 최소한 활용하려면 일단 빠르고 안정적인 인터넷 서비스를 마련해야 합니다. 아무래도 멋있게 보이게 위해 시간을 많이 투자했더라도 인터넷 환경 때문에 화질이 떨어지거나 끊김 현상이 발생한다면 모두 헛수고가 될 수 있겠지요.
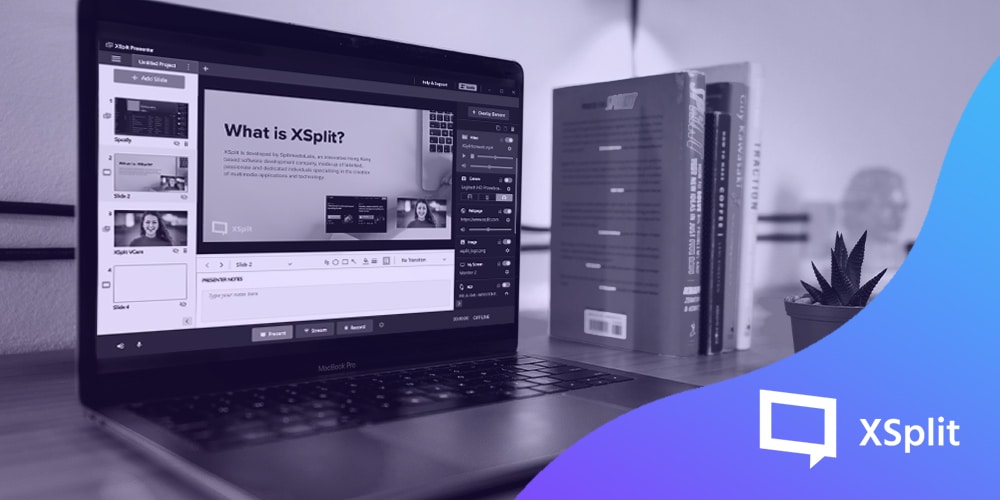
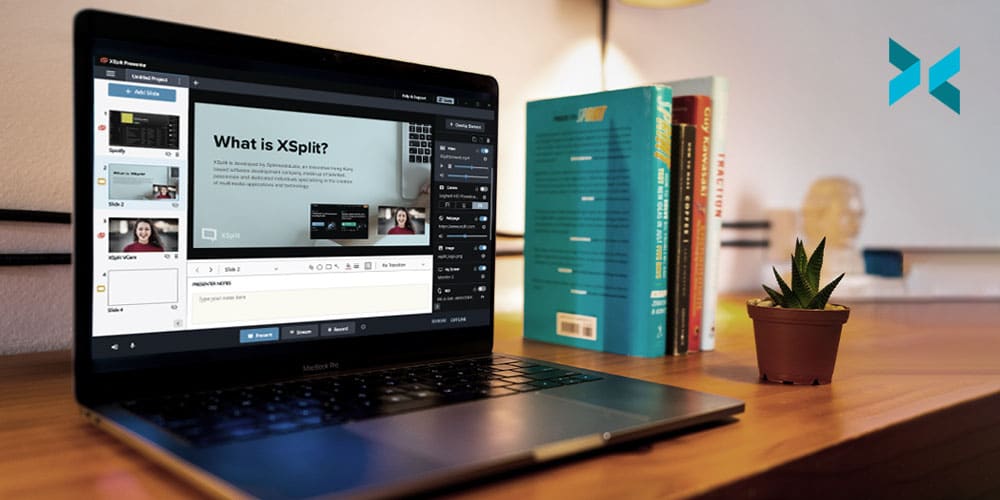
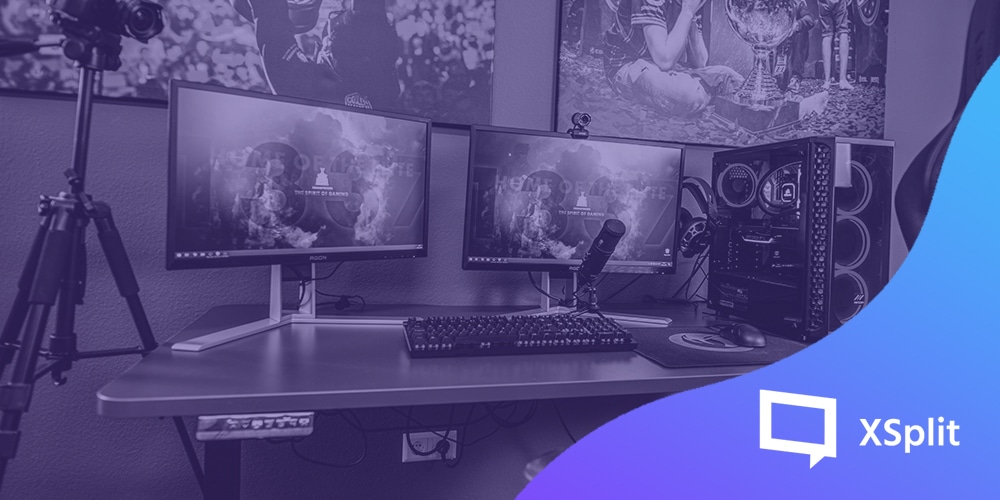
다행히 현재 시장에 있는 중상위권 스펙을 가진 노트북 컴퓨터들은 쓸만한 웹캠이 장착되어 있습니다. 현재 데스크탑 컴퓨터를 사용하고 있다면 인기 유튜버나 스트리머들이 사용하는 웹캠 정도는 마련해야 합니다. 캠 장비가 갖춰졌다면 이를 최대한 활용할 수 있는 온라인 서비스 중에 XSplit Presenter를 사용하시면 온라인 프레젠테이션을 손쉽게, 신속하게 제작할 수 있으며 클라이언트와 바이어들에게 충분한 어필을 제시할 수 있습니다. 이미 기존에 사용하던 PPT 또는 구글 슬라이드 같은 서비스를 연동하여 사용할 수 있고 추가적인 요소들도 최소한의 클릭으로 이루어 낼 수 있습니다. 밋밋하던 PPT 화면을 더욱 역동적이게 만들도록 최적합의 환경으로 이루어져 있습니다.
이제 더이상 비싼 항공료를 내고 방향도 모르는 타지에서 일일이 사람들을 만나가며 비즈니스 제안을 하지 않아도 됩니다. 물론 어려운 시기 및 복합적인 문제로 현재로써의 해외 출장은 더욱 제한적인 것 도 있습니다. 그렇다 하더라도 여행에 드는 경비, 시간 등 무시하지 못하는 요소들은 이미 준비 절차부터 스트레스를 받게 될 수 있습니다. 이제 간편한 도구를 활용하여 나만의 제안서를 전 세계에 뿌릴 수 있다는 가능성이 여러분들을 흥분케 하는 부분입니다. 물론 새로운 환경에 적응하기 위한 충분한 연구와 연습이 필요로 하겠지만 이러한 시간을 투자라 생각하고 이전에는 타지의 지리와 언어를 배우기 위해 비워둔 시간이었다면 이제는 나만의 방식으로 언제 어디서나 사용할 수 있는 기회의 시간으로 전환 해보시기 바랍니다.
물론 이전처럼 대면 형식의 회의는 없어지는게 아닙니다. 대면으로 진행된 요소와 경험을 토대로 더욱 멋진 비대면 회의를 꾸밀 수 있다면 그야말로 금상첨화 겠지요. XSplit Presenter로 학업, 직장 생활을 더욱 업그레이드 해보시기 바랍니다!
Whether you run your own business from home or are one of the many employees whose usual premises are closed at the moment, the chances are you’ll need to give an online presentation at some stage. Perhaps you have been asked to train some colleagues remotely or you may even have to give a fully-fledged business pitch online. Whatever the circumstances, the tips below will help you make the process less stressful and deliver a more professional result.
Regardless of whether you’re pitching your idea remotely or face to face, one of the key elements to a successful business pitch is human connection. Even the most amazing idea can suffer if the delivery is cold and disingenuous. It might feel as though the human touch is lost through a remote business setup. There’s no opportunity to offer drinks or make small talk in the lobby and as normal as video chat has become over the past year or so, screens can still be seen as a barrier by some.
A well-planned introduction can make almost as strong an impression virtually as in real life. Rather than diving headlong into your presentation, take time to establish a rapport with your target audience. A brief, but warm informal chat will put everyone involved at ease. Those who are a little more shy can benefit from both planning and the presence of a screen. Even the most seasoned presenter can be intimidated by an important business pitch, so why not take advantage of the slight disconnect from the real world and star in the performance of your lifetime?
Particularly when you’re making an important business pitch online, it’s best to ensure you take full advantage of the technology available. Utilizing the newest tech tools will show you in a capable and professional light. Investing in a fast and stable internet connection should be a priority, particularly if this type of presentation is a regular task. Whilst it sometimes can’t be helped, patchy unstable video calls can, unfortunately, put a dampener on business meetings.
Most laptops have a reasonable quality webcam as standard these days, and desktop machines can be fitted with an external webcam very inexpensively. There are some amazing software packages available specifically aimed at making your remote pitch go more smoothly. XSplit Presenter is an excellent tool for presentations that allows you to have full control of your presentation! Its handy annotation function can also be a great way to interact with clients, rather than just talking at them. The ability to import Google Slides is ideal for showing a visual presentation alongside yourself, meaning that you don’t need to click between screens, losing eye contact with your clients, or potentially clicking the wrong link mid-pitch.
Gone are the days of international travel to pitch businesses overseas. Forget the fact that it’s not really possible for most of the world to travel at the moment – there’s also really no need to! Long-haul trips to negotiate business deals are not cost-efficient for most small businesses, but it’s so easy to give a remote pitch to anyone in the world. This opens up a plethora of new opportunities to SMEs. Don’t let superficial map-drawn boundaries narrow your opportunities for success! Always do your research first, but consider the possibility that you can pitch your ideas worldwide.
It can certainly take time to adjust to our new virtual approach to historically face-to-face tasks. Armed with the right knowledge, preparation and attitude, however, you can take full advantage of the new world of working from home. Whether you present regularly or have a big one-off business pitch online, use these tips to improve your chances of winning your clients over. You can check out some additional info about XSplit Presenter here.
Over on our YouTube page, we had previously discussed how to make your own tutorial videos, something linked below. Probably the most important element of any tutorial, however, is the script as it’s your plan for whatever it is you wish to teach. Today, I’m going to discuss three ways you can write tutorials, which kind of content works best for each method, and some additional script writing tips to find out how to write a video tutorial.
How to make Tutorial videos on your PC.
Freestyle
This is probably how a lot of people script their first videos, completely freestyle. This is where you come up with a topic and just talk about it for however long you feel and then put it together in the edit. The George Lucas approach to tutorials, if you’ll excuse the Star Wars reference. Now, if you’re going for more personality-based content or maybe more general advice, guru-type content then this is a great choice. It gives you the freedom to put out a lot of information in a way that makes sense to you and creates a more intimate feeling for the audience as if they were getting advice from a friend. There are, however, some drawbacks to using this method.
The main challenge will come when you get to the edit. If you missed something you needed to mention, you’ll need to re-record, which may be a challenge as getting the exact same lighting conditions, clothing, hairstyle, etc is always a pain. Although, you can be smart about it and make these cutaways more of an aside to the audience, which is an established aesthetic and can be useful when you’re learning how to write a video tutorial with this method.
Another challenge is if you aren’t naturally the best talker and fumble over your words it can lead to some pretty rough cuts of all your good takes together. Nobody wants to be the Tekken 3 of tutorials.
The next method of writing involves creating a brief outline of your talking points. Since this requires a bit more organization, I’d like to reiterate some things from the video at the top of the page about the importance of dividing your videos into segments. With this in mind, the workflow would become video topic, segment topic, bullet points of discussion topics
For example, say you are doing a video about how to make a sandwich. You have a segment on bread, and then each bullet point could be different types of bread and while recording you’d talk about how suitable that bread is for a sandwich.
This tends to be the preferred method for a lot of online content creators when learning how to write a video tutorial. You get to pass along accurate information while also maintaining some flexibility to inject some personality into the tutorial to keep your audience engaged. It can also be helpful by allowing you to rearrange your content in your post-production process if you don’t find the original order you recorded in makes as much sense as you’d hoped. One tip while using this method is to make sure your last take is your best take on the subject you’re discussing, as this will speed up the editing process.
The final method of writing tutorials is to fully script out each word you’ll be saying in the tutorial. Much of the advice for bullet-pointed scripts in terms of organization also applies here, but you can take it a step further during the pre and post-production stages.
Since you know exactly what you’re going to be saying, this means it’ll be easier to subtitle and translate your video, thereby opening up your content to a larger audience. You will also be better able to plan out the b-roll segments for your tutorial, which in turn will give you a better idea of how long a video will take to make. So, if you’re rigid or strict on deadlines for releasing content, it’s good to know in advance if the video you are plotting is going to require an elaborate shot.
If your content needs to be accurate and detailed, like if you’re teaching someone how to put together a model or talking about history or philosophy, then it is really important to script all this out and plan in advance. This is also helpful if you won’t be the on-screen talent for your videos, just make sure you get feedback from your talent so that you can write things that fit their natural way of speaking.
I personally use the fully scripted model for most of my videos because I find it hard not having set endpoints for whatever I’m describing or explaining. I’m susceptible to going off on tangents that aren’t related to the main topic, which can just make the editing process even longer! There are, of course, drawbacks to this method.
It can be hard for people to follow a script, especially if you have to use exact phrases. In these cases try to separate things into shorter phrases. While this can make editing a bit more difficult, it can really help you or your talent not feel exhausted at the end of a recording session. Also, if you’re reading off a script, say you’re just doing a voiceover, or happen to use a teleprompter, then it can be easy to sound robotic or lacking energy. In this case, it’s important to be present and listening to yourself or the delivery of the talent and make adjustments where needed. And hey, speaking of teleprompters, adding your script into XSplit Broadcaster or Presenter’s projector mode can make a great make-shift teleprompter on your monitor.
Now, I recommend experimenting with each method and see what works best for you. You don’t need to stick to any given method, perhaps some videos work best with a full script, especially when working with collaborators and for other short and quick videos you just need a few bullet points! Whatever the case, you’ll hopefully find writing your next video tutorial script that bit easier!
“Do you wear your pajamas all day?” “Do you mostly watch daytime telly?” Yes, those of us who’ve been working-from-home warriors for years have gotten pretty used to these questions. Suddenly, many more folks are faced with the WFH lifestyle and are realizing that there’s a lot of self-motivation and work-life management going on behind the keyboards. Now, we are being asked, “what is the best work from home routine?” Here’s your chance to shape your day to suit your own rhythms and find your own!
When unleashed from the office, the temptation may be to throw routine to the wind and just work as-and-when. However, like the kid allowed to help themselves to the cookie jar, eventually, we have a full belly of freedom. Having set work hours and a dedicated workstation helps you to keep on top of your workload, and prevents that vaguely lost feeling that many of us experience when our usual rituals vanish.
You’ll also feel more professional if you’re dressed and at your desk (XSplit VCam can help by blurring out the background of your meetings, but it can’t block out a pair of old pajamas). Try using software like our XSplit Presenter to create a professional-looking online presentation without taking up too much time or adding too much stress!
Everyone has a different line in the sand when it comes to work-life balance. You may find juggling cooking the evening meal with answering emails either a liberating use of your time or a complete imposition. Those of us who’ve chosen to work from home generally accept that lines get a little blurry; however, if you’re new to this, you may prefer to set a routine that keeps business and family life strictly separate. This is your call, and don’t be afraid to stick your out-of-office on after a certain time as this can be a big help when looking for the best work from home routine.
This is the good bit: within reason, we can set our own work routines when we’re in our own space. However, this does really depend on your job and your home surroundings. If you’re a teacher running live classes from nine until three every day, then you’ll have very little flex in your working hours. Likewise, if your job involves consultations, interviews, and meetings, you have to work alongside other people’s timetables.
However, with some jobs, provided you meet your deadlines and communicate when required, you have the freedom to work to your own rhythms. If you’re a night owl or a morning lark, you can adjust your hours to accommodate this and find your best work-from-home routine. Keep some overlap with your colleagues if you need a responsive relationship; but if you find you’re more creative at 6 pm than at 11 am, put your working hours back. Juggling work with home educating? Take the pressure off by dividing the day into work and school times. If you’re struggling, speak to your line manager or your school to come up with a routine that suits both roles: don’t wear yourself out trying to accomplish everything at once.
Most work schedules build in breaks and lunch hours. It’s all-too-easy to ditch those when you’re working home, grabbing lunch at your desk. One of our top work from home tips has to be: build-in breaks! If you can, go into a different room or even outside, and enjoy the change of scene for a while. Missing your colleagues? Schedule a coffee break Zoom catch-up, or have “lunch together” on a Friday.
Conversely, working near the fridge can lead to a lot of breaks! Having proper time-out sessions for a coffee break can cut down on the grazing. That leads into another WFH pitfall: the sedentary aspect, which can be a double health-whammy when combined with the snacking opportunities. Many people find they’re missing the walk into town at lunchtime or even the commute – our advice is to step away from the screen and go for a walk or run during the working day.
So, while a routine is important, you will hopefully have the chance to plan your day in a way that suits you. Setting up a new home office? Take a look at our blog.
One group that has been at the forefront of the work from home experience has been artists. Many artists have begun to look into other revenue streams like live-streaming the creation and process of making their art or providing educational content teaching others the skills they have learned. How you may ask, do you stream or record your art? Well, you may have noticed it in the title but today we’re going to discuss how to live stream or record digital art!
First up, you’ll need a computer, a desktop PC or laptop are both good for this, just make sure it hits certain requirements, something you can read about here. Briefly though, make sure you have at least an NVIDIA RTX GPU or a six-core CPU. Next, if you’re doing physical art, like painting on a canvas or sculpture, you’ll need some type of camera. You can grab a webcam, a Logitech C920 is a good start, or you can even use your cellphone! Download XSplit VCam, get the XSplit Connect: Webcam App, and make sure your phone and PC are on the same WIFI network and you can use your phone as a camera!
If you’re creating digital art on something like an iPad you’ll need to be able to capture your screen to stream digital art. There are two ways to do this, one is using an HDMI adapter (HDMI to Lightning or USB-C in the case of some iPads) to connect the device to a capture card. Or you can use software like airserver to airplay your screen over WIFI. Another important thing as well is to make sure you have a microphone if you’re going to be talking to people in the chat, but especially if you are going to be creating tutorials! A lot of webcams come with built-in microphones but we would recommend a standalone one, something we’ve discussed here.
We’re going to be using XSplit Broadcaster as our streaming software. First thing, I recommend setting your resolution to 1920×1080 and a frame rate of 30fps. You’ll want to add whichever source will be displaying your art, if this is from a capture card simply use the sources menu by clicking Add Source > Devices > Video and selecting the name of the capture card you have. If you’re going to be capturing the software you use to make digital art like Adobe Photoshop on the same PC you’re streaming from again go to the sources menu, Add Source > Screen Capture and you can either select Smart Capture to capture only the software you’re using or you can select monitor capture. This will, however, mean people can see anything on your desktop so we’d advise using Smart Capture.
Adding your camera is just as easy as adding the capture card, but this time select the name of your webcam and it will go in the main XSplit Broadcaster window where you can easily move and resize everything. Then you just need to go into your audio settings (Tools > Settings > Audio) and select your microphone. Leave your system sound set to default, this is basically capturing any sound that your PC makes, such as audio from a video or music playback.
Another useful source, especially if you’re teaching people about software that uses a lot of shortcuts is the keyboard input display. This can be found by going to the plugin store, which can be found by selecting Add Source > Find More Sources and in the search bar typing Input Visualizer. Click on it and select Install and now back in the sources menu selecting Add Source > General Widgets and selecting the Input Visualiser. You’ll need to enable permissions for this, a bar will however automatically appear at the top of XSplit Broadcaster prompting you to do so. After that, all your keyboard inputs will appear visualized on the screen!
If you’re doing timed lessons, you can easily set up a text source to be a countdown timer which you can do again by heading to the source menu Add Source > Text then right-clicking on text source that appears and click the box that says “Use Custom Script” then clicking “Edit Script”. From here select in the Template drop-down menu “General Purpose Clock” and setting it up as you like. Finally, I recommend setting up a starting soon scene just so you can be sure everything is ready for your session. This is easily done in the scene menu clicking the + button, adding some of your artwork, some text that says Starting Soon, and maybe another countdown timer from the custom scripts. Or however you want it to look, honestly!
Now that you’re all set up let’s get a stream or recording going! If you’re streaming to any of the popular platforms like Twitch, Facebook, or YouTube this is pretty straightforward, just log in to your account when you first open up XSplit Broadcaster (or by going to the File dropdown menu and selecting Log in) and let the wizard set you up with all the recommended stream settings. If you’re streaming to a different platform you’ll use the custom RTMP plugin. This is found in the plugin store which you can find by going to Extensions > Add Extensions > Find More Extensions and installing it in the same manner we did with the Sources store above.
You’ll need to get the RTMP URL and the stream key from the service you’re using and put them in by heading to Broadcast > Set Up New Output and select Custom RTMP. You’ll also need to manually input your stream settings. Twitch offers some good guidelines for bitrates that are roughly applicable in most places and can be found here. The most important thing to take note of is your internet upload bandwidth, do a quick speed test to find out your upload speed. Basically, you want to set a bitrate that’s about 70% of your upload bandwidth or less.
Now, you’re ready to stream digital art! You can record while you’re streaming at the same time easily by checking the “Automatically save a recording on local drive” box in your Custom RTMP output or particular service Properties box which can be found by clicking the gear icon next to its name in the broadcast menu. To set your recording settings click the Record drop-down menu and click the gear icon. You’ll want to set the quality to Ultra High and enable multi-track audio and select Force constant frame rate if you’re going to be editing your video after the fact. From here just click okay and then hit record when you’re ready to go! Finally, it’s not a bad idea to hit the little camera symbol up the top in order to take screenshots, something that’s useful for sharing your finished work or using it to create thumbnails.
That’s all it takes to get started streaming or recording your artwork! Of course, there’s still promoting your content and getting people to watch, but that’s a subject for another day!
Building your streaming brand and increasing your viewing figures can be the result of many factors, but the one thing underpinning them all is your ability to deliver high-quality videos consistently. If you want to showcase superior streams to your viewers, check out these tips on how to improve stream quality and give your broadcast that extra edge.
A hardwired connection is the cornerstone of a reliable stream. While convenient, Wi-Fi can be too unreliable for consistent video streaming. Streamers using Wi-Fi can lose signal strength and speed, which can result in pixelated streams, buffering and freezing issues – all of which are immediate turn-offs to your audience.
It might be an idea to invest in an ethernet connection directly from your PC to your router to improve stream quality. If this is not possible because of the room you are streaming from, consider buying a separate router. Alternatively, you could also use powerline adapters. These devices are relatively easy to install and utilize your home’s electric wiring to transmit the signal from your router to your PC.
The need for speed to improve stream quality
Another factor that comes hand-in-hand with connection is your upload speed. High-quality streaming at 1080p at 60fps requires upload speeds 7.5 to 11 Mbps. To reach these sorts of speeds with any level of consistency, you may need to shell out for your internet provider’s premium plan. This is likely to vary (both in terms of speed and cost) depending on where you live and which providers serve your area.
You may also wish to do a bit of forward planning as streamers push towards 4K streaming as the norm. In fact, YouTube already supports 4K and HDR. However, to stream at this quality at 60fps, you will need a super-fast upload speed somewhere between 24 Mbps and 61 Mbps.
Which resolution and frame rate should you aim for?
While gamers want to play the latest games in crystal clear 4K resolution, streaming at this level is in its early days. YouTube supports 4K streaming but other popular platforms such as Twitch, at the time of writing, do not. As a broad rule of thumb, it pays to focus more on the frame rate than the pixel density when you’re looking to improve stream quality.
For example, the ideal streaming rate is full HD 1080p with a frame rate of 60 fps. This will present your viewers with a sharp, smooth broadcast, though your internet upload speed may not be able to cope with this. Lowering the resolution to 720p will help you maintain 60 fps. An alternative to this is to reduce the frame rate slightly, but no lower than 30 fps, which is where you will find issues and pixelation.
Which bitrate should you output at to improve stream quality?
If you are streaming footage in full HD 1080p resolution, most streaming services recommend that you set your bitrate around 3500 kbps to 4000 kbps. The higher the number, the better looking your stream will be.
For those who have very high internet upload speeds, you could push this to 5000 kbps to 6000 kbps for pixel-perfect streams. Those looking to adopt 4K streams will need to be reaching somewhere in the region of 8000 kbps. One thing to be wary of is that streaming services may frown upon higher bitrates or even cap it depending on your platform of choice.
If you have an Nvidia graphics card, then you can stream using the NVENC H.264 encoder. Those who don’t will need to employ the standard .x264 codec. This may result in the loss of a frame or two as the CPU powers the stream, so it is worth investing in a good graphics card. Either of these are possible with XSplit Broadcaster which will automatically optimize your stream based on the system and connection speed you have!
The main difference between the two is how you set your encoding quality. Those using the NVENC codec should ensure that the Encoder Preset is switched to Max Quality. On the x264 codec, you will have a CPU Usage Preset, which ranges from ultrafast to very slow. What you use here will depend on your computer’s CPU, but if it can handle it, switch to fast or medium for a high-quality stream.
Following these tips should place you in a prime position to grow your viewing figures and start capitalizing. There are many other tweaks and settings that can be fine-tuned to further improve stream quality, such as the profile, keyframes and B-frames. Experiment and see which combination works best for your PC setup.
최근들어 나만의 개인 방송을 시작하는것이 전보다 훨씬 보편화 되었습니다. 하지만 준비 단계부터 일일이 배워야 하는 부분은 여전히 복잡하기에 혼자서 모든것을 기획하고 진행 하는것에 대한 두려움은 여전합니다. 게다가 게스트를 초대하여 진행하는 토크쇼 같은 경우에도 이미 힘든 진행 절차를 더욱 힘들게 하는 부분이 될 수 있습니다. 방송 플랫폼과 방식에 따라 천차만별인 온라인 토크쇼 진행 방법에 대해 배워보겠습니다.
이 게시물에서 예시로 사용할 방송 프로그램은 엑스플릿 브로드캐스터 입니다. 토크쇼의 진행자, 즉 MC는 방송 화면에 웹캠과 각자의 마이크 장치를 설정해야 합니다. PC에 연결된 마이크 장치나 오디오 장치를 방송에 적용하려면 엑스플릿 브로드캐스터 상단 메뉴의 도구 > 환경설정 > 오디오 탭으로 들어가서 마이크 장치를 목록에서 선택하면 됩니다. 그 후 방송 화면을 구성 하려면 엑스플릿 브로드캐스터 하단 메뉴에서 소스 추가 > 장치 > 영상 장치 를 선택하여 연결된 웹캠을 목록에서 선택하면 됩니다.
게스트를 초대하는 토크쇼일 경우 원격으로 진행된다면 원하는 화상 연결 프로그램을 지정하여 게스트의 캠 화면을 캡처하면 됩니다. 여러 인기 화상 연결 프로그램 중 디스코드, 줌, 행아웃 등을 사용하면 되고 게스트를 해당 프로그램의 서버에 초대한 뒤 캠을 활성화 하도록 진행 한 다음에 엑스플릿 브로드캐스터에서 화면 캡처 소스를 추가하면 됩니다. 엑스플릿 브로드캐스터의 하단 메뉴 중 소스 추가 > 화면 캡처 를 선택한 뒤 스마트 캡처 를 사용하여 내 모니터 내에서 캡처하기 원하는 구간, 즉 게스트의 캠 화면이 있는 부분을 클릭 후 드래그 해서 지정하면 됩니다. 이 단계는 두 개의 모니터를 사용한다면 조금 더 편리할 수 있습니다. 한 개의 컴퓨터에서도 무난하게 캡처가 가능하지만 해상도가 작을수록 화질이 저하될 수 있는점을 주의 해주세요.
만약 스카이프 를 사용한다면 스카이프 자체 포함된 기술 중 NDI 소스 송출이 가능합니다. 엑스플릿 브로드캐스터 역시 NDI 송출 및 불러오는 기능이 탑재 되어있어서 더욱 쉽게 NDI 신호를 받아올 수 있습니다. 스카이프의 NDI 설정은 환경 설정 > 통화 > 고급 > NDI 활성화 를 선택하면 되고 엑스플릿 브로드캐스터에서 소스 추가 > 기타 송출 신호 > NewTek NDI 를 선택하면 됩니다. NDI 신호를 받을 시 스카이프 연결이 동시에 활성화 되어있을 경우 게스트의 오디오가 더블링 되는 현상이 생길 수 있으니 반드시 해당 NDI 소스를 마우스 우클릭 하여 오디오를 음소거 하면 스카이프의 오디오만 사용할 수 있습니다.
토크쇼를 송출할 집 또는 스튜디오에 별개의 PC 또는 노트북 컴퓨터가 있을 경우, 해당 기기를 게스트 전용 서버로 지정하여 캡처보드를 사용하는 방식이나 NDI 를 사용하여 조금 더 간편하게 캡처 소스를 활용할 수도 있습니다. 한 대의 PC에서 원하지 않는 영상 이나 오디오가 발생할 경우 트러블슈팅이 복잡해질 수 있지만, 두 번째 컴퓨터를 사용할 시 문제가 생기면 해당 캡처용 컴퓨터만 손보면 되기 때문에 조금 더 편리한 진행이 될 수 있습니다.
캠 화면만 덩그러니 있을경우 약간 허전할 수 있으니 시청자들에게 간단한 화면 구성 꾸미기 정도는 보여줄 수 있는 성의가 필요하기도 합니다. 물론 어느정도 자본이 있다거나 내가 직접 그래픽 디자인 경험이 있다면 수월하게 해결 할 수 있는 부분이기도 합니다. 하지만 구할 수 있는 자원이 한정적이라면 엑스플릿 브로드캐스터 자체의 구성 몇가지만 익혀도 간편하게 해결할 수 있습니다.
일단 캠 화면만 사용한다 하더라도 배경화면이 중요합니다. 내 뒤에 멋진 가구와 반짝반짝 하는 장식들이 있다면 문제 없이 캠 화면의 배경으로 활용하실 수 있을겁니다. 하지만 방송 화면에 특정한 무늬나 색상, 그리고 문구를 사용하려면 기본적으로 엑스플릿 브로드캐스터의 일반 소스 중 색감 소스를 사용하여 원하는 크기와 색으로 결정한 뒤 텍스트 소스를 사용하여 MC의 이름이나 토크쇼의 주제 등을 방송 화면에 배치할 수 있습니다.
자연스럽게 이러한 소스들을 활용하다 보면 진행 도중에 텍스트를 업데이트 하거나 불필요할 시 숨기기 정도를 실시간으로 변경할 수 있게 될 것입니다. 나아가서는 키보드 단축키를 활용하거나 매크로를 사용하여 고급 연출까지 엑스플릿 브로드캐스터 자체에서 실행할 수 있습니다.
엑스플릿 브로드캐스터는 사용자들이 최소한의 노력으로 신속하게 원하는 녹화 또는 송출을 하도록 디자인 되어 있습니다. 일단 엑스플릿 계정을 만들어 로그인 한 뒤 원하는 인기 방송 플랫폼 (트위치, 유튜브 등) 을 선택할 수 있고 화면의 해상도, 품질 등을 설정 후 곧바로 인터넷을 통하여 송출, 컴퓨터에 직접 녹화를 실현할 수 있습니다.
인터넷 환경이 괜찮을 경우 2000 비트레이트에서 6000 비트레이트 사이로 설정한 뒤 720p, 1080p 화질과 60fps 의 부드러운 품질로 방송을 할 수 있습니다.
녹화의 경우 화면 구성이 간단하다면 일반적인 화질로 녹화해도 좋은 결과를 얻을 수 있으며 다채로운 화면 구성일 경우 고성능 설정을 하면 필요한 용량이 많아지는 대신 고품질 영상을 녹화할 수 있습니다. 녹화 전에는 반드시 하드디스크의 여분 용량을 확인해보세요.
실시간으로 토크쇼를 진행하게 되면 기획한 토크쇼 자체는 물론 화면에 나와 게스트가 어떻게 표현되었는지, 마이크 음질은 괜찮은지 등의 기술적인 부분도 확인할 줄 알아야 합니다. 원격으로 초대한 게스트 역시 이 부분이 궁금할 수 있으므로, 위에 언급한 화상 연결 프로그램 설정에서 엑스플릿 브로드캐스터를 주 카메라 소스로 지정한 다음에 이를 게스트에게 보여주면, 게스트 역시 안심하고 토크쇼를 진행할 수 있을겁니다. 이와 같이 엑스플릿 브로드캐스터를 가상 카메라로 여러가지 프로그램에 연동할 수 있습니다.
엑스플릿 브로드캐스터의 고급 설정중에 작업 환경을 스플릿 모드로 구성한다면 기존의 한 개의 미리보기 화면과는 달리 예시 화면과 활성화 화면 두 가지를 볼 수 있게 됩니다. 이 모드를 활용하면 특정 장면 송출하기 전에 미리 직접 확인해볼 수 있고 최종 확인 버튼을 눌러서 송출 하므로 조금더 안전하고 자연스러운 화면 전환을 할 수 있습니다. 이 설정은 해상도와 초당 프레임율을 설정할 수 있는 부분인 엑스플릿 브로드캐스터의 상단 우측에서 확인할 수 있습니다.
이 모든 과정은 다른 작업과 크게 다르지 않게 많은 연습이 필요로 할 것입니다. 곧 익숙해지기만 한다면 토크쇼 진행과 방송 연출을 동시에 자연스럽게 제어하실 수 있으리라 믿습니다. 모든것을 한번에 완벽하게 하려고 무리하는것 보다 차근차근 하나씩 배워가며 기술을 익힌다면 추후에는 모든게 자연스럽게 이루어질 수 있을겁니다.
While going live is easier than ever, learning how to livestream an online podcast can still be a bit difficult. Adding a guest, especially with video can be a bit tricky depending on the platform you’re trying to use. In this article, we’re going to discuss how to produce your own talk shows or podcasts, add some production values and make your life as a host and producer easier.
We’re going to be using XSplit Broadcaster to set all this up. For the host, they just need to set the microphone device and add their webcam to the main scene. This part is pretty easy in XSplit Broadcaster, for the audio head into the Tools drop down menu > settings > Audio and select the microphone you wish to use. For your webcam, in the Sources menu select Add Source > Devices > Video > and select the webcam you wish to use.
Adding a guest really depends on the software you’re planning to use. If you’re using something like Discord, Zoom or Hangouts you’ll need to use the screen capture feature in XSplit Broadcaster to get the video feed. This is found in the Sources menu again, Add Source > Screen Capture, and either Smart Selection or Window Capture and select the program. From here you can crop and move the source around. If you have multiple monitors, I recommend dedicating one monitor to place all your video calls and be sure to set them to full screen so you can get the highest resolution from the window capture.
The only outlier to this process is Skype. With Skype you can enable NDI output, which means you can pull the video feeds of your guests as an independent NDI source. This is easily done in Skype by going into the Settings > Calling > Advanced > Allow NDI Usage, then is XSplit Broadcaster go to the Source menu > Streams > NewTek NDI stream > select the caller you’re bringing in. Also, if you’re pulling all your system audio as your main output for the stream, be sure to mute the NDI source in XSplit Broadcaster or you’ll end up with doubled up audio, this is easily done by right-clicking on the video source and hitting the “mute” button.
One pro tip, if you have an additional laptop or PC to livestream your podcast, designate that as the call laptop. You can then capture the calls from the laptop via a capture card and use an audio mixer to adjust levels. This is a bit more expensive and you should only really do this if you’re planning to invest in your online talk show.
If you want to add some production elements, here’s where you’d call on a designer to make some graphic overlays to use, but if you don’t have access to such resources there are some tools within XSplit that can help!
First, if you need a background for your cameras or a bar for a lower third, you use the color matte source. This can be found in the XSplit Plugin Store which can be found in the Source menu by clicking “Find More Sources” and once installed it will be found in the General Widgets section of the Source menu. Adding a Text Source (again, in the sources menu) will let you add names and other info on top of a color matte source to make a lower third! You can then group these sources together and add source effects like animating in and out during the scene changes. Source effects can be found by right-clicking on a source and selecting the “Effects” tab. In these same settings, you can also add a border around your video feeds like your screen capture and webcam source.
Combine all this with presents and/or scene transitions so you can dynamically add in or out guests throughout the broadcast. One particularly useful element is having a countdown timer before the show starts. You can easily create one of these using the text source we used earlier and clicking enable custom scripts. You can use the clock script and either use the count or timer function to set up a timer.
Streaming with XSplit Broadcaster is pretty straightforward. Login to your platform of choice and use the setup wizard to configure your stream settings. For recording, you want to record in the highest quality and highest audio bitrate possible which can be changed by clicking on the Record drop down menu and clicking the cog symbol next to the recording profile you’re using. Enabling multitrack audio will allow you to adjust the audio levels later in your editing software of choice.
Setting up these multiple recording profiles can also be very useful when you’re recording a talk show. Basically, you can setup multiple recordings from different scenes, so for example you could set up a scene per camera source, and then when you come to edit the talk show later for YouTube you can zoom in or crop your guests based on what’s going on. You can find out more about multiple recording profiles right here.
One important final element for livestreaming a podcast or talk show is that your guests need to be able to see what’s going on! XSplit Broadcaster can act as a virtual camera which means you can display whatever the current live scene is as your camera output in programs like Skype or Zoom. This means that your guests can easily see when they’re live, when you’re on a break, or just what the focus of the stream is. It’s good to know you’re not on camera if you need to take a sip of your coffee!
Another important feature is split view mode. This mode will give you a preview scene that you can edit before pushing live. This is really helpful for cueing up your next segment or easily adding new elements smoothly before pushing them live. So, for example, did one of your guests just mention a new trend or video? You can find it and add it to your scene then push it live in a smooth and seamless way. This can be easily accessed in the top right corner drop down menu for the resolution > work space and selecting split mode.
As with most things practice makes perfect, so don’t be dissuaded if the first few shows don’t go off perfectly, we’re all at the mercy of the internet! Just stick with it and add production elements as time goes on, remember the content is what’s most important when you livestream your podcast or talk show!
It’s a tough time across the world right now, and those with careers in the performing arts are particularly limited at home. Social media is a great tool, but let’s face it, it’s the live experience your fans really want. Musicians are increasingly tech-savvy these days, as album production, mixing and mastering is largely software-based. What you might not know, however, is how best to live stream music. Whether you’re looking to set up a live-streamed concert or simply produce content about the creative process for your YouTube channel, here’s what you’re going to need.
In order to live stream music, you’re going to need everything you use in your home studio and a few key add-ons. As bands are likely to be contributing from separate rooms and, in some cases, separate countries, you’ll need to ensure that all members have the same basic set-up available to them before you can arrange this type of performance.
If you already use an audio interface to record, you’ll be familiar with the process. The Focusrite Scarlett 2i2 is ideal for solo artists and bands alike. It combines studio-quality sound and affordability, making it one of the most widely used audio interfaces around. If you have multiple instruments to mic up, you might need to hook up a mixer, but you can easily achieve a solid setup for a mic and guitar, two guitars, a drumkit, or another non-electric instrument. In terms of vocals, condenser (studio) mics are great if you have one, but a dynamic (live performance) mic will work in a pinch – and, of course, a pop shield is always a plus.
It might seem obvious, but a quality camera is almost as important as your audio set-up to live stream music. Your fans will be missing the gig scene almost as much as you are, so audio alone is not going to cut it. If you don’t have a top of the range webcam lying around, you can easily convert your phone into a high-quality webcam with XSplit Connect: Webcam. If you’re more of a shy performer, no problem. Live streaming your Ableton (or preferred Digital Audio Workspace) screen is going to give your fans something interesting to look at whilst they listen.
Back to the concert-goers. Though not essential, if you can access some, smart lighting rigs will add an extra touch of live performance authenticity. The Philips Wiz Connected Smart lights don’t need a hub and can be fully controlled via a phone app. There are some great tutorials available on YouTube, like this one by artist Aaron Rutten.
Achieving optimal broadcast quality to live stream music
Hopefully, you’ll have the required set-up in place at this point. Essentially, this is still a live performance, so though it might not feel as important as playing Glastonbury, remember that this is your chance to provide a high-quality alternative for your audience. I would strongly suggest plenty of rehearsals using this set-up, as it’s not always as cohesive as you might imagine, particularly with multiple musicians.
Once you’re good to go, XSplit Broadcaster is a great choice for your live event. You can stream in 4k 60 FPS (Frames Per Second) from multiple sources simultaneously to provide your fans with an experience as close to the real thing as possible. You can even preview scenes prior to the live broadcast to ensure everything is in place. While the show is underway, you can also get feedback and virtual cheers from your audience via your social media platform of choice, as XSplit Broadcaster supports all web-based alerts and widgets.
We’re living in crazy times but it is possible to set up a live-streamed concert for your fans from the comfort of your own home. This could be the well-needed boost that gets you through to your next live event and who knows how many more lives you might help to brighten in the process.
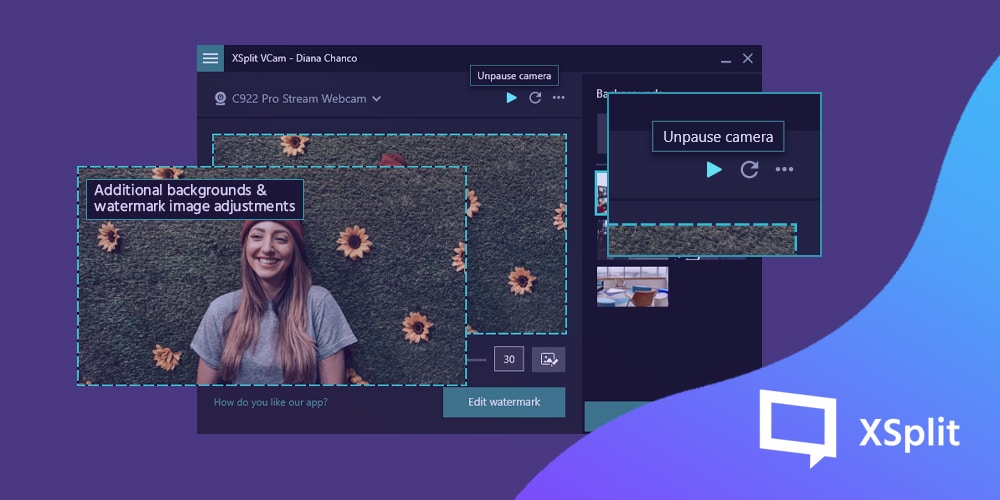
성공적인 XSplit VCam 2.0 출시에 이어 VCam 2.1은 조금 더 세밀한 부분을 개선하여 편의성을 높이는 중점으로 업데이트 되었습니다.
커스텀 워터마크
캠 화면 앞에 항상 표기될 커스텀 워터마크를 표기하는 기능입니다. VCam 2.1에서는 내가 원하는 이미지나 동영상을 워터마크로 설정할 수 있어서 조금 더 전문가 다운 연출을 하거나 창의력을 돋보이게 하여 프레젠테이션 발표, 유튜브 동영상으로 사용하기에도 편리합니다. 커스텀 워터마크에 대한 내용은 저희 커스텀 워터마크 블로그에서 확인 해보시기 바랍니다.
카메라 화면 일시정지
사람이라면 누구든지 휴식 기간이 필요합니다. 카메라가 켜진 상태로 자리를 비우면 부자연스러울 수 있으니 이를 해결하기 위해 이젠 사용자들이 카메라 화면을 일시정지 하도록 설정할 수 있습니다. 화장실을 가거나 중요한 전화를 받기 위해 잠시 자리를 비우게 되면, 현재 화상 연결에 참여하는 사람들이 볼 때는 인물이 없는 빈 화면만 보일 수 있으니 이를 조금 더 자연스럽게 해결하는 방법을 소개 해드립니다.
색도와 채도 변경
이제 캠 화면의 색도와 채도를 변경하여 화상 연결에 참여한 사람들과 비슷한 분위기를 맞출 수 있고 제한된 조명으로 인해 내 카메라 화면이 부자연스러울 경우 이를 자체적으로 조절하여 맞출 수 있습니다. 아래에 색도와 채도 변경 방법을 소개합니다.
기타 버그 픽스
다른 업데이트와 비슷하게 여러가지 부분을 개선하였고 이전 버전에서 알려진 피드백으로 인하여 다양한 부분의 기능과 성능을 개선하였습니다.
카메라 새로 고침 시 자동 노출 설정이 강제로 켜진 점
NVIDIA GeForce RTX 3070 그래픽 카드를 기본 하드웨어로 지정하여도 ‘자동’ 으로 바뀌던 점
카메라 장치가 감지되지 않을 시 카메라 설정에 접근하지 못하던 점
다수의 인터넷 연결이 유효한 컴퓨터에서 XSplit Connect: Webcam 사용시 재대로 컴퓨터 이름이 표기되지 않던 점
질문과 피드백을 잠겨주시고 싶으시다면 아래 댓글란에 남겨주시기 바랍니다. SNS로 소통하고 싶으실 경우 트위터 @xsplitkr 로 문의해주시거나 엑스플릿 공식 디스코드 주소 discord.gg/xsplit 에서 한국어 채팅방에 문의해주세요.