The Cheapest Live Streaming PC you can buy in 2021

This year crypto and the global chip shortage have dramatically inflated prices on PC components, specifically CPUs and GPUs. In fact, if you took a look at the video we published earlier this year about building a streaming PC, most of the builds we’ve looked at have doubled in price! These are the centerpieces of any new PC build and are especially important for determining the performance of your streaming PC. So what is an amazing streamer to do? Well, if you don’t mind some compromises, in this post we’re going to take a look at how you can snag yourself a cheap live streaming PC in 2021.

This is still a solid guide but these parts are more expensive than ever!

Criteria

One of the first things I’d like to point out is that no brands were involved in this, which is the case with all our content unless otherwise stated, the opinions here are purely subjective!Ed

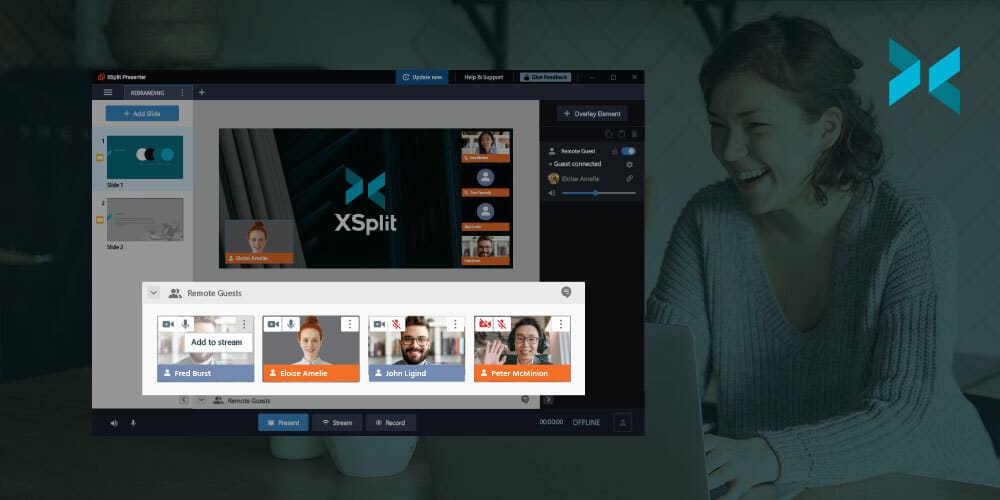
Our goal is to find a cheap live streaming PC that can encode a decent quality 60fps 1080p stream, on the GPU side, it will mean we lean toward NVIDIA since NVENC is such a powerful encoding tool for gaming and event streamers. On the CPU side, it’s basically dead even between Intel and AMD, all that matters is whichever gives the most cores at the cheapest price. Also, the focus will be people using these machines as dedicated streaming PCs rather than your primary gaming machine, so keep that in mind.

A Geforce RTX 2080 graphics card which you could get as part of a cheap live streaming PC build.
Photo by Christian Wiediger on Unsplash

Custom Build

First up, this one is for all the diehard PC enthusiasts that only build their own machines. Now, if you’re planning to game and stream on the same PC, this isn’t going to be the build for you. You either have to eat the scalper’s tax to get a decent GPU or take a look at some of the laptop options we’ll discuss later on. But if you’re just building a cheap living streaming PC dedicated purely to encoding, then you have some choices.

Basically, you’re going for the CPU that will give you the best value. So, you’ll have to go back a couple of generations and go for a 10th Gen i7 or a 1st GEN AMD Threadripper, both of which clock in under $300 USD. Get the thread ripper if you’ll have a lot of capture card inputs and go for the i7 if it will just be your streaming PC. Both will allow encoding a solid 1080p stream.

I’ve linked some potential builds below, but you can make this even cheaper if you can use any spare parts you may have available.

PC 1 (AMD): https://pcpartpicker.com/list/pNgNt8
PC 2 (Intel): https://pcpartpicker.com/list/WqBYsX

Pre-built

If you’re going to want the latest and greatest components for your streaming PC, well you’re going to have to go to the land of pre-builds. These are the only options for getting access to the latest AMD and NVIDIA GPUS for reasonable prices. For some of the more boutique stores, you’re likely going to get the best prices from iBUYPOWER and Cyberpower, Linus Tech Tips actually did an amazing video where they go through the buying experience from different PC manufacturers.

Of the big boys like Dell, HP, Lenovo, Asus, etc it really depends on your region. I have to say that going back to Linus’ video, I would be inclined to give HP a try, especially their Omen series. They have 10th gen Intel PCs with 20 series GPUs that are great starting points for any game and event streamers looking for a cheap live streaming PC.

A gaming PC that could be a cheap live streaming PC is on a desk next to a monitor, keyboard, microphone and a gaming laptop.
Photo by Andre Tan on Unsplash

Laptops

Finally, chances are one of the best places you’ll find a deal on streaming PCs are laptops. Mainly because retailers constantly have to clear out supplies every year to make space for all the new toys that get announced at CES, Computex, and the like. So for a laptop, we’re primarily looking for two things, at least a 1660 GPU and thunderbolt ports.

MSI makes great gaming laptops with both, and it’s a thin and light laptop which means you’ll be able to take it with you to events or just keep it tucked away at home. The 1660 means you’ll have access to the best version of NVENC and the thunderbolt port means you can add an enclosure to install multiple capture cards.

Now if for some reason you need a gaming monster, Gigabyte’s aero line is usually a good bet, but with the 30 series cards one important thing to note is that the cards will have different wattages which will affect their performance, so be sure to check that if that is important to you for gaming.

Finally, there’s always a ton of refurbished laptops on the larger manufacturer’s sites, so be sure to check these sections as you can get an amazing deal on a like-new laptop.

We hope we have saved you a few bucks and got you up and streaming with this blog, but be sure to let us know the cheap live streaming setups you’ve made in the comments!

What To Look For In An Affordable Gaming Mouse in 2021

Having a dedicated gaming mouse can make all the difference when playing and streaming games but finding a cheap one can be tough. They often feature more buttons than a standard mouse, allowing for full control customization. They also tend to be more accurate and reactive when you need to make those precision shots. If you’re engaging in long gaming sessions through the night, then you might also want to consider how ergonomic your mouse is. Let’s have a look at what features you can expect in an affordable gaming mouse in 2021.

How many buttons do you need?

Extra mouse buttons allow for quicker input, which can make the difference between life and death in a gaming situation. In addition to the two standard buttons, an affordable gaming mouse will hopefully offer some side buttons or even trigger buttons. The Razer Basilisk X HyperSpeed, for example, features six buttons, which can be customized further by creating macros to offer secondary use functionality.

For MMO players, check out the Redragon M908 Impact. You’re unlikely to find another cheap gaming mouse with 18 programmable buttons plus LED backlighting – it’s perfect for casting different spells or activating a vast range of abilities in a MOBA.

An affordable Razer mouse on a desk next to a keyboard with their green RGB lights on.
Photo by Zany Jadraque on Unsplash

The comfort of ergonomics

If you plan on spending long sessions streaming or gaming, you need an affordable gaming mouse that’s comfortable in your hand. The Razer Basilisk V2 has a longer, angular shape, textured rubber grip, and thumb rest that allow for comfortable use over extended periods.

The other option you could look at is a vertical mouse like the DELUX M618 Plus. It looks like a hybrid between a joystick and a regular mouse. The vertical form of the mouse might take some getting used to, but it’s designed to fit your natural grip better. Its unusual shape should help prevent hand fatigue and reduce muscular strain.

Wired or wireless?

When you’re streaming games, it’s highly recommended that you use a wired Ethernet cable rather than rely on Wi-Fi, which can drop and affect the quality of your stream. However, the same rule does not necessarily apply to wireless mice.

The wireless Corsair Harpoon, for instance, is a relatively affordable gaming mouse, especially from this high-end brand, and removes the need for wires cluttering your desk. It comes packed with Corsair’s Slipstream wireless technology, which means you could reach latency speeds of under 1ms. The battery will last for 30 hours in Slipstream mode or 60 hours if you switch to the power-saving Bluetooth mode. For a wireless mouse with longer battery life, check out the aforementioned Razer Basilisk X HyperSpeed, which offers ultra-fast wireless performance for up to 285 hours on a single charge.

Two affordable gaming mice sat next to eachother on a desk, one wired and one wireless.
Photo by Antonio Manaligod on Unsplash

Pinpoint accuracy for FPS sniper shots

For some games, the DPI of your mouse may not matter considerably, but for FPS games like the Counter-Strike or Call of Duty series, you need pinpoint accuracy to pull off game-winning shots. The Corsair Sabre RBG Pro has been designed and tested by esport professionals for this very purpose, with an 18,000 DPI optical sensor and 450 IPS tracking at up to 50G acceleration.

An alternative is the aforementioned ergonomic Razer Basilisk V2, with a 20,000 DPI optical sensor designed to detect the slightest movement. Similarly, the wireless Basilisk X HyperSpeed features a 5G advanced optical sensor with 16,000 DPI to track your every move with ultra-fine precision.

Finding the right affordable gaming mouse can reduce your input lag and make for better streams thanks to some better gaming skills on display. You also want to make sure you have a gaming keyboard that is just as durable and as fast as your mouse, something we will cover in a future post so be sure to head back to the blog for more on that! What mouse do you use? Be sure to let us know your favorite gaming mouse in the comments below!

Adjusting to the new normal, working from home, and staying safe.

2020 caught all of us by surprise, our personal and professional lives ultimately changed, not because we wanted them to but because it was necessary. Companies that rely on employees to be in-office have slowly transitioned into working from home, although not all operations can afford to have 100% of their employees away from their workplace, the majority had to make the move for the health and safety of not only their employees but everyone they have to interact with personally – vendors, clients, etc. While businesses should go on, our lives and health took the utmost priority. Adjusting to the new normal wasn’t going to be easy but we knew we had to do the work!

A stencil of the smiley face emoji with "stay safe" written underneath it on the floor  is part of adjusting to the new normal.
Photo by Nick Fewings on Unsplash

The challenge of adjusting to the new normal

It was truly a challenging time, it seemed as if we had to make a total shift on how we normally do things. Everything and everyone has stopped to take a look and listen to what we can do to help. There was a need to reevaluate priorities without compromising our people and productivity.

As our employees are based in multiple locations across the globe, and the difference in the implementation of local restrictions and health guidelines, as well as the lockdowns taking place – our management, requested staff to efficiently move their work to their homes. With urgency, our teams strategized how we can smoothly transition our work fully remotely without disrupting core tasks. Necessary office equipment was sent to employees’ homes equipping everyone with the tools required for their tasks. While some require more time in setting up, we also have others who have designated home spaces ready for the remote work we’re set to do in the coming weeks, even months, and now for more than a year and a half.

We’ve done remote work to some extent, so adjusting to the new normal wasn’t too jarring for some, as we have team members who are stationed from different countries across the globe. For any business, it is a bold move to shift the entirety of operations to fully remote. It poses a lot of questions about how we can manage our teams better, how to measure their productivity and focus on what matters most.

Someone moving their office equipment in to their home as a part of adjusting to the new normal.
Photo by HiveBoxx on Unsplash

How XSplit adapted

At first, there was uncertainty on how we could overcome this obstacle. It must’ve been a management nightmare, not knowing how to make sure that people are doing what they’re supposed to and keeping track of their productivity. One thing that XSplit can be proud of is how much trust the management has put in its employees, letting them manage their time while exhibiting the same productivity during these past months.

Setting up face-to-face meetings has turned into video conferences, emails, and digital calendars. It was during this process we came up with XSplit Presenter, something we discussed here. Meeting our colleagues at the pantry for some coffee and a little chat during a break, or some celebratory pizza and donuts from our coworkers, these have now gone remote as well. Our big end-of-month meetings see our team get food and drinks delivered to their homes!

Our priorities have changed too, more than anything – health and our people’s safety take the utmost importance. Our people are our greatest asset, and taking good care of them is the most important aspect at this time.

From shifting our workplace from our offices in our HQ to a small space in our homes, converting our unused spaces into home offices where we can work was a part of adjusting to the new normal. We were granted a small benefit to have our home spaces decked with the necessary equipment and tools for an efficient work environment. We had our desktops, laptops, and other office equipment shipped to our homes, making sure that nobody is ill-equipped to function as they did when we were still stationed in our office.

We can #workfromanywhere, we have teammates located from across the globe. What we are most proud of is the openness in communication among our peers. Yes, meetings are still inevitable and are much needed since we’re not able to speak to each other face to face, but a simple catch-up call in a week with the team can really help keep us all feeling like a team.

Kudos to our People and Culture team too! They are the go-to people when you need help with anything, they make sure that everyone is well taken care of and they also make sure to make our end-of-the-month meetings more special and engaging with mini-games and cute prizes, which has made adjusting to the new normal easier!

Someone working from home on a laptop at a desk adjusting to the new normal.
Photo by Corinne Kutz on Unsplash

Our work from home set up

Like most companies, we have mostly fully transitioned our operations into our homes. We can safely say that the transition was abrupt but a necessary part of adjusting to the new normal. Could we say that we have fully adapted to our new operating environment? Maybe, maybe not. We can be sure to say that we are continuing to adapt as needed. The challenges and situations are temporary but the learnings and experiences we’ve received have made us stronger, more productive, and more optimistic for the future.

Zoom calls from home, a big part of adjusting to the new normal.
Photo by Chris Montgomery on Unsplash


The Best Budget Mics for Online Presentations and Zoom Calls!

It looks like working from home will be here for a while for some of us, and even those of us returning to the office are working in a hybrid way. You’ve managed plenty of Zoom calls, but it’s becoming clear (or rather, less clear) that your laptop mic isn’t up to the job. If you’re going to be attending more remote meetings, it’s time to invest in a dedicated microphone. However, this doesn’t need to be a massive outlay, and we’ll take a look at the best budget mic options, which are all easy to get hold of from retailers like Amazon.

Best for convenience: USB mics

A USB mic is a quick and simple way of improving your audio quality, and the Plug & Play type couldn’t be easier. If you have a smaller workstation or will be Zooming on the move, you can get small and neat models like the TKGOU Ture Plug and Play Home Studio USB mic. This tidy little mic can be cheaply purchased on Amazon and delivers improved sound quality for this very small outlay. It’s also sturdier than it looks, being made from metal and heavy plastic. It’s compatible with Macs or PCs. It’s pretty basic, function-wise, but does have that all-important mute button, something we love to see on the best budget mics.

A person sits at a desk with a simple USB mic connected to a boom arm using a PC and enjoying one of the best budget mics.
Photo by ConvertKit on Unsplash

Best for vocal quality: condenser mics

Condenser mics are the best option for sound quality, which is why they’re often used for studio vocals. They cut down on ambient noise, so are ideal for Zoom calls with background distractions (working-from-home parents, take note). The Blue Yeti is often held up as the gold standard for a conferencing mic but is on the higher end of the price scale for the best budget mics. For half the price, try Blue’s Snowball mic, which delivers crystal-clear vocals and has a fab retro design. Skype has certified it as a great mic for conferencing platforms use, so you know it’s a good option. You can also get conference condenser mics: try the MTFY Conference Microphone, which offers omnidirectional sound for a very small sum.

The consensus for the best Zoom, Teams, or Skype mic seems to be the Yeti. However, we reckon that the best budget mic is the Blue Snowball, and those meeting experts at Business Insider agree with us. Of course, a lot depends on what you’re the most comfortable using, and many people do prefer a headset design.

A headset microphone sat on a desk next to a laptop is one of the best budget mics.
Photo by Petr Macháček on Unsplash

Easiest to use: headsets

Headsets aren’t just for call centers or gamers. They’re great for remote meetings because they remove background noise. You’re completely immersed in the meeting, and you’ll be able to hear your colleagues much more clearly if you’re in a busy environment, which no doubt makes one of the best budget mics. They save space on your desk during the call, helping it look and feel less cluttered, too.

There are plenty of headsets out there, such as the Nigecue PC USB Noise Cancelling Headset, which is a great value mic and ideal for reducing noise disruptions. It’s also comfortable to wear during longer calls. The USB charger is always a bonus as well.

We hope this has helped guide you in the right direction for crisper vocals and the best budget mic. Here’s a look at other set-up upgrades you might need for your home-based workstation.

방송 시작후에 꼭 해야할 것들

드디어 8시간짜리 방송을 끝마쳤습니다. 마지막에 구독해주신 분들과 팔로워분들께 감사 인사를 드리고 방송을 종료했습니다. 이제 일이 다 끝난 것 처럼 느껴지겠지만, 사실은 아직 할 것들이 남아있습니다. 방송이 마무리 된 후에도 방송의 성장에 도움이 될 수 있는 것들에 대해서 알아보도록 하겠습니다.

클립 저장하기

많은 사람들이 가장 선호하는 홍보 방법중 하나인 클립 저장하기 입니다. 방송 도중에 재미있던 상황이나 기억하고 싶은 장면들은 짧은 클립으로 구성하여 따로 저장해두는 것 입니다. 해당 클립을 유튜브, 인스타그램, 트위터같은 SNS 에 공유하거나 다른 방송 시간때 다시 틀어서 시청자들과 함께 감상할 수도 있습니다. 클립들을 직접 다운로드하여 다음에 사용할 영상 편집에 활용할 수도 있습니다.

클립을 저장해두면 마치 일기장 같이 작용하여 예전 방송의 분위기를 다시 확인해볼 수 있습니다. 뭔가 기록을 남겨야 하지만 마땅한 방법이 없을땐 클립 저장하는 것 만큼 효과적인 것도 없습니다. 인터넷이 활발하고 당연한 시기인 만큼, 재미있는 장면들이 한번 유행이 되면 여러 유입 시청자들도 확보할 수 있습니다.

이전 방송 저장하기

트위치, 유튜브, 페이스북 같은 방송 플랫폼에서는 ‘이전 방송’ 영상들을 (제한적으로) 자동 저장하는 기능이 있습니다. 무조건 모든 영상들이 무한적으로 존재하지 못하므로, 특별이 기억나는 방송은 직접 다운로드 하여 컴퓨터에 저장해두는 것이 바람직합니다. 만약 지금 방송하고 있는 플랫폼이 영상을 자동으로 저장해주는 기능이 없다면, 방송 프로그램에서 송출과 동시에 녹화를 진행하는 방법도 있으니 참고하시기 바랍니다.

다행히 엑스플릿 브로드캐스터에서는 영상 녹화시 멀티트랙 오디오가 적용되어 있어서, 당시 녹화했던 영상에 게임, 마이크, 음악 등이 모두 섞여있을 때 이를 따로 분리하여 따로 편집이 가능합니다. 특정 음악이 저작권 문제가 있거나, 게임 오디오에서 반드시 들어야 하는 구간이 있으면 문제없이 따로 분리하여 편집할 수 있습니다.

그리고 오래 전 방송 영상들을 유튜브 같은 곳에 업로드 하려면 해당 방송의 분위기를 잘 전달해줄 수 있는 썸네일을 만들어서 부착하는 것도 시청자들이나 본인에게 더 명확한 방송의 주제거리를 파악할 수 있게 도와줄 수 있습니다.

커뮤니티 관리

디스코드같은 채팅 프로그램이나 커뮤니티 웹사이트 및 온라인 카페같은 플랫폼을 이용하여 시청자들과 소통하는 공간을 관리하는 것도 중요합니다. 시청자들이 시간내어서 내 방송을 시청해주는 것에 대한 감사의 인사를 전할수도 있고 방송을 쉬어야 한다면 이에 해당하는 공지사항을 발표할 수도 있습니다. 현재 유행하는 게임에 대해 알아볼 수도 있으며 여러가지 자료를 모아서 시청자들이 참여하는 컨텐츠도 구상할 수 있게 됩니다.

다음 방송 시간에는 어떤 컨텐츠를 방송할 것인지 미리 시간표를 공유할 수도 있습니다. 시간표를 공유하면서 피드백도 실시간으로 주고 받을 수 있으며 다양한 아이디어를 방송으로 구현할 수도 있습니다. 여러가지 의견을 모아서 더욱 재미있고 알찬 방송 컨텐츠를 만드는 것에는 시청자들이 도움이 굉장한 효력을 증명할 수 있는 공간이기도 합니다.

마지막으로 이메일과 쪽지, DM 등을 확인하여 참고할 사항 및 불필요한 요청들은 모두 삭제하거나 예의 바르게 해결하는 방법도 배워보는 시간입니다. 모든 DM들에 답변할 필요는 없으며 판단은 본인이 확고한 신념과 철학을 가지고 관리하는 것이 중요합니다.

A person is sat at a kitchen table making notes in a notebook, something you should do after you stream.
Photo by ConvertKit on Unsplash

통계

현재 방송하는 플랫폼에서 방송의 시간대, 시청자 유입 및 실시간 시청자 수 등을 확인할 수 있는 도구가 있다면 반드시 확인해보는 습관을 들이는 것이 좋습니다. 데이터를 분석하는 것 처럼 특정 시간대에 어떤 게임이나 컨텐츠를 진행하면 시청자들이 더 유입되는지, 유입의 경로 등을 파악할 수 있습니다. 굳이 매일 확인하지는 않아도 지속적으로 확인하여 약점을 개선하고 실험적인 도전도 해볼 수 있는 기회를 만들 수있습니다.

항상 긍정적인 통계를 바랄수는 없지만 통계는 노력과 경험의 바탕이 되어 이를 잘 관리한다면 방송 뿐만 아니라 교육적인 목적으로도 활용될 수 있습니다. 다른 취미 활동이나 업무를 진행할 때도 통계의 영향이 더욱 생산적인 결과를 얻게 해줄 수 있는 점을 깨닫게 될 것입니다.

휴식

가장 중요한 활동은 바로 휴식입니다. 휴식도 과정의 일부이며 결과물에 가장 직접적인 영향을 주는 활동이기도 합니다. 편히 잠들 수 있는 환경이 주어지면 건강하게 기상할 수 있으며 당일 분위기와 컨디션에 모두 영향을 줍니다. 수면을 하지 않더라도 스트레스를 줄일 수 있는 운동이나 독서, 영화 감상등이 지속적인 인터넷 방송을 할 수 있는 원동력이 될 수도 있습니다. 너무 열심히 일만 하며 앞으로 달려가면 반드시 전력이 방전되는 때가 오게 됩니다. 컨디션을 유지시켜주는 체력은 사람마다 다르지만, 한 번 방전되면 다시 회복하는데에만 시간이 낭비될 수 있으니 뭐든지 적당히 조절해가며 하는 것이 중요합니다.

여러분들이 현재 실행하고 있는 휴식 방법이 있다면 댓글로 공유해주세요. 자신만의 노하우가 있다면 같은 방송을 하는 친구들에게 공유해주면 모두가 기뻐할 것입니다.

Stream Better: Improve your microphone tone for that professional sound!

When it comes to upgrading your streaming equipment, we’ve argued a few times that audio is the first thing to pay attention to. Clarity of voice to most viewers can be more important than the quality of a webcam. Once you have a decent mic, however, you might be wondering how you can get that deep, boomy, bassy-sounding microphone tone that you hear in podcasts, talk radio, and basically any spoken word on the internet. Content creators have been replicating it for a little while now so we’re going to take a look at how you can recreate this professional microphone sound.

Placement

The most important thing straight off the bat for a professional microphone sound is microphone placement. The closer the microphone is to your mouth, the better it will pick up your voice and not your room. Many microphones have what is known as the proximity effect, which means the closer the microphone is, the greater the amount of lower frequencies (bassy sounds) are picked up. Some microphones like the EV RE-20 actually have tech built in to limit this effect, but basically, if you want to sound like Barry White, you gotta get close to that mic.

One important thing to consider with placement is how you will mount your mic. Articulating arms are pretty common, but can get pricey. If you have desk space, a simple microphone stand is always a good option. Get one with a nice weighted base that can go on your desk, this will minimize the amount of noise made if you’re using a keyboard at the same time.

A content creator sat at a desk with headphones on talking in to a Shure microphone connected to a mic stand and a laptop for professional microphone sound.
Photo by Soundtrap on Unsplash

Type of microphone

As I mentioned, different microphones have their own unique purposes and you should pick the correct microphone for your use case rather than trying to get a microphone that can do everything. That being said, the gold standard mic is the Shure SM7B. Pretty much any podcast and most streamers these days are using this mic for professional microphone sound. It doesn’t pick up too much background noise and the proximity effect will give you those quiet storm vibes

If you don’t have the budget, the Shure MV7 is basically the cheaper version and functionally the same with the addition being a USB mic. Other devices that work well are the Rode Podcaster and the classic Shure SM58. Types of microphones for content creators is something we’ve discussed here before so be sure to check out this handy guide!

EQ and Compressor

Now you’ve got the right microphone and it’s placed in the perfect spot, but you’re just not getting the professional microphone sound that you want? Well, now it’s time to add some EQ to the mix. XSplit Broadcaster has DSP plugins built-in and one of them is the EQ. Basically, EQs lets you target and boost or lower certain frequencies. Now everyone’s voice is different which means you will have to experiment to find the right frequency, but generally speaking around the 100-200 range is what you want to boost if you want more bass or presence. If you’re looking for more clarity, try the 4000-6000 range as well.

Setting up the EQ in XSplit Broadcaster is simple, simply head to Tools and click Audio Effects, which will open up a host of settings you can tweak. Applying some compression can help achieve a certain tone as well. As we’ve said, all voices are different so feel free to experiment and find that tone you want!

Now one thing we omitted is hardware compressors and EQ. That’s a bit outside the scope of this article, but the most important part is to get the right mic and get it as close as possible. This will really be a big factor in getting that professional microphone sound. If hardware compressors are something you’d like us to discuss, however, do let us know in the comments below and we can get a post out about them!

How Better Online Presentations Can Help You Stand Out

Whether you’re new to working from home or a seasoned professional, it can be difficult to host an online presentation that both engages your audience and stands out from all the others they’ve sat through that week. The good news is that there are plenty of ways you can enhance your online presence to ensure you’re giving your audience a quality and memorable experience. In this blog, we will offer some tips to help you to create the best presentations possible.

Setting the scene

It doesn’t matter who your audience is, in order to offer them a quality online presentation experience, there are a few rules that should be applied as you set up. And, though you’ll probably want to step up your professionalism a notch for presenting to clients as opposed to colleagues, it’s important to maintain some basic standards at all times.

Background photographs and mess may be acceptable when you video chat with your parents and friends but your colleagues are likely to find these to be distracting. Solve this common problem by positioning your camera towards a plain clutter-free wall or adding a virtual background. You can even use XSplit Presenter to add your own green screen. This allows you to add your webcam on top of the presentation, enabling you to connect with your audience eye to eye, whilst you talk through your slides.

Another obvious, but incredibly important, point is to ensure you have the most stable internet connection possible. The most outstanding online presentation can quickly lose an audience when the connection drops. You may manage to continue successfully following an outage, but it’s possible that you’ll be flustered and have lost your momentum. If your ethernet cable is long enough, plugging your computer directly into the router is your best option. It’s a minor hassle for much better end results. You could also look at wired solutions, like those from TP Link that use your in-home wiring to send a wired internet connection from your router to your PC, saving on the long wire going upstairs!

A man sat comfortably on his sofa is making a better online presentation with XSplit Presenter on their laptop.
Photo by Windows on Unsplash

Hold their focus

The best presentations are those that are delivered with enthusiasm, integrity, and direction. Writing things out word for word can work for some people, but the last thing you want to do is give the impression that you are reading from a script. Having a list of key points available can be more helpful, as it provides structure and keeps you on track to deliver your message, but the words will be spontaneous. It can be a good idea to think of it as an audition (in some ways, it might be, as many people will need to give online presentations as part of a job interview). This can help you to breathe life into your subject, even if it isn’t something particularly groundbreaking.

That covers enthusiasm but what about direction? Though many presentations can benefit from having a number of sources of information on screen at a time, this may mean that your audience could be looking at ‘graph A’ when you’re discussing ‘graph B’. An excellent remedy to this is XSplit Presenter‘s virtual pointer. This customizable tool allows you to direct the focus of your audience to where you want it by annotating over your slides, as you go. This way your audience will find it easier to follow the intended flow.

Variety is the spice of a good presentation

Presentations can tend to be boring when they focus too heavily on one aspect of a particular subject. People lose focus when there’s too much talking with no visual aids. On the other hand, too many Google slides stuffed full of statistics can be a tough watch. Whilst balance is the key, in order to really stand out from the crowd, the trick is to offer something just a little bit different.

With XSplit Presenter there are so many options available, from incorporating videos and audio, scene transitions, and adding single application windows without the need to share your screen entirely. You can choose to appear alongside or over the top of your online presentation either throughout the duration or at key points. You retain full control of each of the different media aspects involved in real-time, allowing you to adjust volumes or pause videos, if necessary.

A person sat in a chair in their home using a laptop giving a better online presentation with XSplit Presenter.
Photo by Windows on Unsplash

Encourage audience participation

Another key way to engage with and retain the attention of your audience throughout your presentation is to involve them. Talking endlessly at your audience is never a good thing and injecting a little conversation helps them to feel involved. Provide an opportunity to ask questions or try having a few questions planned to ask instead. Nobody likes to be put on the spot, but providing an open-ended platform for anyone who wishes to participate can be beneficial for all.

XSplit Presenter allows you to switch easily between remote guests’ and the host’s webcams so that those participating in the conversation can be both seen and heard. You could even plan to have guest speakers present a section, perhaps an area that they specialize in. You can easily add additional presenters part-way through via the integrations for Skype or similar NDIs, so if you only need guest speakers for a short time, they can be added at the appropriate time instead of waiting around for their slot. Both audience and guest participation can enhance how well your presentation is received, adding variety, as well as inclusivity.

Outside of the technical changes, there are a number of other improvements you can make to ensure your presentation stands out in all the right ways, from more detailed planning and organization to rehearsing and recording (something you can do with XSplit Presenter!) your ‘performance’ beforehand. You can read more great presentation tips here.

Stream Better: Creating a narrative while streaming

In the early days of streaming, it was miraculous enough just to get a stream online and stable. Nowadays, streaming is accessible to everyone, you can use your smartphone, any PC, or even a console. Streaming is easier than ever and this means there are more people streaming than ever, so while having a technically sound stream used to be good enough to start building an audience, there’s more competition than ever. So how do you stand out in a crowded market? Well, one solution we’ll talk about, is building a narrative!

What is “building a narrative”?

Well, it’s just a fancy way of saying you need to build a story with your stream or a “narrative hook” which is a term used to describe the key point of interest in a story. And like all stories, there needs to be a beginning, middle, and end. And like most stories, there needs to be a hero, which is you the streamer, and a goal that you will achieve. So what are some examples of streams with a narrative?

One example is speed-running streams. The beginning is the speedrunner practicing their runs, the middle is attempting the runs and the end is achieving a new personal best or record. The overarching goal is to get the world record for that game. But speedrunning a game takes immense amounts of practice and what if you’re not a hardcore gamer or your content isn’t focused on gaming at all?

If you’re planning to do IRL streaming, it’s good to give your streams a purpose for that day. It can be useful to follow cues from vloggers who generally focus their videos on one aspect of their daily life. So, your IRL stream for that day can be about achieving a particular goal, such as cooking your first pizza, which means your 3 act structure is getting the ingredients, cooking the pizza, and eating the food.

This also helps engage viewers who may join your stream late, they can quickly catch up on what part of your adventure you are on. I feel this is why battle royale games have been so popular for streaming, each match basically tells a different story. The goal is to survive, the beginning is looting, the middle is surviving until the final circle and the end is if you win or not.

An IRL streamer using an expensive camera out on the streets connected to a backpack streaming setup is creating a narrative in order to get better at streaming.
Photo by KAL VISUALS on Unsplash

The Long Story

What we’ve discussed so far is basically for single streams. It can be quite hard to come up with creative ideas for each and every stream you do. So what you can do is create storylines that will last over a period of time. Fundraising works really well with this. Whether it’s for personal benefit or charity, having a fundraising goal is a great way to get people to watch and support you.

Subathons are a great example of this content. The goal is how long can the streamer keep broadcasting. Other forms of this content are long-form art projects, like woodworking or cosplay. It can also be achieving a goal, like in games with global rankings, it can be your race to be #1 in the rankings or trying to achieve the highest gamerscore possible on Xbox live. Maybe you have a backlog of games you wished you beat when you were a kid and couldn’t afford. Maybe you want to start a podcast revisiting the albums of your youth or old cartoons.

One important note is if you are planning long-form or serial content, make sure you do a good job archiving as well so new viewers can get up to speed quickly. One of my favorite pieces of long-form content was video game championship wrestling, which emulated WWE-style storylines with video game characters. The community built a whole wiki page around the federation so new and lapsed viewers could revisit and catch up on storylines.

This can also be a great way to approach playing a narrative game, for example, Chris here at XSplit once streamed LA Noire, which already has a narrative flowing through but added the idea that his character was “the backward detective”, which essentially meant walking/driving backward at all times. This made the journey of Cole Phelps, the Backwards Detective, all the more exciting as parts of the game were completed.

A streamer sat at a PC desk with a gaming headset on streaming themselves playing a game, using tips to get better at streaming.
Photo by Sean Do on Unsplash

The Never-Ending Story

Now I know I said every story has a beginning, middle, and end, but sometimes there doesn’t have to be an end. Sometimes there’s content that can just go on forever, and it’s more about the interactions the character has, rather than a storyline.

A good example of this is GTA RP, where the player develops the character and works on inserting them into a variety of situations and interactions with other role players. VR Chat works in the same manner as well. Create your avatar, explore some worlds and talk with other characters.

Also, something like a D&D stream (something we have discussed with Felicia Day and Tanya De Pass) can take this route where while you tell tales with beginnings, middles and ends the characters themselves can go from campaign to campaign. The audience gets to know them better and past events will always help shape future ones so it’s a great thing to consider if you want to build your narrative across streams.

Let the audience tell the story

Now the beauty of streaming is that it is interactive, unlike movies or novels, the audience can change the story and the onus is on the streamer to give the audience these tools. Some of these are staples of streaming, like sub-goals and donation rewards, if you haven’t set these up, then you should as you’re just tossing away potential income for your stream. All you need to do is add a web URL link as a source in XSplit Broadcaster. (Simply get the web URL from the service you’re using to get donations, set up alerts and ctrl+v that link into Broadcaster!)

Other things to do are adding lists of activities as a stream overlay or in your stream title. One good way to encourage engagement is to have a poll after you complete an activity to ask the audience what you will do next. Now you probably don’t want to make all aspects of your life a choose your own adventure type ordeal, but it’s going to give the viewers some type of influence into what they are watching.

Basically, you should always experiment with the format of your content. What have you found successful as a narrative device for your streams? Let us know in the comment section and if there’s anything else you would like us to discuss, that’s the place to do it!

XSplit Presenter is now available in public beta!

In the last year, we’ve seen a radical shift in the way we work together and here at XSplit and we thought, using the knowledge we’ve gained over the last ten years, that we could make the way we meet and present information better. We found that giving presentations with everything scattered over a number of windows, from our Google Slides, the webpage we wanted to show, and a YouTube video that demonstrates our point didn’t make things run smoothly. We were asking “can you see my screen?” way too often for our liking! 

On top of that, we found having to choose between seeing our face as we gave a presentation, or seeing our slides, was removing either the information or the personal connection that can keep people engaged and connected with what we were saying.

Introducing XSplit Presenter

This is where we got the inspiration for XSplit Presenter, letting you add personality, flair, and interactivity to your presentations, pitches, and meetings. What we wanted to do was pull all your sources into one, secure program and let you add videos, websites, and your webcam (of course, using our VCam background removal tech) all in one place.

Full Integration with services you already know and use

Something we knew we wanted was integration with the services we are already using, so you’ll find XSplit Presenter works with Google Slides, Microsoft Powerpoint, or even a PDF file! It also works as a virtual camera in all your favorite video call platforms like Zoom, Teams, and Skype, so no more worries about someone seeing a Messenger window pop up during your meetings as you choose what gets shared, not the share screen button!

Engage and Interact with your audience

Another thing we found we needed was the ability to address questions easily as they came up, so we built in real-time annotations and highlighting with our virtual pointer. Not only that, but you can easily pull in more sources, or interact with a webpage live inside the presentation so again, nobody needs to see your desktop and you don’t have to break the flow of the conversation. Want to show your product page? Just click on it!

Multiple speaker support

Giving a group presentation? Using NDI sources from software like Skype you can add multiple remote speakers and seamlessly transition to them as the presentation progresses, even integrating them into your slides like your own camera.

We’re going to be adding more and more features, including remote collaboration, so we’re excited to go on this journey with you! XSplit Presenter is available to download and try for free during the open beta period so download it and try it out for yourself today!

We’d also love to hear your feedback, you can reach us here in the comments, on our social channels @xsplit, or on our Discord server.

엑스플릿 프레젠터를 소개합니다!

XSplit Presenter는 엑스플릿 영상 제작 프로그램중 새롭게 제작된 소프트웨어 입니다. 발표용 프레젠테이션을 더욱 다채롭게 구성하고 전문가스러운 면모를 추구할 수 있도록 도와줍니다. 요즘 시대에 꼭 필요한 프레젠테이션 발표를 온라인 또는 대면시 제출용으로 활용하는 방법을 알려드리겠습니다.

일단 엑스플릿 프레젠터를 다운로드 후 설치를 합니다. 첫 실행시 새로운 프레젠테이션을 제작할건지 아니면 기존에 있는 프레젠테이션 파일을 연동할 것인지 물어보게 됩니다.

The main screen for XSplit Presenter with an arrow pointing to the "connect presentation" button.

파워포인트, 구글 슬라이드, PDF 형식의 파일들을 연동할 수 있습니다. 파일 탐색기를 열어서 원하는 프레젠테이션이 있는 경로를 탐색 후 선택하면 됩니다.

XSplit Presenter showing you the options avaliable of what you can import.

구글 슬라이드 프레젠테이션을 연동하려면, 해당 구글 계정으로 접속 후 원하는 프레젠테이션을 ‘모두에게 공유’ 설정으로 변경해야 합니다. 브라우저 우측 상단에 있는 공유 (Share) 버튼을 눌러 ‘일부에게만’, 또는 ‘비공개’ 상태를 ‘모두에게’로 변경해야 합니다. 그 후 정해진 URL 주소를 엑스플릿 프레젠테로 불러오면 됩니다.

Inside Google Slides and the Share button is highlighed, you will need to click this to get your link.
Showing the sharing options in Google Slides make sure you click "share with anyone".

원하는 슬라이드가 적용되었다면 추가로 슬라이드를 제작할 수 있습니다. ‘슬라이드 추가’버튼을 눌러서 시작해보세요.

Back in XSplit Presenter now showing you the Add Slide button you need to press if you want to add more slides.

슬라이드 내에서 웹캠, 동영상, 데스크탑 화면 캡처 등을 적용할 수 있습니다. 모든 슬라이드에서 등장하는 것이 아닌 원하는 슬라이드에서만 나오도록 할 수 있어서 더욱 정교하고 섬세한 프레젠테이션이 될 수 있습니다. 프레젠터 미리보기 화면내에서 원하는 소스들의 위치, 크기 구성을 변경하거나 웹캠의 배경화면을 투명하게 변경할 수도 있습니다.

Inside XSplit Presenter with an arrow pointing to the Overlay Element menu.
Inside XSplit Presenter with a webcam added and an arrow pointing towards the Background Removal button.

기존의 프레젠테이션에 추가 슬라이드나 주석을 달았다면 그대로 기존 파일을 덮어 씌워서 새로운 파일로 저장할 수 있습니다.

Inside XSplit Presenter with an arrow pointing to the "Re-Sync Presentation" option in the setting drow down menu.

각 슬라이드에는 하단 메뉴를 통해 주석을 추가할 수 있습니다. 이 도구를 사용하여 화살표, 하이라이트등을 추가할 수 있습니다. 생방송으로 송출중에도 이 기능을 통해 실시간으로 표기할 수 있습니다. 예를들어 화상 연결도중 질문을 받을 때 주석 도구를 사용하여 생동감 있는 답변을 할 수 있습니다.

Inside XSplit Presenter with an example of the live annotation tools you can use.

각 슬라이드마다 전환될 때 특별한 전환 애니메이션을 적용할 수 있습니다. 마치 영화나 TV같은 연출을 할 수 있는겁니다.

Inside XSplit Presenter an arrow is pointing to the transition menu where you can select what kind of transition you would like.

온라인으로 프레젠테이션을 발표할 때 엑스플릿 프레젠터를 사용하여 Google Meet, Zoom등에 적용할 수 있습니다. 기본 캠 소스를 XSplit Presenter로 적용하면 엑스플릿 프레젠터 화면 내의 모든 장면을 캠 화면으로 내보낼 수 있습니다.

Inside XSplit Presenter with an arrow pointing to the "Present" button.

오프라인으로 실행되는 프레젠테이션 발표때는 표기하기 원하는 모니터를 지정하여 전체화면으로 출력할 수 있습니다.

Inside XSplit Presenter showing you the Present menu which will guide you through setting up your call on any service or connecting to an external monitor.

실시간으로 발표하는 것이 아니라면 녹화 버튼을 눌러서 프레젠테이션 전체를 녹화할 수 있습니다. 녹화 전에 반드시 마이크 장치가 활성화 되었는지 확인하시기 바랍니다. 그리고 PC 자체에서 나오는 모든 소리가 녹화되기 때문에 다른 음악이나 동영상을 재생중이라면 주의하시기 바랍니다.

Inside XSplit Presenter with two arrows pointing towards the Record and the audio settings buttons.

엑스플릿 프레젠터의 소개를 마치겠습니다. 질문이 있으시다면 24시간 고객센터에 문의하시거나 트위터 @XSplitKR로 태그하시면 됩니다. 이 게시물에 있는 모든 스크린샷은 엑스플릿 캡쳐로 제작되었음을 알려드립니다.