Is Sending A Short Video Better Than An Email?

You have a lot of information to get across to your team. What’re your chosen means of communication? Most of us default to email when we want to reach several people quickly: but is a written email the most effective method?

Software like our XSplit Presenter enables you to pre-record a seamless presentation. Instead of sending out lots of text and attachments, why not try sending a link to a short presentation instead? Here are a few reasons why you and your colleagues may prefer watching to reading.

TL;DR

Or, “too long; didn’t read”. We’ve all opened emails and, faced with what looks like a whole dissertation to wade through, quickly closed it “for later” and then forgotten about it. If you have a lot of information to get across, maybe a presentation is better suited to your needs. As advertisers know, 80% of people will watch a video, but only 20% will read all the text, so why not borrow a tip from marketing practice, and use visual rather than written media?

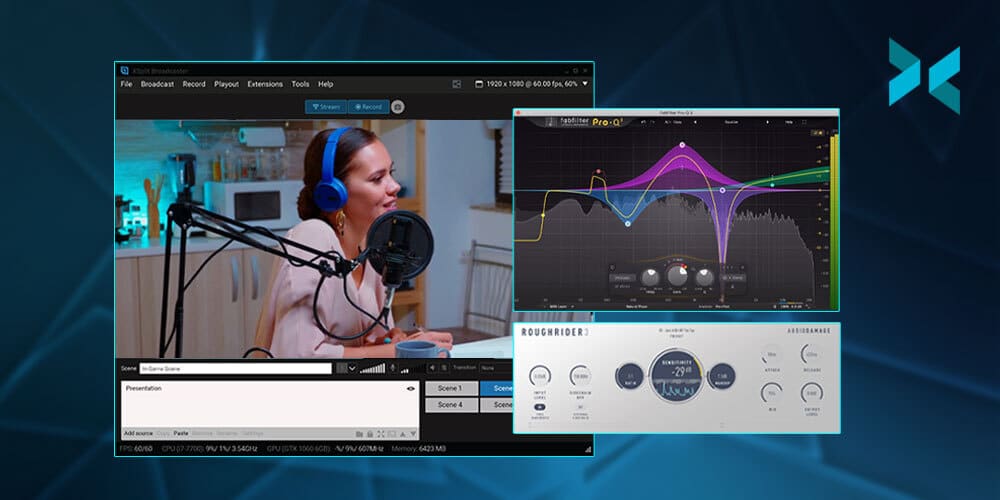
This still requires work from you as you’ll need to write the script and record the delivery. But, thanks to XSplit Presenter, this is super-straightforward, and when you get used to it, it’ll seem even easier than just writing the text. Import your Microsoft Powerpoint or Google Slides presentation, include clips from YouTube, or connect to Zoom, Skype, and other platforms to add flair to your presentation.

Two people, both laughing, one looking at a laptop at better email, a video sent rather than a wall of text!
Photo by Jason Goodman on Unsplash

Unattached

Then there are attachments. Not only do emails have paragraphs of text to get through but there are multiple attachments and links to open. If you are sending a pre-recorded link, you can incorporate the information from these attachments into the presentation itself.

XSplit Presenter lets you import PowerPoint or Google Slides into your presentation, cutting down on the need to attach graphs or images, which can be simply included in your PowerPoint or Google Slides instead. You can also play videos directly in your presentation. Rather than provide your recipients with multiple links, this allows you to show snippets in a more convenient and user-friendly way. The result of all this? A straightforward email with a link to the presentation.

This video was created with XSplit Presenter!

Better Email Has Access for all

There are plenty of ways to make the text of an email more accessible; however, a subtitled presentation will reach most people without the need for any adjustments. As well as providing email alternatives for colleagues with visual or hearing impairments, you’re also helping your neurodiverse teammates.

XSplit Presenter is simple to use and has the tools to facilitate bringing teams closer together in a way that accommodates accessibility needs. For one, it allows you to add text to provide a subtitled presentation for your colleagues. It can also make things easier for you if you prefer to speak than to write, or if the thought of speaking in front of a live audience gives you the jitters.

We’ve covered several compelling reasons why a video can make a better email than text. Download XSplit Presenter to make your business communications easier and more accessible. Find out more about XSplit Presenter in our blog (and yes, it does include a short film).

Why You Should Pre-Record Your Monthly Company Meetings

In the busy world of work, it can be difficult to get everyone together for an all-hands meeting or for a big announcement.  This may be down to holidays, busy schedules, or other commitments. You can make your company updates slicker, more streamlined, and more flexible for your colleagues by pre-recording them instead of doing them live!

What are the advantages of pre-recording meetings? 

Using XSplit Presenter to record your presentation has many advantages. You can script it in advance and then record it carefully, making sure you don’t stumble over your words. You can check everything in your demonstration goes smoothly, include a voiceover, and make annotations on your presentation as you go along. This will come from rehearsing as well as recording your presentation and watching it back to see what you need to improve.

Using these points can make your presentation more interesting and engaging, and of course smoother and slicker. But don’t forget that it can make it shorter as well – by removing any awkward pauses and speeding up anything obvious or slow. This can remove dead air time, getting all the same information across but in less time. This is something that will definitely be appreciated by your busy colleagues! 

When you pre-record meetings, you can also easily bring in your chosen guest speakers to make a contribution to the presentation. Of course, this can be done live too but pre-recording can make things easier. Now, you can work around your guest’s schedule, making it more likely to secure someone’s time. You can also help your viewers focus on what’s important by adding quick and easy annotations that capture their attention.

A crowded all hands meeting room with lots of people taking notes could be avoided if you pre record meetings
Photo by Sincerely Media on Unsplash

Videos can be reused

Once you’ve made your video, it can be watched at a later time by anyone who missed the meeting, without you having to spend time delivering the presentation again. It can also be sent as a file or uploaded to places like YouTube so your audience can watch it back as and when they wish to. Choosing to pre-record allows busy staff to prioritize their workload and to pick an hour that best suits them during the day without compromising their other tasks.

Doing this for your colleagues will prevent them from being taken from their most vital and pressing work to attend a meeting. This allows them to instead structure their day without missing out on the information. It will essentially give your guests greater control over their working day and, in turn, help them to perform at their best.

Having a pre-recorded video allows the meeting attendees to watch the video more than once if they want to. This allows them to make sure they picked up all the information or to show it to a colleague if they wish. This can, again, save you time and increase your reach, whilst still making it more convenient for your audience and their schedule. 

Pre-recording your big company updates can improve the quality of the presentation and make it easier for your colleagues to watch when it’s most convenient for them. We have some handy tips to get you started and some pointers on how to add some sparkle as well!

Your Perfect Pitch Deck, Starring You!

These days, every presentation has a set of slides. As your perfect pitch deck, it should be well-formatted and engaging, as well as containing pictures and video content. Why not take yours to the next level? Instead of just showing your slides and talking about them, you could take it up a notch and appear in them in a video pitch deck. This will help you stand out from the crowd and might even make putting your presentation together easier.

Make your perfect pitch deck a live video

There are a number of good reasons to create a recording of yourself delivering the presentation. The first one is the wow factor of the perfect pitch deck – by being that little bit different, it’s more likely to pique your audience’s interest. It also allows you to script, practice, and pre-record your lines, meaning that you can edit out any fluffed delivery. This would be perfect if you’re nervous about presenting, allowing you to deliver a much slicker, smoother, and more carefully paced presentation.

Having your presentation pre-recorded in advance takes a lot of pressure off you as a presenter. You now know you can just hit go, and then make yourself available to answer questions at the end. You can amp up audience engagement by speaking to your viewers in the chat while your presentation plays.

Getting yourself prepared to make the perfect pitch deck is important! Here we have someone making notes on paper on a desk with pens and post-it notes.
Photo by Felipe Furtado on Unsplash

What else can you do with a video presentation?

Video pitch decks allow you to plan and implement special effects, such as having your recorded self point to bullets on a slide or pull a graph out of thin air. As you put the video together in XSplit Presenter, you can time transitions to fit your movements and cut out any pauses while you try to find the next graphic or video. This helps make sure that all your media, graphics, and notes appear at exactly the right time in your perfect pitch deck. Now this will require some rehearsal on your part, but getting everything perfect is what we’re after here!

It also gives you the option to include webpages as part of your media, again removing any loading times or worrying about whether a site will work properly when you load it. The platform also pulls in presenter notes from your original presentation, making it easier to remember what to say when you present. To help your viewers focus on the right parts of your presentation at the right time. You can annotate it in real-time using a handy virtual pointer tool. 

How do I make the perfect pitch deck?

XSplit Presenter allows you to take control of your presentations in many ways. At the basic level, you can overlay media, including webcams, NDI guest calls from Zoom or Skype, pictures, and videos over your slides. At its most advanced, you can pre-record your entire presentation and then work through it again. Tidying it up, moving elements around, and producing a more polished and efficient show for your audience when you record it again. Presenter offers the tools to make your presentation stand out, allowing you to concentrate on making the content and writing the script. 

Does your deck require more than one presenter? XSplit Presenter makes it easy to mix things up and add more speakers to your presentation with NDI sources like Zoom or Skype to make it more engaging. 

Presentations can be a challenge no matter what industry you’re in. You can find out more about what XSplit Presenter can do for you here, and we’ve got some additional useful advice for improving your presentations, too.

The Best Spooky Webcam Backgrounds for Halloween (or any time!)

Setting the mood for your online Halloween party is essential, so having the right spooky webcam background can make all the difference! However, spending time trying to find the perfect image through search engines can be a bit of a chore! So, we’ve got a whole bunch here that should do the trick! Since our own program, XSplit VCam, can use videos and gifs as backgrounds, we have some extra spooky moving ones as well!

Spooky Webcam Backgrounds

Pumpkins on the ground with a woman holding a skull spooky webcam backgrounds
Photo by freestocks on Unsplash
Hands holding on to a cliff edge spooky webcam backgrounds.
Photo by Daniel Jensen on Unsplash
Two Jack'o'lanterns spooky webcam backgrounds
Photo by David Menidrey on Unsplash
A open forest in gloom.
Photo by zengxiao lin on Unsplash
A person stood in front of a spooky house at night.
Photo by Ján Jakub Naništa on Unsplash
Two jack'o'lanterns on a doorstep next to a treat bucket.
Photo by Samuel Bryngelsson on Unsplash
A shadowy figure against a translucent background spooky webcam backgrounds
Photo by Stefano Pollio on Unsplash
Pumpkin lights, ghost candle holders and a jack'o'lantern on a desk.
Photo by Sophie Coonen on Unsplash
Train track in a forest that is full of fog.
Photo by Andrea Boldizsar on Unsplash
Many candles in a dark room spooky webcam background.
Photo by Nicola Fioravanti on Unsplash

Horror Movie Backgrounds

Here are some images from various horror movies that would make great scary backgrounds for your next call! From iconic images to more modern classics, we’ve got you covered!

An iconic scene from The Exorcist spooky webcam backgrounds
The Exorcist (1973)
A famous scene from The Blair Witch Project
The Blair Witch Project (1999)
An iconic scene from The Thing spooky webcam backgrounds.
The Thing (1982)
The Cabin from the film The Evil Dead
The Evil Dead (1981)
An iconic image from movie Shaun of the Dead
Shaun of the Dead (2004)
A famous image from The Silence of the Lambs
The Silence of the Lambs (1991)
The living room from Stranger Things Spooky Halloween Backgrounds
Stranger Things (2016) Sure it’s a TV show but this is an iconic image, right?

Spooky Horror Gifs

Pop these in the background of your next call, and you’re ready to go with a spooky background guaranteed to add atmosphere to your next call! Not every call platform can support gifs and videos as a virtual background, but if the program you’re using can (did we mention our own XSplit VCam can do this as well as videos from places like YouTube?), then these will be great!

A famous scene from The Shining
The Shining (1980)
A famous scene from Signs spooky halloween backgrounds.
Signs (2002)
The spooky character from The Ring
The Ring (2002)
A famous scene from Halloween spooky halloween backgrounds
Halloween (2018)
The clown Pennywise from IT
It (1990)
An image from Scream spooky webcam backgrounds.
Scream (1996)

We hope these spooky webcam backgrounds help you out with your next virtual Halloween party. Or, if you want to add a bit of the horror world to your next call! We don’t recommend showing up with one of these for your next check-in call with your boss, though! If you’re looking for some more webcam backgrounds that are less specific, we have a long list right here!

How to Use Color Effectively in Your Presentations

Colors have an impact on the way we see and interpret visual information. They can influence emotion, set the mood, build structure and emphasize certain elements. This means that choosing the right colors can make your presentation stand out and control how it’s received. So, what are some critical tips for using color theory in your presentations?

Using color theory in your presentations

Colors are often associated with emotions. Warm colors, like reds, oranges, and yellows can be used to communicate energy, excitement, optimism, and enthusiasm. In contrast, cool colors such as blues, greens, and violets lend feelings of professionalism, dependability, and elegance. 

Whether you’re designing PowerPoint slides, printed material, or infographics, using color theory for presentations will help you add depth and meaning. In XSplit Presenter, you can set the color of your slides and backgrounds to suit the mood and tone of your content. Why not subtly personalize your presentation? Choosing colors that align with either the brand identity of your company or of the client that you’re presenting to can really help!

You can make your material ‘pop’ by deploying complementary colors. The two colors that sit opposite each other on a color wheel, such as red and green or orange and blue. Using both complementary colors on a slide, for example, using one for the background and one for the text provides maximum contrast and achieves a high impact as a result.

It’s worth knowing that pure hues (color without any white or black pigment added) all have the same intensity and value (lightness or darkness). Sticking within that group will give a flat and unimpressive look. To avoid this and add interest, you should vary the tones, shades, and tints of the colors you use.

A yellow slide with black text being show to a large room of people. Even for simple slides, like this yellow background, makes a big difference for how people feel viewing it for color theory in presentations!
Photo by Charles Deluvio on Unsplash

Keep it simple

One key rule in the use of color theory for presentations is to keep colors simple and balanced. Choose a palette of no more than three colors (black and white don’t count as colors for this purpose). Create a simple but eye-catching color scheme by choosing two tones, shades, or tints of one color. Then selecting a third accent color which is at least three spaces away on the color wheel.

Another rule for balancing the proportions of colors in presentation and design is called the 60-30-10 rule. According to this rule, once you have chosen your three colors, you should use the primary color for 60% of the space on the slides. The secondary color for 30% of the space, and the accent color for 10% of the space.

Use a consistent palette throughout your entire presentation, so that the same colors appear on every slide. This builds a color association with your audience and helps them to remember your presentation or brand. Using your company color palette serves much the same purpose. What’s more, consistent color-coding on headers and data can also make it easier for you to organize your presentation.

Color theory for presentations could include these sorts of colors on a color swatch, seen on the ground.
Photo by Taylor Heery on Unsplash

Use color to build structure

You can also use color theory to give a clear structure to your presentations. For example, using shapes or negative space can help control the flow of visual information by highlighting the different sections of a slide.

We’ve all been subjected to presentations that consist of just a few text-crammed slides. Instead, build interest and keep the attention of your audience by spreading your content out into smaller chunks of information. You can then spread this out over more slides. Then, vary the arrangement of the colors you use to make each piece of content stand out.

You can also impose structure by using the same colors for headings and subheadings on every slide. This can help your audience to find the information they need at a glance.

By playing around with colors, you can draw your audience’s attention in the direction that you want. Ensure that your presentation flows naturally, and make your presentation, and possibly your brand, more memorable to your audience! This is something we have discussed on this blog in more detail talking about how better online presentations can help you stand out!

How to Add Remote Guests to your Streams

If you’re producing a stream with guests, be that a podcast, running a tournament, or just putting on a show, doing this remotely has become the norm. This might seem simple on paper, load up Zoom or Discord and get streaming, working with remote talent actually brings in a unique set of challenges! So we’re going to discuss how to do it right with some tips I’ve developed over the years.

Using Discord to have Remote Guests on your Stream

My personal favorite for bringing in remote guests to a stream is Discord. It’s easy to use and if you have the budget, you can get really high audio quality by boosting your server. However, since you’re likely going to be having both yourself and guests in the same voice server you may run into issues adjusting audio levels.

Now one way to manage this is to have multiple PCs join the calls and capture the individual voices, but not everyone has that many computers laying around! For this, Discord actually has an audio mixer built into the call! Pretty handy for getting levels in right in a pinch.

Also in Discord, and generally any other call program (VOIP), you’ll want to disable things like noise reduction and any type of input limit, so both sides are getting the cleanest audio possible.

A streaming setup with a PC, dual monitors a camera and microphone which could be used to add remote guests to a stream.
Photo by ELLA DON on Unsplash

Working with Streamer Setups

A lot of time you’ll be working with guests who have their own live streaming setup. Now, while this might seem like the ideal scenario, the problem is if there’s an issue it’s going to be hard to troubleshoot because everyone has a different audio setup.

The most common problems adding a remote guest to your stream like this are echo and/or getting a loop from whatever audio you’re sending the guest. This is most prevalent with 2-pc setups or when the guest is using a mixing desk. For simplicity just ask the guest to only send you microphone audio rather than a loopback mix from their PC.

This may require reconfiguring their stream set up a bit, but this is why you definitely want to have a tech rehearsal with your guests before the event. Make sure you’re getting all your video and audio routed correctly on both ends, for you and the guests. 

A lot of streamers like to add audio effects and enhancements via VSTs to their live stream output. This won’t usually work in VOIP software unless they use software like XSplit Broadcaster to add VSTs directly to their audio output via its Virtual Microphone feature.

Finally, once you’re getting audio from your remote guest on your stream computer, you need to make sure it’s coming in at a manageable level. Most people who are streaming set their audio levels for a “final mix” which basically means at the highest level before clipping.

Now if you’re mixing this isn’t going to leave you with much headroom, so you’re going to want to see if the remote talent can lower the audio until you’re receiving at about 12-18 DB.

Giving your guests a preview scene

One of the most important things your guests need, especially if they are commentators on an event or it’s a visual show reacting to things, is a good preview scene. This is where they can see what is live, the different cameras, and perhaps a notepad with a run of show and general notes. There are two ways to do this!

The first is using the Virtual Camera output in XSplit Broadcaster. You can select whichever scene you wish to output, so just create and then pick the dedicated preview for your remote talent. Make sure to put this scene somewhere in your scene list where you won’t accidentally switch to it. Then just set the camera as the video input on your VOIP software.

Now usually this works just fine, but VOIP software will automatically adjust the bitrate to keep the video call stable, so if your remote talent is far away, they may receive a pixelated video. A workaround for this is using screen sharing. Make a project window for your preview scene and then use screen sharing in your VOIP software. Many times priority will be given to the screen share, which will give the highest video quality possible. Software like Discord will also let you set the quality of your screen sharing as well.

These are all things I have learned over years of hosting remote events so hopefully, this saves you a lot of time in trial and error! Be sure to let us know in the comments if you have your own tips that have helped get streams with guests going! Also, be sure to let us know in the comments what other topics you would like us to discuss in the future!

How To Pitch Your Idea Using A Live Pitch Deck

Live pitches can be daunting and, whether you plan on delivering it in person or via a video call, it is a good idea to have a live pitch deck to hand that you can refer to throughout. The best pitch deck will effectively communicate your idea and also capture your audience’s imagination. It should excite, inspire and educate in equal measure, striking a balance between style and substance. Read on to see how to make a pitch deck that will keep your presentation on track and wow your audience.

What do we mean by an effective pitch deck?

An effective, well-crafted pitch deck will serve two main purposes. It should act as a trampoline for you to launch your pitch from, while also getting your audience excited about whatever you are pitching, be it an investment opportunity, product launch, or new business venture.

The key is to make it clear and concise. Practicing your pitch will reveal which areas, and which slides, you absolutely need and which ones you can do without. Focus on the core idea that your pitch revolves around, while also making it compelling enough to draw the audience in. Ultimately, the best pitch deck will tell your story or that of your business, highlighting the problem or gap you have identified, what solution you can offer, and what you are looking for from your audience.

It should be visually attractive, but not overly busy or cluttered, offering key facts and an enticing investment opportunity that is easy to understand and act upon. Try to keep your visual style consistent throughout the entire deck. If visualization is not your forte, search online for presentation templates that you can customize to bring your pitch deck to life. See if you can find examples of pitches that are similar to your own, and see why they worked or why they didn’t.

A person stood in front of a large screen giving a presentation knowing how to make a pitch deck.
Photo by Teemu Paananen on Unsplash

Making your pitch flow

Once you have chosen the tools and style you will use to build your deck, next you want to think about how to make a pitch deck flow naturally. Alejandro Cremades, the author of The Art of Startup Fundraising & Serial Entrepreneur, suggests the following flow based on his analysis of several successful pitch decks, including the template used by billionaire venture capitalist Peter Thiel.

  • Problem – the problem you have identified
  • Solution – a description of your product or service
  • Market – who is your ideal customer?
  • Product – showing the product or service in action
  • Traction – metrics showing the growth of the business
  • Team – who are you and who is your team?
  • Competition – how do you compare to your competition
  • Financials – projected earnings and profit
  • The amount being raised – the range of investment you are looking for

Depending on what the presentation is about, you may or may not need all of these, but it provides a good spine to work from. While these could all be one slide each, you can also experiment with this format and spread one section over a couple of slides if need be.

A person stood in front of an audience giving a presentation in a large room standing next to a projected screen knowing how to make a pitch deck.
Photo by Charles Deluvio on Unsplash

How long should your pitch deck be?

The length of the pitch deck will correlate to the length of your pitch itself, so practice your presentation and see how long it lasts. You don’t want to be flipping through lots of slides, nor do you want to leave the same slide on screen for too long. The general consensus is that at a minimum you want 10 slides. For some experts, this is also the maximum, while others suggest you can push it to 20 slides.

Several years ago, file-sharing company DocSend completed an in-depth analysis of over 200 pitch decks, looking at the sections included and how long each section was. Almost all of the sections were between one and two pages, with the exception of the Product slides, Business Model, and Financials.

So how long should your pitch be? There is no one definitive answer. Some experts say no more than five minutes while others stretch this up to 20. However, the DocSend analysis found that on average, investors spent 3 minutes and 44 seconds looking at the pitch deck. Alejandro Cremades suggests a time of around four minutes, and definitely no longer than five. This would work out at roughly 30 seconds per slide on a 10 slide pitch deck.

Using presentation software to elevate your pitches

Most pitch decks will be built on presentation software such as PowerPoint or Google Slides. In a physical meeting, you can connect this to a monitor or projector and discuss the slides in person.

However, investment opportunities are global, and in the post-pandemic world, more and more pitches will be conducted via video call rather than in person. The solution here is to screen share your pitch deck while talking it through, but your audience may then lose the ability to see you or have to flick between two screens.

XSplit Presenter offers a perfect solution to this and makes your best pitch deck even better. It is fully compatible with Teams, Zoom, and Skype, and allows you to inject some character and flair into the presentation. By using a webcam, you can integrate yourself into the pitch deck, making it more interactive and informative. It also allows you to annotate your presentation in real-time, or use notes you may have made in your original document. Plus, you can deviate away from your presentation, adding separate windows to show websites or other applications without showing your desktop.

Now that you know how to make a pitch deck, you can take these skills and apply them to similar scenarios like streaming, video presentation, or online meetings. Check out creating media-rich presentations to improve your online meetings to learn some creative ways to keep everyone’s attention during your next Zoom meeting.

엑스플릿 브로드캐스터 4.2 출시! 개선점과 주로 요청되었던 기능 추가

XSplit Broadcaster 4.2 가 출시 되었습니다. 여러분의 인터넷 방송 송출에 도움이 될 개선점에 대해 살펴 보도록 하겠습니다.

  • VST3 지원 – VST3.0 효과 플러그인을 메인 마이크에 적용할 수 있으며 마이크 음질에 영향을 줄 수 있게 됩니다.
  • 가상 마이크 – 가상 카메라처럼 엑스플릿 브로드캐스터를 가상 마이크로 활용할 수 있습니다. 즉 브로드캐스터에서 나오는 모든 음향을 원하는 화상 통화 및 다른 애플리캐이션에 연동하여 송출할 수 있습니다.
  • 전력 절약 모드 – 영상 장치들이 활성화된 화면에 나와있지 않을 경우 프로세서 전력을 절약하도록 변경하였습니다.
  • 10 Bit HDR 지원 – HDR 게임들을 브로드캐스터로 캡처할 경우 자동적으로 SDR로 변형하여 캡처합니다. 즉 HDR 신호로 출력하는 게임을 정상적으로 브로드캐스터에서 감지하도록 변경되었습니다.
  • 관리자 모드 팝업 – 이제 엑스플릿 브로드캐스터 실행시 더 이상 관리자 권한 팝업이 뜨지 않습니다.

이 외에도, 잡음 억제 샘플링 조절, 오직 방송 오디오, 간편해진 로그인 및 회원가입 등등이 개선되었습니다. 고쳐진 버그들과 상향된 패치 노트를 확인 하시려면 여기를 클릭하여 자세히 볼 수 있습니다.

추가로, 보안과 안전을 위해 엑스플릿 브로드캐스터는 현재 시기부터 윈도우 10과 그 이상에서만 실행이 가능하게 되었습니다.

마치며, 엑스플릿 브로드캐스터 4.2 베타 버전을 사용해주신 많은 사용자 커뮤니티에게도 감사의 말씀을 전합니다. 여러분들도 베타 버전을 활용하여 미리 새로운 기능과 기술들을 경험해보시려면 엑스플릿 브로드캐스터 베타 버전 페이지에서 다운로드 하여 사용 해보시기 바랍니다.

엑스플릿은 항상 새로운 기능들과 편의성을 고려하려 새로운 버전 업데이트를 진행하고 있습니다. 피드백과 댓글을 남겨주시면 소중한 의견들에 모두 귀기울이고 있으니 아래 댓글창 및 SNS 등으로 피드백을 공유해주시면 감사할 따름입니다.

날씨가 더욱 쌀쌀해졌기에, 감기 조심하시고 모두 좋은 하루 되시기 바랍니다.

XSplit Broadcaster 4.2 Releases with User Requested Features and Improvements

XSplit Broadcaster 4.2 is here and with it are some really big upgrades to how you stream!

  • VST3 Support – VST3.0 Effect Plugins can be used on your main microphone to add enhancements to the mics sound.
  • Virtual Microphone – Much like Virtual Camera, you can now use XSplit Broadcaster as a virtual mic! So whatever audio is coming from Broadcaster, you can send that to any calls/sources you’re in!
  • Low Power Mode – Save processing power when video devices are not actively being used by activating low power mode on that source.
  • 10 Bit HDR Support – Capture games that output in HDR and Broadcaster will convert them to SDR for your broadcast. So, you can play your game in HDR but send the correct signal out to your stream!
  • No more Admin Permission pop up – XSplit Broadcaster won’t ask for admin permission when you open it.

There are a bunch of other features and improvements like new sample rates added to noise suppression, updates to the stream-only speaker device, a single login/signup button, and more! On top of this, we have a whole bunch of bug fixes which you can find in the full release notes here.

It’s also worth noting that for security reasons XSplit Broadcaster now only supports Windows 10 and beyond.

Finally, we would also like to say thank you to everyone who has been using XSplit Broadcaster 4.2 in PTR, which if you’re interested you can download the latest PTR version of XSplit Broadcaster and try out new features before they hit the main release.

We’re always updating and improving our apps based on what our customers want so if you have any comments, be sure to let us know either on our social channels or right here in the comments section! You can also request new features over on the Feature Upvote page!

Best Practices for Chat Programs in the Workplace

The COVID-19 pandemic has changed the way we work in a lot of ways and some of those changes look likely to persist even after restrictions end. Working from home has seen the use of chat platforms like Slack and Teams explode as employees can no longer consistently communicate face to face. But what are the best ways to use these programs in a hybrid office and when should chat features be used in place of actual meetings, virtual or otherwise? Here’s our guide on how to effectively use Slack and Teams at work.

Starting off on the right foot using Slack or Teams at work

Getting your virtual workspace in Slack or Teams set up correctly is arguably the most important part of keeping everyone connected in the hybrid office. A few tips to consider when looking at how to use Slack or Teams at work:

  • Be organized when setting up your channels. Cross-talk can create confusion between project stakeholders, especially with text chat, so clearly communicate what topics should be discussed in each channel by giving them names that are easily understood. 
  • Starting a new project? Create a new channel for it as soon as you can so your team members can start communicating there rather than on unrelated channels.
  • Secure your accounts with strong passwords and two-factor authentication (2FA) if possible. Remote employees may not have full control over the networks or physical locations they’re using, so it’s worth being extra diligent with your security.
  • Finally, it’s a good idea to leave a general channel open for team members to coordinate social events, share GIFs, or enjoy a non-work-related chat. By creating a designated space for that kind of communication, you lessen the chance of it cluttering up your work-specific channels.
A phone with Microsoft Teams icon displayed on it and here you can find out how to use slack at work.
Photo by Dimitri Karastelev on Unsplash

Use XSplit Capture to get the most out of your chat

Typically, chat is great for quick status checks or tossing around safe-for-work GIFs. But what if you could communicate more than just words and happy dogs from your chat command line? Enter XSplit Capture, a new tool, currently in beta, to supercharge your chat possibilities. Capture lets you quickly screenshot or record all or part of your desktop and share it from the cloud via an easily accessible link.

You can even record voiceover or add text annotations. This means you can share simple explainers with your coworkers on how to test the latest feature you built, or give specific feedback to your team on the latest mobile ad mockup, all without having to pull everyone together in real-time. When learning how to use Slack or Teams at work, making your life faster and easier is going to make all the difference!

Meetings get a bad rap, but you have the power to change that

There’s a lot you can do through chat, especially with XSplit Capture in your corner. But chat isn’t always great for soliciting feedback or brainstorming with a whole team at once. We’ve all been in a group chat where the conversation gets off the rails because everyone is responding to someone ten lines earlier – and it can be a mess. Finding out how to use slack or teams at work is very important here! There is a real backlash in our collective consciousness against meetings in general, but keep in mind that arose because of the proliferation of bad meetings. So, have great ones instead!

A good rule of thumb: if you want to get something more tangible out of your group, like a project schedule or a pitch document, that’s probably best done outside of a chat platform. For feedback or ideas, a meeting is usually best, whether that’s online or in person.

Chat can be a great way for workers to communicate, collaborate, and connect, especially while we’re not all in the office together. Now that you know how to level up your office chat game, learn how to win everyone over in meetings with our guide to giving great presentations.