Leveling Up your Stream

Getting Started Leveling Up Your Stream

So you have the gear, the internet connection is stable, XSplit is set up and Player.me overlays are ready. What now? Well, stream, obviously, but are there more things you could improve? More little Secret Tips That Streamers Don’t Want You To Know? (hey, if it works for those weird ads it might work for us?).

Watch More Streams

Who got you into streaming to begin with? What did you like about them? Now, it’s a terrible idea to copy a streamer but there will be core elements from someone that resonate with you. Do they have a friendly attitude? Is inclusivity important to them? Do they focus more on showing you how good they are at whatever it is they are streaming? There’s something to learn from every stream you watch, both good or bad (“I don’t want to be like them!” is just as valid a take away) and the only way you can get this info is by watching! All of this experience and info is out there and being demonstrated to you right now wherever you find people doing things live!

Talk to Streamers

Remember in that intro paragraph we said “Secret Tips That Streamers Don’t Want You To Know”? Not only is this a terrible reference that has been done to death, but it turns out a lot of streamers do want you to know more about their experiences. From vlogs, meeting them at conventions or just asking them polite questions in chat when they have initiated conversation they can be friendly and helpful. Don’t just jump in someones chat and hijack it with tons of “how do I be the biggest streamer in the world?” type questions or just ask streamers “follow me on Twitter” as an opening gambit at conventions. You know how you talk to someone you respect or how you’d like people to talk to you? Just do that!

Don’t Focus on the Numbers

From viewership, to subscribers and donations you can easily get caught up worrying about these things. So much so that they can become the soul focus of the stream. How many times have you jumped in to someones stream to hear them talking about sub numbers or what the viewership is like? If you let these things dominate conversation or even your internal conversation they will change how you present yourself, what you talk about and what you think about when you stream. It won’t be fun any more.

Stream with Friends

Either having friends watching you and hanging out while you play or playing a game together and streaming it can make it a lot more fun for both you and the viewer. Your friends might be streaming themselves at the same time from home or you’re all together playing a multiplayer game.

Don’t Stream for Long Periods of Time with No Breaks

While we do see many streamers doing charity streams or just streaming for entire days, we don’t recommend it. While regular schedules are important for bringing back an audience over time, streaming for long hours with no breaks can be bad for you both physically and mentally. Schedule out your time, make sure you stop, get up, get some water and some fresh air every few hours or so. If you’re feeling better, the stream will be better.

Make Sure you’re Having Fun

There isn’t a magic way to get more people to watch you but I can guarantee that you will keep more people if you are being yourself and you’re having fun. Would you want to watch someone pretending to be “a streamer”, playing a game they don’t really like to get viewers? Someone who loves what they do shines through, you’ll be happier and your stream will be better.
Interview with SuperMCGamer of Zeldathon

With XSplit once again sponsoring this year’s Zeldathon Champions, we thought it would be awesome to give you guys some insight about the event and the brainchild behind it, SuperMCGamer.

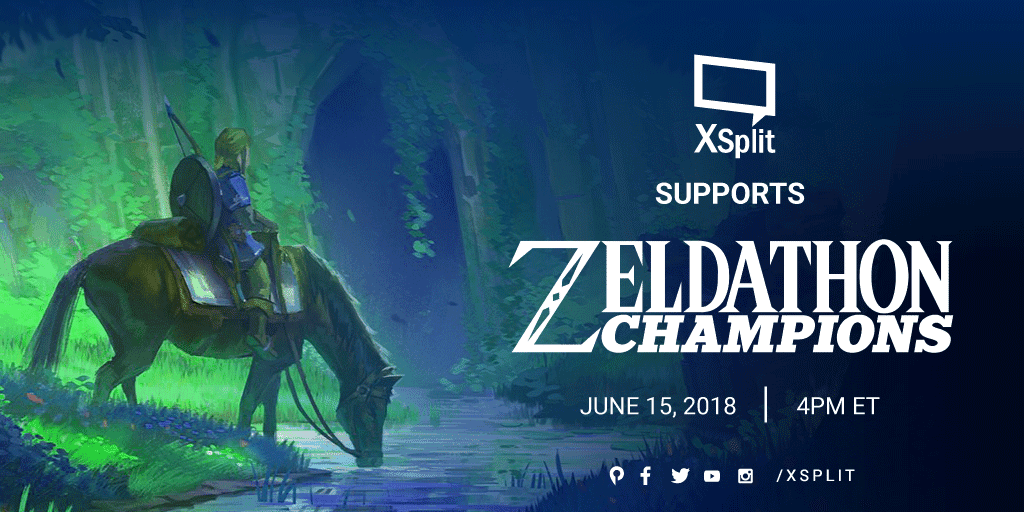
XSplit Supports Zeldathon Champions

Matthew Moffit aka SuperMCGamer is one of our all time favorites, not only because he’s been using XSplit since pre-XSplit days, but because he’s one of the best in the business. He’s part of our Elite Program and we’ve worked with him many times in the past (here’s one).

We decided to pick his brain a bit ahead of Zeldathon Champions and here’s the exchange.

You’re a popular figure in the space but for those who don’t know you, tell them a bit about yourself

SuperMCGamer: I am MC, I am the Executive Director of Zeldathon. I also work on various other charity projects such as Direct Relief Gaming.

Tell us about Zeldathon and what inspired you to start it

SuperMCGamer: Zeldathon started back in 2009. After watching a group called The Speed Gamers streaming on Ustream for charity, I worked with my friend Zak to start Zeldathon. We played Zelda for 36 hours on a under-powered laptop and raised just over $300 for Child’s Play Charity. After that, we just kept trying to improve, buying new technology, bringing in more entertainers, and working to get better at our games. Now, we’ve raised nearly two million dollars for charity, and are heading into our 22nd event this June.

What’s the most rewarding thing about running an event like this?

SuperMCGamer: Every event, we keep learning more about production and how to make our event something that is appealing for everyone to watch. But more than that, we keep hearing from charities how surprised they are that gamers can bring so much money and awareness to their cause. It’s really rewarding to hear that we are not just changing entertainment, but how non-profits fundraise on a high level.

You’ve been using XSplit for a long time. What are your favorite features?

SuperMCGamer: XSplit has been instrumental in making our events as amazing as they are. The infinite scenes that were added have allowed us to not fuss with multiple files and we can contain our entire event in one UI. If we ever need to make adjustments on the fly, the Preview Editor and Split View features have helped us keep a high production value by avoiding editing live. However, overall, our favorite features are just the great options on every source. The quick adjustments and settings for everything really allow us to make an experience that is all our own.

What tips can you give aspiring streamers who want to be like you someday?

SuperMCGamer: Any streamers out there trying to build an event need to remember to never settle for what they have. Constantly look into how to improve your event. Microphones, cameras, overlays, entertainment, game skill. Everything can be improved over time, just keep at it and don’t worry about the numbers. Have fun with it.

You can support Zeldathon by spreading the word on your stream and social media channels. It begins on June 15th 2018 and will be live streamed non stop at twitch.tv/supermcgamer.

Why You Should Stream Console Games Through a PC

Ever had the urge to stream your console games? Sure, you could stream them from your console directly to Twitch or Mixer, but what if you wanted to stream an older game from a PS3, Xbox 360 or Wii-U? Or maybe you wanted to personalize your stream? By streaming your console through a PC, you’ll be able to do all that. There are distinct advantages to hooking your console up to a PC.

In a previous blog post, we talked about the how. Today, we’ll attempt to talk about the why. Here are some benefits to streaming PlayStation or Xbox games via a PC.

Overlays

When putting your console stream through XSplit, you’ll be able to add a lot of your style and personality into it by adding a custom overlay. Putting an overlay on your stream can really make it stand out from others streaming the same games.

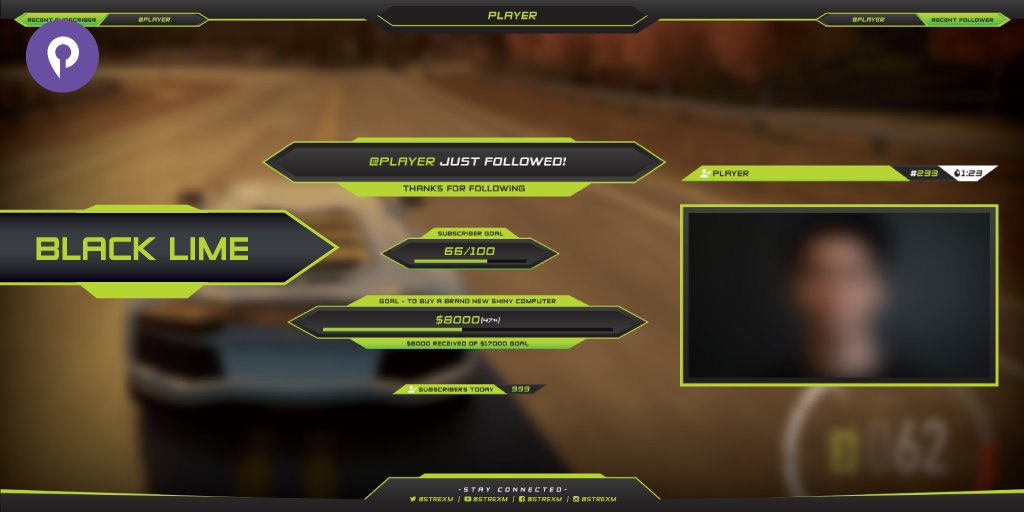
Player.me stream overlay

You could get free pre-made overlays or customize your own over at Player.me.

Alerts and Widgets

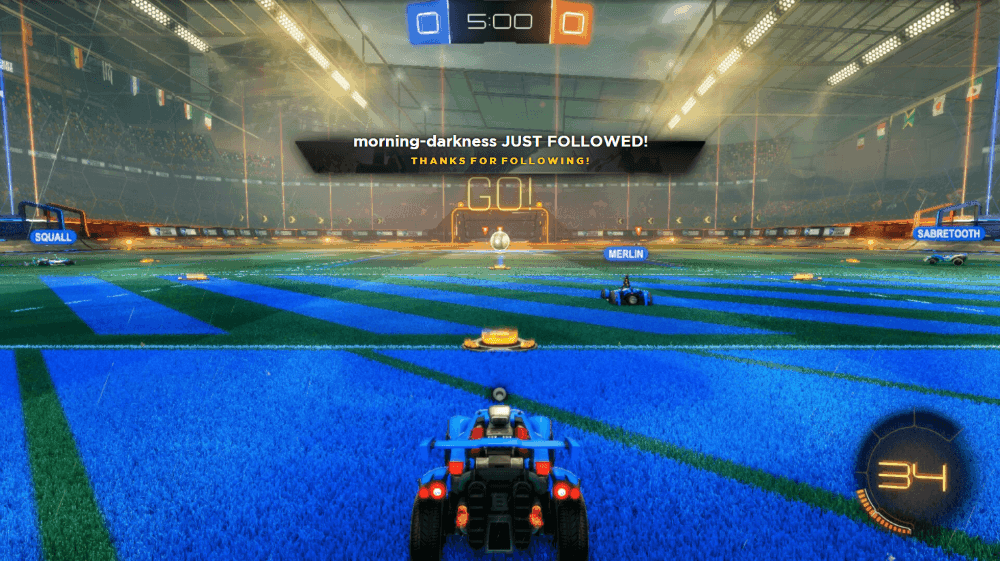
Whether it’s a donation or a new follower or a new subscriber, alerts are great for everyone involved. It’s a quick notification for you, so you can respond appropriately, and it’s really fun for your audience to be able to interact with you and influence your broadcast in some way. It just gives your stream that much more interactivity.

Twitch Follower Alert

Just being able to add all manner of widgets and apps is a great way of adding that extra layer of fun for your viewers and fans. Whether it’s a chatbot or the ability to customize your chat interface, it makes your stream that much more interactive and enjoyable.

Choice of Gear

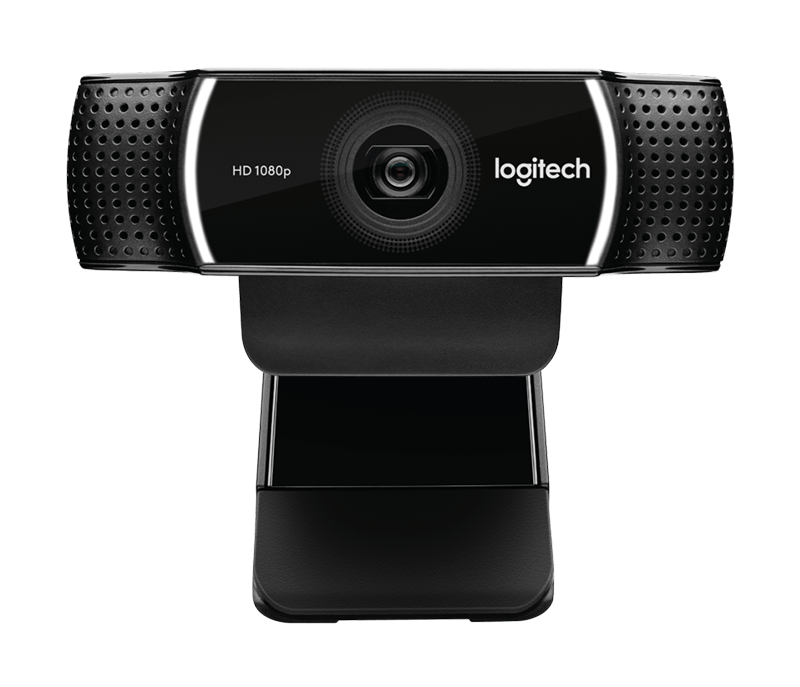
With consoles, you’re pretty much stuck using the proprietary equipment these platforms provide and support. On a PC, though, there’s a wider range of choices for microphones, cameras, or other peripherals you might want to use.

Logitech Webcam

Check out some of our hardware partners here.

It might take some work and some extra hardware to do, but you’ll find that there are distinct advantages to capturing your console gameplay and streaming from a PC.

Got any more questions? Let us know in the comments below!

How to Stream with Elgato Stream Deck

Elgato released Stream Deck just recently (2017) but it didn’t take long before it gained popularity for content creators. While not a must-have, It has become an integral tool for people who want to be able to do more with their stream. This post is a step-by-step guide on how to use the Elgato Stream Deck with XSplit Broadcaster.

How to stream using Elgato Stream Deck

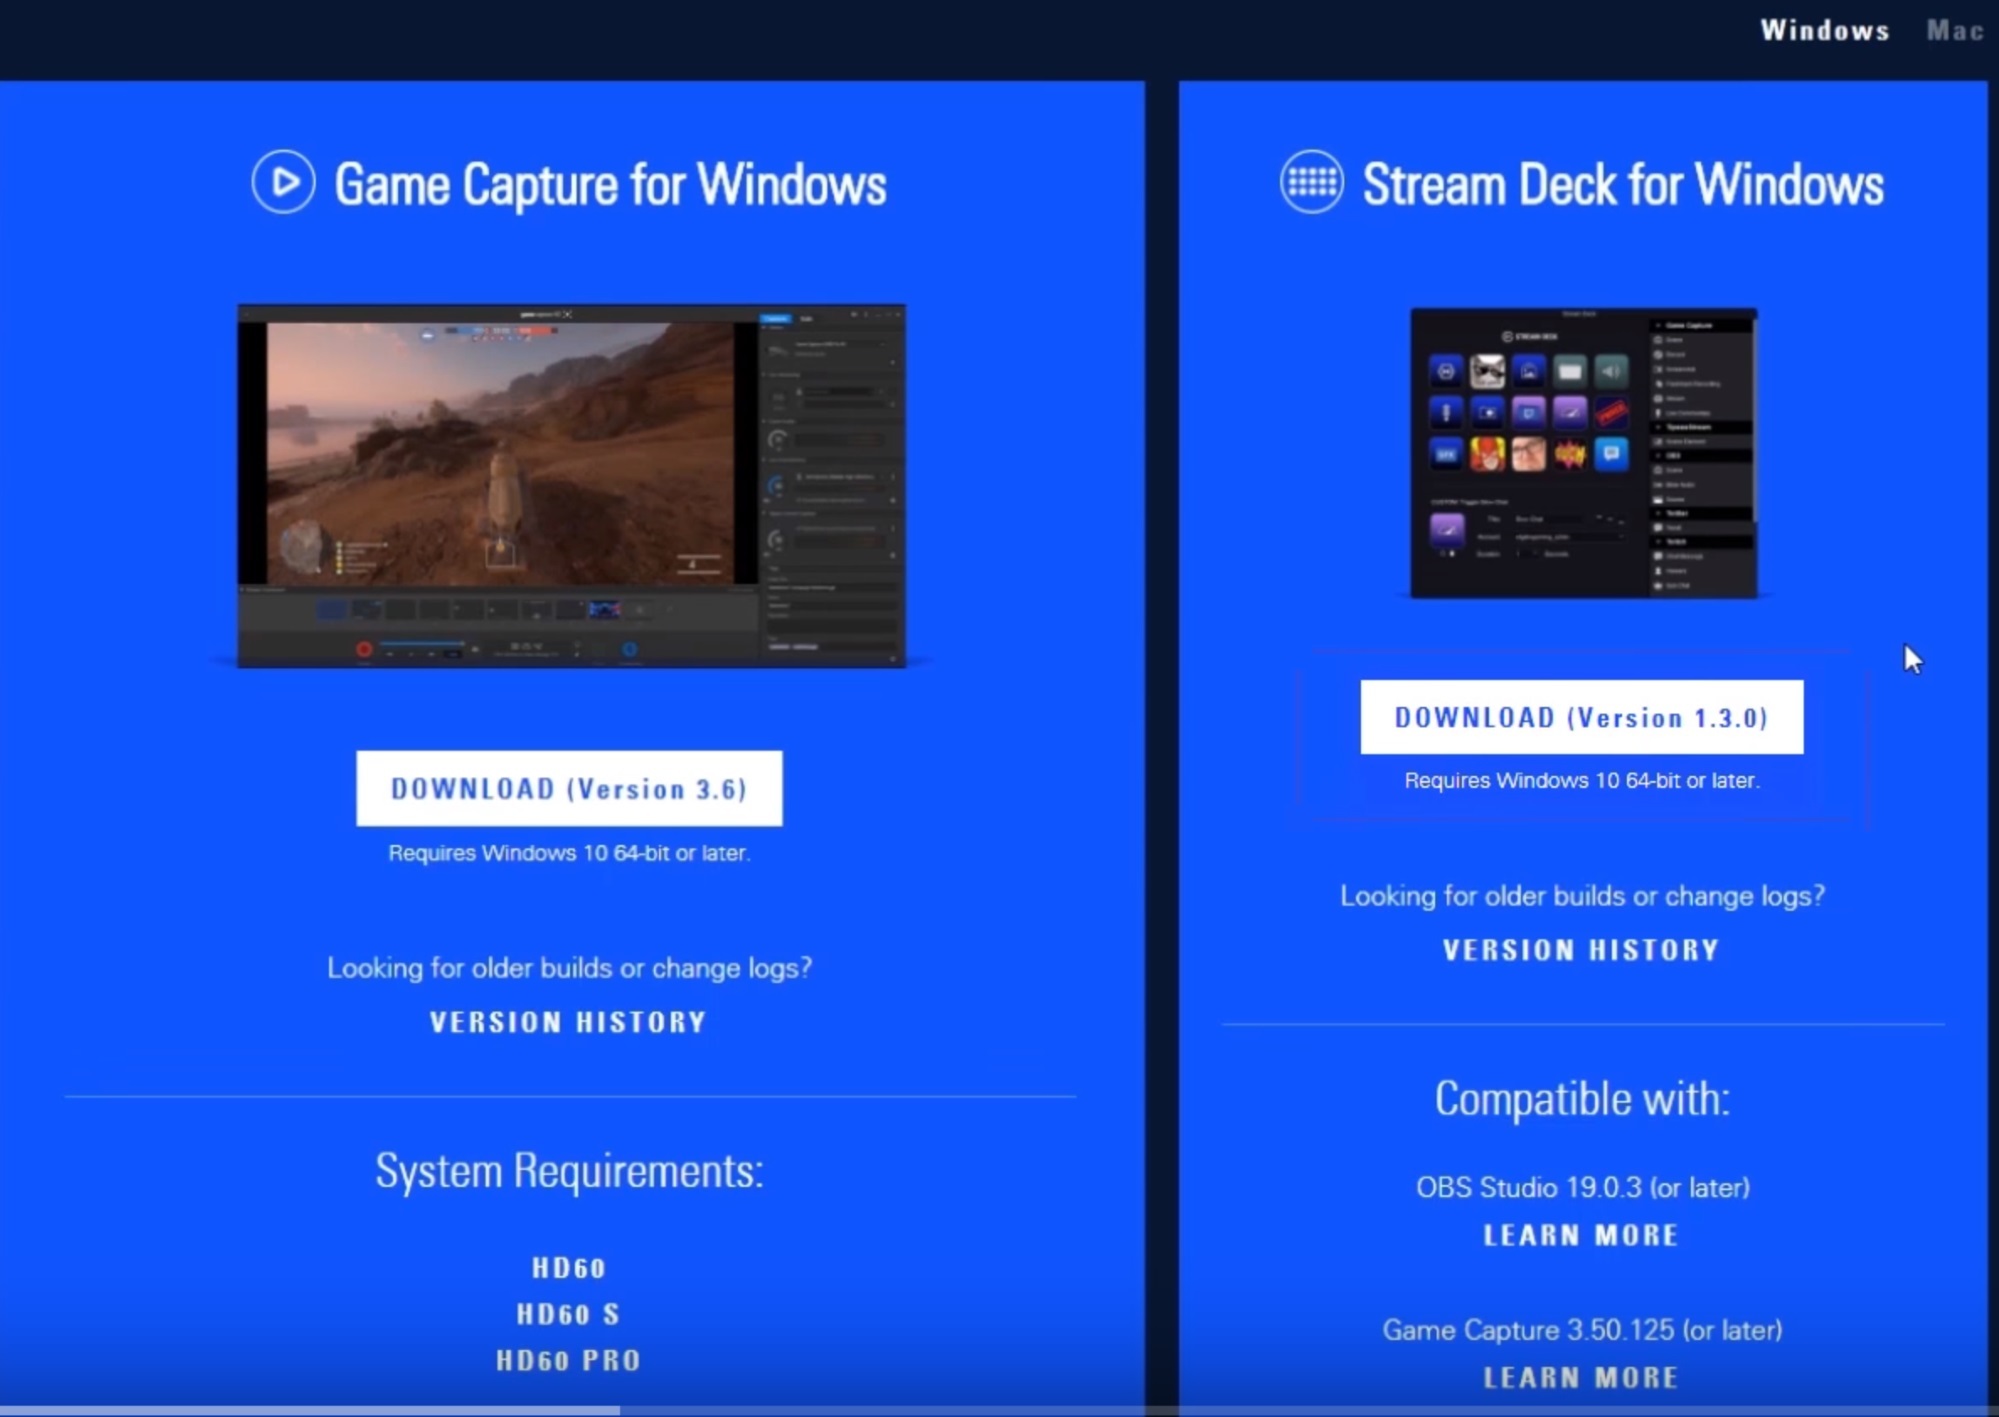
First of all, make sure you have the latest version of both XSplit and the Stream Deck software from Elgato.

XSplit Broadcaster and Elgato Stream Deck software

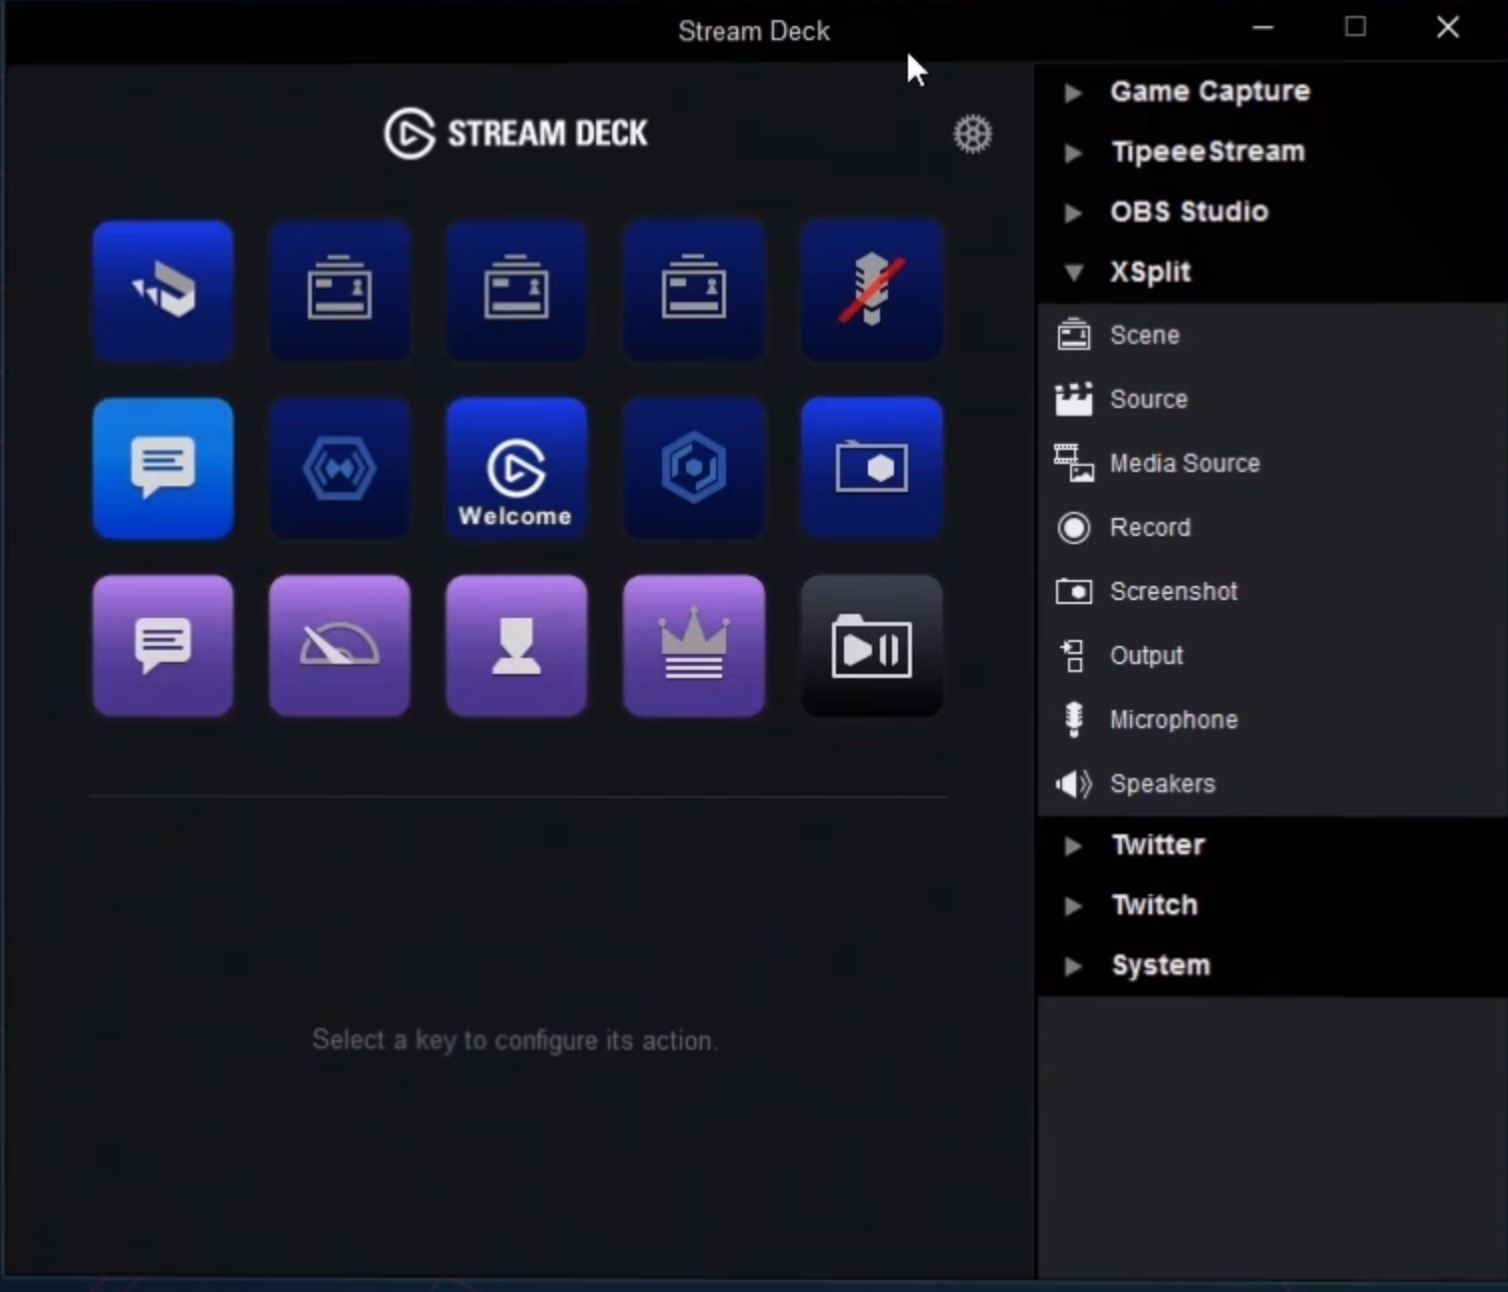
Once you have both installed and have XSplit opened, you will have an extension called the “Elgato Stream Deck” which will allow XSplit to interface with the hardware. Open the Elgato software as this is where you will set things up for controlling various elements of your stream in XSplit Broadcaster.

Elgato Stream Deck

The procedure is very similar with every function that you want to set up. It mostly involves assigning the function to a button, labeling and adding a thumbnail to each, and then setting up the specific options for each functions. Here’s how to set them up.

Scene switching

This is a pretty handy option if you want to do scene switching via your Stream Deck.  To start, drag the scene function to a button in your Stream Deck. In the bottom menu, you can name it and select which scene it goes to when pressed.

Toggling sources

If you want to enable or disable your scene sources, then this is the option for that. Drag the source function to the layout then at the bottom, select the source that you want to toggle. There is a ‘toggle linked sources’ option too for sources that are linked between scenes. This allows you to toggle sources regardless if the scene is active or not.

Record/Output

This option allows you set up recording and streaming on your Stream Deck. The procedures are pretty much the same and the only difference is with Outputs where you will select where you want to output your stream if you have more than 1 channel to output it to.

Microphone/Speakers

You can also assign a function to your Stream Deck that can toggle microphone or speaker audio and they work pretty much the same. For microphones, there is an added option for push to talk should you wish to set it up like that.

Hope this guide helps you with setting up Elgato Stream Deck with XSplit Broadcaster. If you’re already using it, we’d love to know how you’re utilizing it. Share it in the comments section below.

How to Stream to Mixer With XSplit Broadcaster

Mixer has grown since its days as Beam and the underlying technology behind it is still as exciting as the first time we saw it. FTL allows streamers to have next to no latency between them saying something and their audience hearing it, and with XSplit it couldn’t be easier to take advantage of this. So, friend, let’s take a look at how you can stream to Mixer with XSplit Broadcaster.

How to Stream to Mixer with XSplit Broadcaster

To get started with Mixer you’re going to need to set up an account, which is easily done on https://mixer.com. Next, open XSplit Broadcaster and select the Outputs tab at the top of the window.

XSplit Broadcaster Outputs Tab

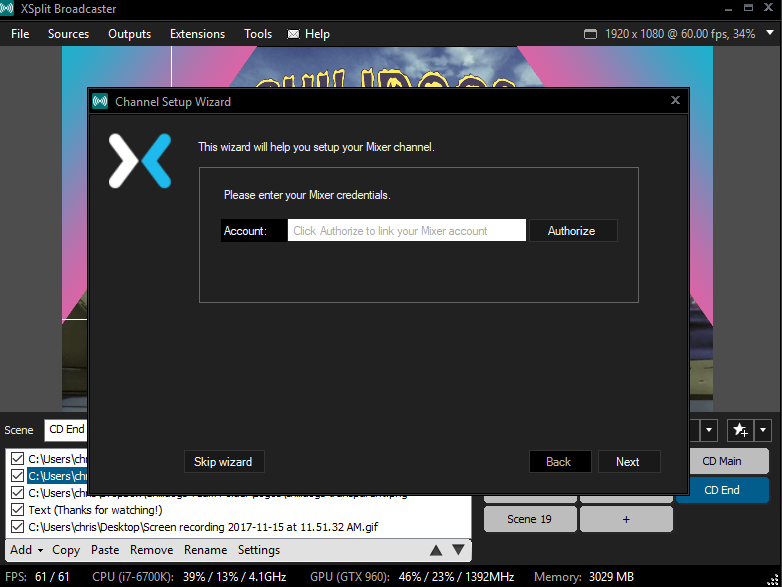
Select “Set Up New Output” and then Mixer. From here you’ll be asked to enter your Mixer credentials which will have you sign in to the account you just created. From here XSplit will work everything out for you and let you know your recommended stream settings.

XSplit Broadcaster Channel Setup Wizard

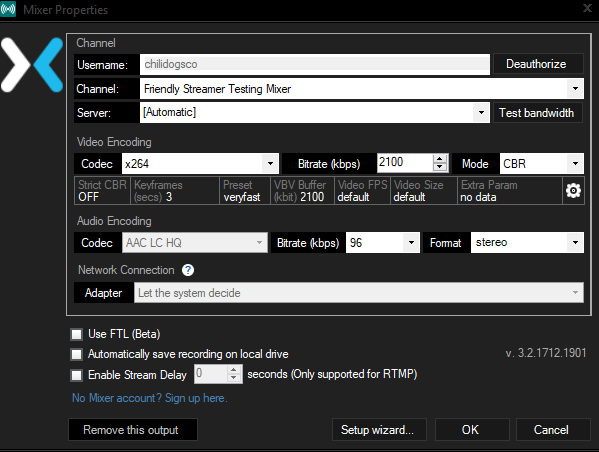
The next window that opens up will have all your settings filled out, if you have a good enough connection you can also check the “Use FTL (Beta)” button which will allow you to take advantage of Mixer’s low-latency FTL streaming protocol.

XSplit Broadcaster Mixer Properties

Once you click okay, your account will be added and you can now stream directly to Mixer from XSplit Broadcaster which will have your Mixer account ready to go in the Outputs menu!

Now you’re all set up, enjoy streaming and let us know how you get on!

How to Record Gameplay with XSplit

XSplit applications can do more than just stream. Did you know that both XSplit Broadcaster and Gamecaster can record gameplay? Here’s how to do it:

Recording Gameplay with Gamecaster

1. Settings

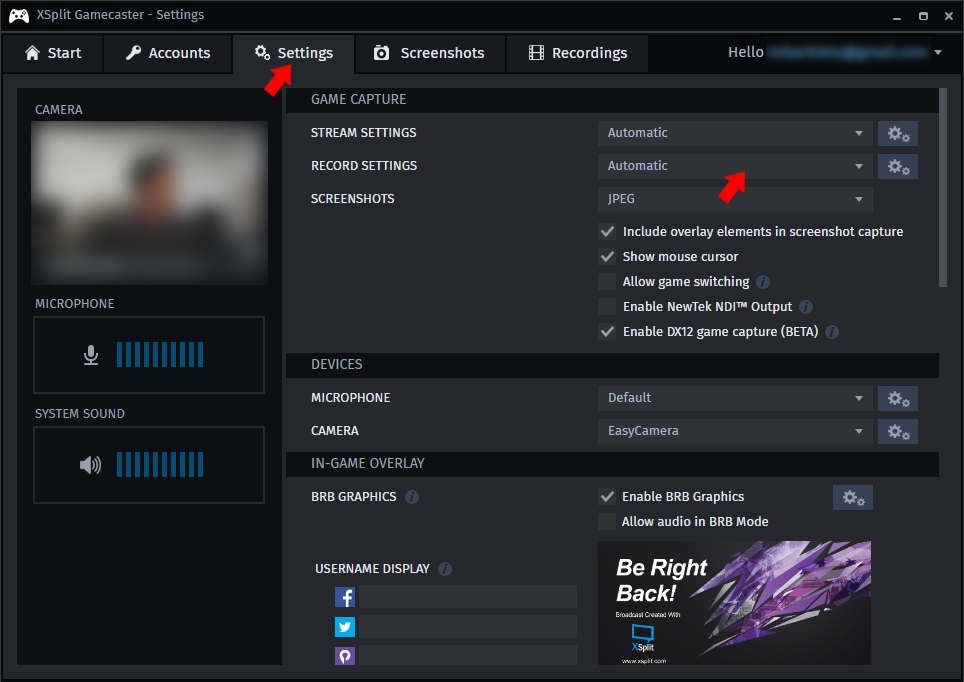
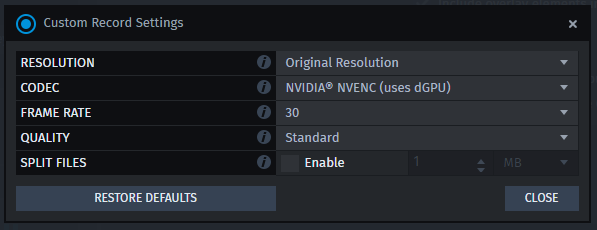
Click the “Settings” tab on the top menu, and from there you’ll find “Record Settings” on the right. By default, the settings are set to automatic. This means that all your settings are optimized based on your hardware. And, if you want to customize your settings, select Custom.

Gamecaster record settings
Gamecaster custom record settings

Resolution – This allows you to set the resolution you record your gameplay at. The higher the resolution you pick, the more upload bandwidth and CPU usage are required.

Codec – The available codecs will be dependent on your PC’s hardware. x264 is the recommended codec, provided that your CPU can handle it.

Framerate – Choose between 30 and 60 FPS. Higher FPS uses more resources.

Quality – Choose among Standard, High, Very High, and Ultra High. The higher the quality, the better your recording will look but the file size will also be bigger.

Split – You can split your recording files by either time or size.

For more information on the specifics of these settings, check this video out.

2. Starting Your Recording

To begin recording your gameplay, start up your game and then press ‘CTRL+Tab’ to launch the XSplit Gamecaster overlay.

XSplit Gamecaster record overlay

Click on Record to start recording. You’ll see a small notification on the upper left side of your screen to let you know you’re recording.

small recording icon notification

3. Finding Your Files

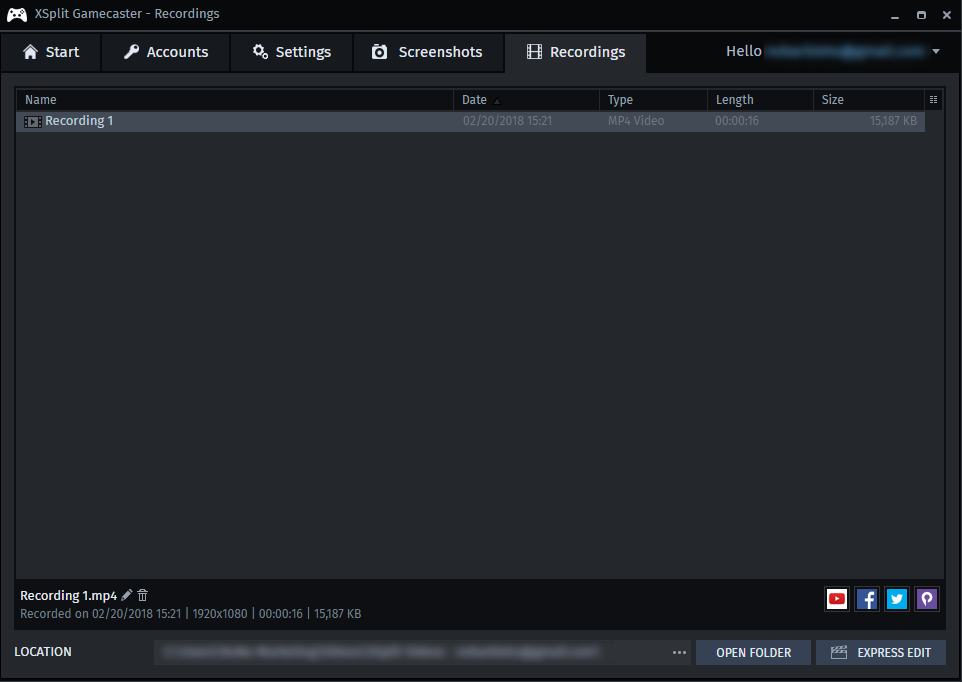
On XSplit Gamecaster, find your recordings by clicking on, aptly enough, “Recordings.”

XSplit Gamecaster recordings

In there, you’ll find all your clips, and see details like the date recorded, the format, the video length, and the file size.

From there, you’ll be able to rename or delete your clips or share them directly on YouTube, Facebook, Twitter, or Player.me .

Recording Gameplay with XSplit Broadcaster

Make sure you’re using the latest version of XSplit Broadcaster to get the best performance possible.

1. Settings

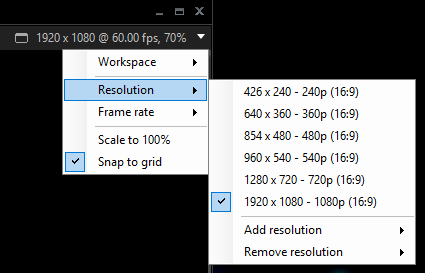
For the resolution and framerate, those settings can be adjusted from the upper right-hand corner of XSplit Broadcaster.

XSplit Broadcaster resolution settings

With XSplit Broadcaster, you can fully customize your resolutions and framerates. Again, you have to keep in mind that the larger the resolution and the higher the framerate, the larger your file size will become.

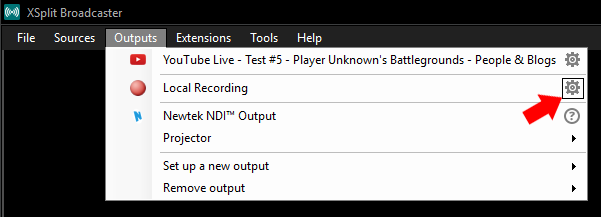
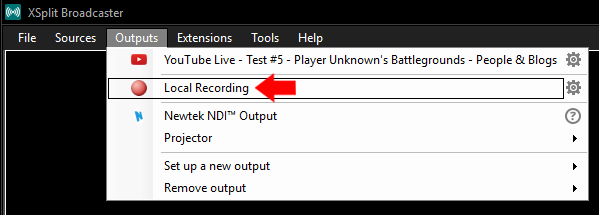
To adjust more properties, click on Outputs from the top menu. Then click on the setting icon that is next to “Local Recording.”

XSplit Broadcaster outputs menu
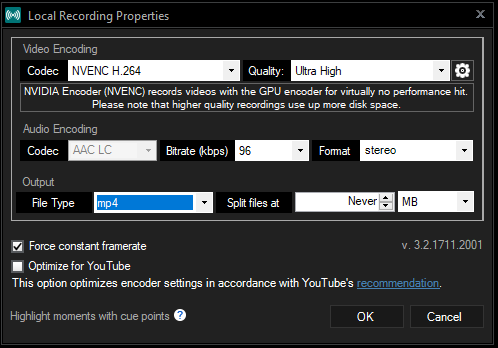
XSplit Broadcaster local recording properties

From there, you’ll be able to change the video codec, the quality of the video, the audio bitrate, the audio format, the output file type, and file splitting. For more information, check out this video.

2. Add a Game Source

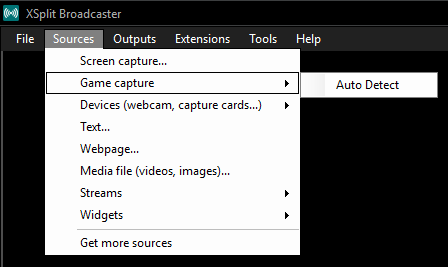
XSplit Broadcaster adding video source

To specify what game you’re recording, you have to add a video source. If your game runs on OpenGL or DirectX 9 – 12, add a video source by clicking “Sources” on the top menu and select “Game capture,” then either select your game or pick “Auto Detect.”

Alternatively, if your game doesn’t run on OpenGL or DirectX 9 – 12, you can select Screen Capture instead.

For more details on this, check out the XSplit Broadcaster Manual.

3. Start Recording

To begin your recording of the game, go to “Outputs” from the top menu, and click on Local Recording.

XSplit Broadcaster local recording menu

To stop recording, click on that again.

4. Finding Your Files

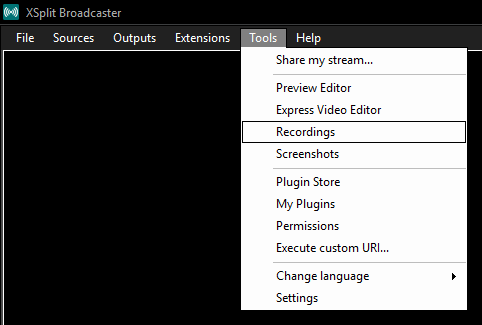
To find your recordings, click on “Tools” from the top menu. In the dropdown, select “Recordings.”

XSplit Broadcaster recordings

That will open a window where you’ll be able to delete, rename, or upload your file.

And there you go! That’s how you record your games via XSplit Gamecaster and XSplit Broadcaster. Simple, right? Now, go out there,  play some games and record them using XSplit.

Questions? Write us in the comments section below and we’ll be sure to respond.

Getting Started: What You Need To Get Streaming

This is Part 1 of an on-going and constantly updating series looking at what you need to start and stay streaming.

Getting Started - What You Need To Get Streaming

Streaming has become easier than ever with technology and streaming software being simpler and more accessible, if we do say so ourselves. There are some key things you will want to get going and right here in part one of our how to stream series we’re going to cover tech.

You can go ham with tech, spend thousands, surround yourself with monitors, cameras and microphones and have a broadcast set up stronger than some large film productions. You can, but do you need to? Not really.

First things you will need is a solid internet connection (we would say around a 5 MB/S upload speed) and a PC that can handle streaming (check our streaming software minimum/recommended system requirements for XSplit Broadcaster and XSplit Gamecaster.

Next, you will want some streaming software and, well, we’re pretty fond of XSplit Broadcaster and Gamecaster. We will go over what’s different and why you may want one over the other in a future blog but here are the basics; Gamecaster is the simplest way to get started with all the features you need. Broadcaster powers some of the biggest streams you see online and is full of more pro features.

Second, you’ll want a webcam. These days you can get a very solid USB webcam that can capture in 1080p and even have a solid microphone built in for an affordable price. Plug and play, recognised by our software and ready to go. Check out our list of hardware partners for some recommendations.

That can be all you need, people will see you, hear you and be able to see a video game you’re playing on your PC. if you want to broadcast a console you’ll want a capture card. Again, these are more affordable and high tech than ever with very simple set up processes. We’d recommend something external with USB 3.0 (this puts the gameplay you’re capturing on your screen with almost zero latency). Again, you can check out our hardware partners linked above for some recommendations.

From this base, you’re good to go! You can get online, broadcast gameplay, creative, talk shows or whatever you like!

Stay tuned for more tips on how to make your stream even better.
The Ultimate Streamer Pack Steam Bundle

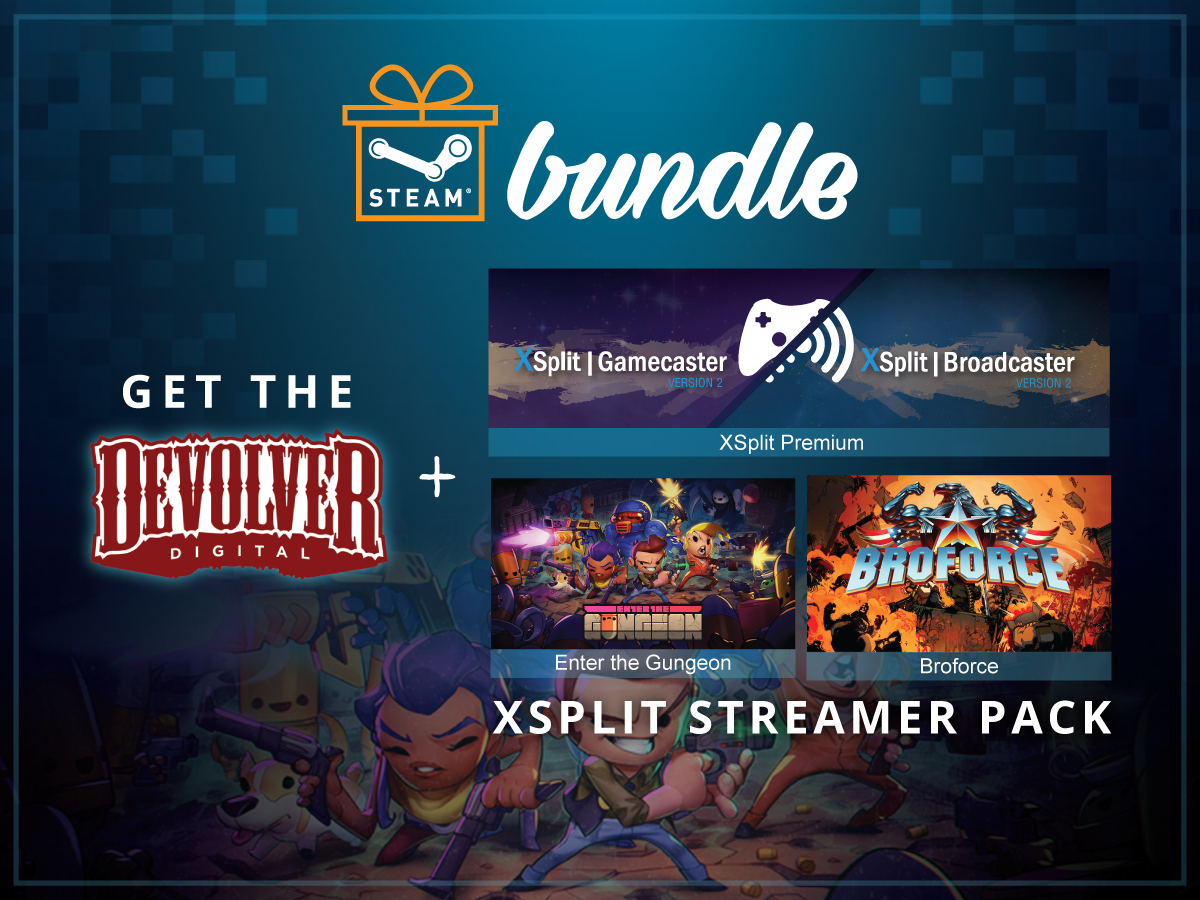
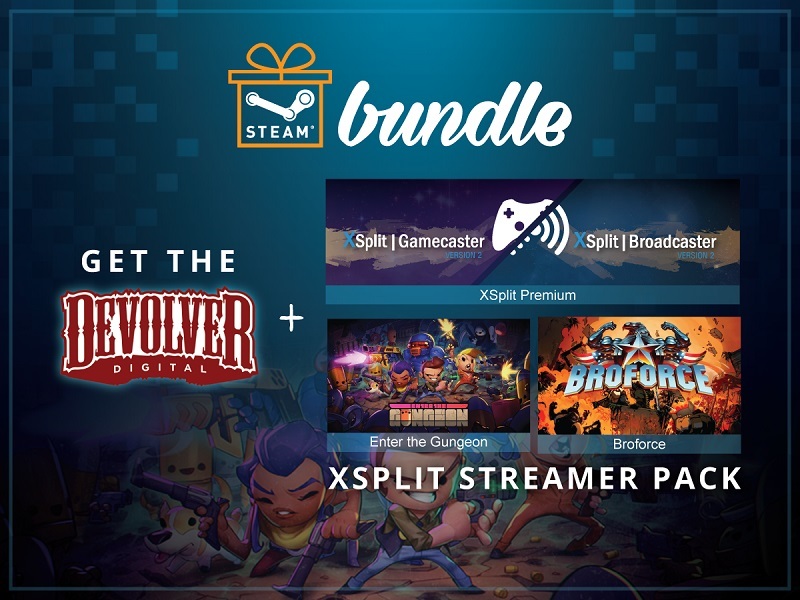
We have partnered with the renowned video game publisher Devolver Digital to bring you the Ultimate Streamer pack bundle on Steam. The bundle contains an XSplit Premium along with Broforce and Enter the Gungeon games from Devolver Digital.

Devolver and XSplit Streamer Pack Steam Bundle

Here’s a quick description of the bundled games in case you’re not too familiar with them:

Broforce When evil threatens the world, the world calls on Broforce – an under-funded, over-powered paramilitary organization dealing exclusively in excessive force. Brace your loins with up to four players to run ‘n’ gun as dozens of different bros and eliminate the opposing terrorist forces that threaten

Enter The Gungeon is a bullet hell dungeon crawler following a band of misfits seeking to shoot, loot, dodge roll and table-flip their way to personal absolution by reaching the legendary Gungeon’s ultimate treasure: the gun that can kill the past.

These two exciting, action-packed games can be streamed of course using XSplit. The Premium license more than allows you to share your gameplay to the world with ease. It is the same XSplit that powers countless live streams and recordings around the world.

Save 25% by getting this bundle exclusively from Steam today.

Setting Video and Audio Delays on Camera Sources

Welcome to the XSplit Workshop, a feature series where we provide handy tips to help you get the most out of your broadcast. This week we have put together a guide that will teach you how to set video and audio delay.

For those who prefer more visual learning, the video below will cover most of the points in this post.

USB 2.0 capture cards have built-in delay!

Some of the most popular capture cards on the market are USB 2.0 based capture cards. There are the Elgato Game Capture HD, the Hauppauge PVR series, the Roxio Game Capture HD, and the Avermedia Live Gamer Portable. These cards are great for gamers who wish to start recording or live streaming their console gameplay in high quality.

Due to the limitations of USB 2.0 bandwidth, these capture cards are forced to compress (encode) the video stream – before it is passed through the USB cable and into the computer.

This inevitably leads to a delay between the capture card feed from the real-time video feed on your gameplay monitor and when it reaches XSplit Broadcaster. To compensate for the delay, XSpit Broadcaster allows you to set the delay on secondary video and audio sources, like your web camera and microphone.

Determine the duration of the capture card delay

Before settings a delay on a source, you must find out what the delay between the capture card feed and the live feed is. Some manufacturers advertise what the delay is in the instruction manual. Otherwise, you will have to measure it manually and make fine adjustments on the fly. One useful method is using a stopwatch to time the difference between the live feed and the capture card feed. Once you’ve measured the delay, you will need to convert the number in milliseconds – that is how the delay is set in XSplit Broadcaster.

Setting the webcam delay

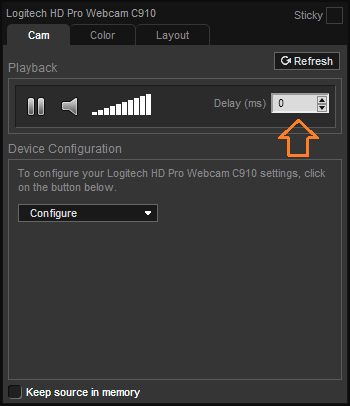
To set video delay, you need to add a video source like a webcam. After adding the webcam and is set up to your liking, right-click on the camera in the source list. On the first tab, you will see a box where you can enter the video delay for the webcam. In this box, you will enter the delay amount that you measured earlier.

Logitech HD Pro Webcam C910 Settings

Setting the mic delay

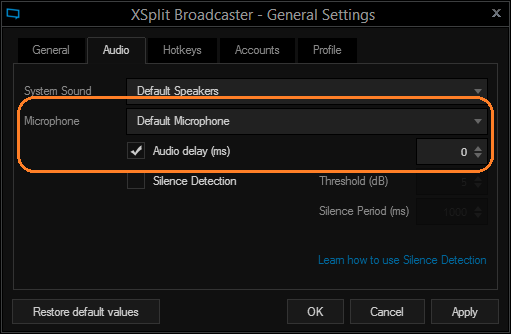
To set the audio delay, click on the Tools tab and then on the general settings option. In the audio section, mark the check box next to audio delay. From there, you can access the box to enter the audio delay time. Enter the same value as you did for your webcam video delay. Click ok to exit this window.

XSplit Broadcaster General Settings Microphone

Test the settings

Now that you’ve set your delay, it is time to test the settings to see if they are correct. Start a local recording by going to broadcast then clicking on the local recording. Spend at least 30 seconds doing some gameplay with commentary and then stop the broadcast by once again clicking on the local recording button in the broadcast menu. You can review your local recording by clicking on the Tools tab then on my recordings option. When reviewing your recording, make sure your microphone audio and webcam audio is in sync. Please also check if these are in sync with your capture card feed. Once the settings and other customized delays are in place, then you are ready. Congratulations you are now ready to record and/or stream with your USB 2.0 capture card!