The Essential Video Conferencing Hardware for Small Businesses

This last year, it’s become clear that video conferencing is the way forward for businesses of all shapes and sizes. Many companies have learned the value of remote meetings. It can increase your potential client and collaboration base, as well as enabling you to have a more flexible workforce. If you’re just starting out as a business, or if you suddenly find yourself engaging with more online communication, what hardware do you need for effective video conferencing? We’ll take you through the basics.

Essential video conference hardware

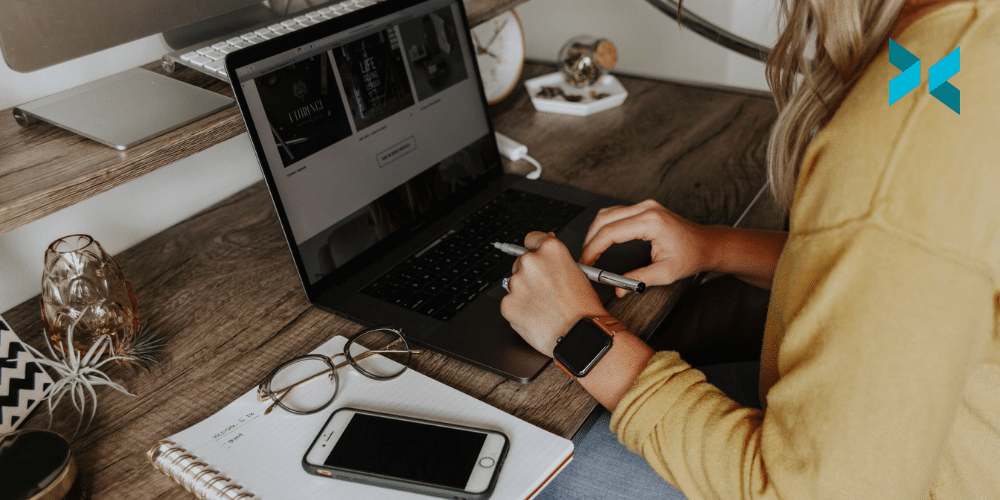
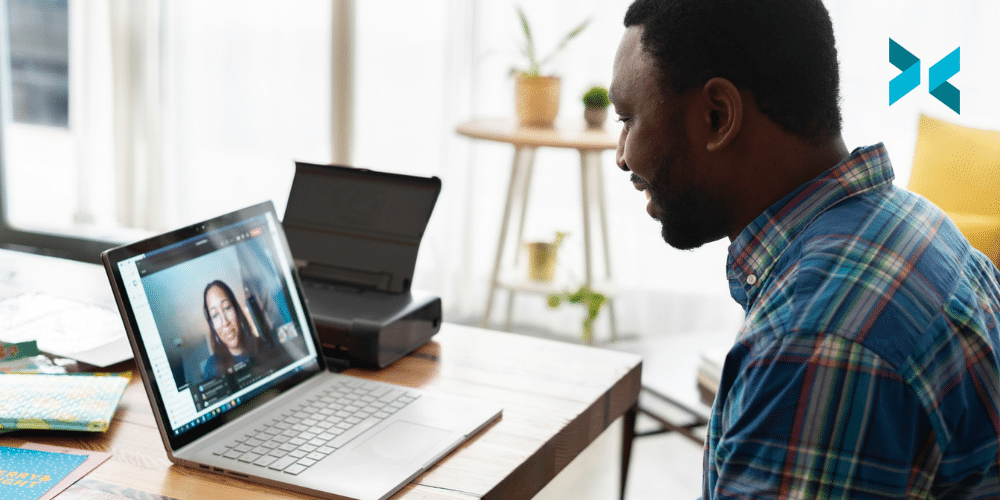
It’s actually pretty straightforward. You need to be able to see, be seen, hear, and be heard. If you’re using platforms like Zoom or Microsoft Teams to engage in virtual meetings, there’s very little needed except for a computer, tablet, or smartphone, some sort of webcam, and a mic. You can improve your video conferences significantly, however, by combining software like Zoom or Microsoft teams with our XSplit Presenter. It makes delivering presentations to your company so much easier and even lets you add a little flair to them. You’ll be able to annotate with a virtual pointer and make use of the virtual green screen to remove your background and keep your team engaged.

If you’re a small company with numerous team members, you’ll need to make sure that every person has access to the right kit. With this in mind, we’ll look at easy and low-cost options, and give you some tips about making your meetings look and sound great.

A blue snowball which makes a great piece of video conferencing hardware.
Photo by Jeroen den Otter on Unsplash

Can you hear me? The importance of getting the right mic

Once upon a time, a small company could get away with one online-ready laptop, which was used by anyone booked onto a virtual conference. These days, with our teams more likely to be working remotely themselves, it’s important that everyone has good access to tech. Make sure that everyone in your team has a decent webcam and mic, along with reasonable internet bandwidth. If these aren’t in place, any online work can be incredibly stressful.

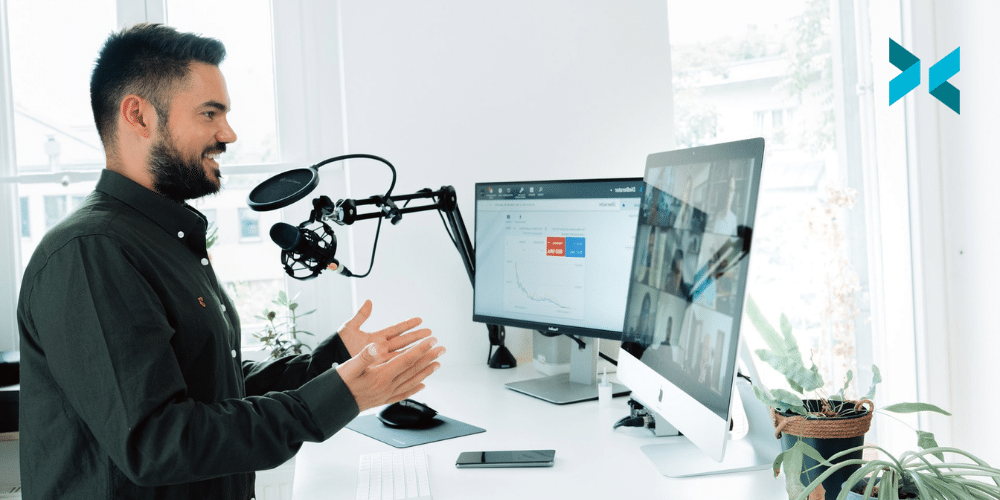
Starting with speaking: do you stick with the built-in mic or go for a separate one? We’ve discussed mics before but briefly, most modern laptops have a good built-in microphone. There are also plenty of webcams with built-in mics like the Logitech C920, which has remained a firm favorite. However, if you or a colleague is going to be doing a lot of online presentations, you may prefer the clearer sound of a separate mic. There are plenty of USB mics that offer optimal sound quality such as the Blue Yeti, Snowball, or the Elgato Wave:3. For something that’s a little lower in price, the HyperX SoloCast USB is ideal. It also has a handy little mute button that’s perfect for conferences.

Do you need a headset?

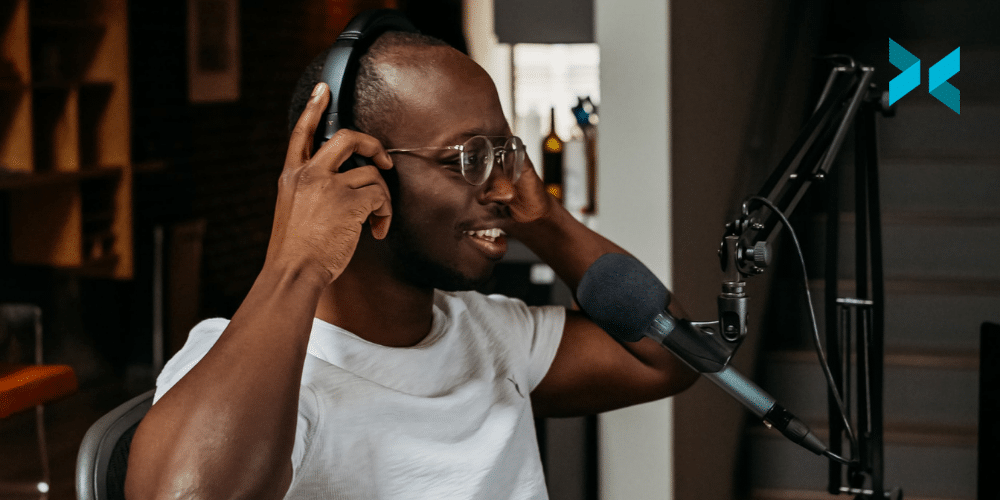
In theory, you don’t need to use a headset with a built-in mic for video conferencing but they’re pretty useful. Some remote workers prefer to use a headphone and mic set up, as it cuts out any background noise (hence their use in call centers), and can help with focus. If your team will be returning to a workplace but continuing to liaise with other collaborators online, headsets will help.

You can get USB, noise-canceling lightweight headphones with mics like the Jabra Evolve range that aren’t too costly. But, you could also make use of a number of gaming headsets that are ideal for canceling out background noise. The HyperX Cloud Mix and Logitech G Pro X for instance, have excellent mics. The latter even lets you play around with customization to control the clarity and output level of your voice.

What’s the right sort of webcam for video conferencing?

When it comes to video conferencing, most of us simply use our laptop’s camera, while feeling vaguely self-conscious about the awful angles. If you’re not happy with your computer’s camera, you can get an external USB webcam, and these are ideal if you need to capture a wider view than simply your face (for example, there are a few people in your room, or you need to demonstrate something). The Logitech C920 that we mentioned earlier is a great option for a USB webcam. It has excellent sound quality from the built-in mic but it’s also great in low-light settings and has full 1080p HD video.

At XSplit, we’ve come up with XSplit Connect: Webcam, which lets you use your smartphone as a wireless webcam. Download the app for your phone and the software for your laptop or PC, and there you have it – an instant, non-static webcam. You can also use the XSplit VCam, which also acts are the software for Connect: Webcam, to blur or change your background for a more professional (and private) look.

We’ve covered a few of the essentials but there is a huge variety of hardware out there that will make video conferencing a breeze for small companies. Don’t forget to also find out more about how to use XSplit VCam with the main video conferencing platforms in our blog.

How to Create an Online Course And Where To Share It

Even before the coronavirus pandemic, people were gradually shifting to online courses and mobile apps to learn new skills. With fewer classes and classrooms available in the post-pandemic era, teaching and learning online has gone mainstream, making it the ideal time for you to find out how to create an online course.

We’re going to look at a basic overview of creating your own classes, including putting together an online syllabus, structuring them effectively, and the software you can use to do so. We’ll also consider which education and online portals you can share your class with so that more people to find it and learn directly from you.

How to create an online course using XSplit Presenter

If you’ve sat in an online class before, what people often do is share their screen while dictating over it. While this approach is simple and easy to achieve, it can often be dull. Especially if there are long moments of inaction. In order to prevent your students from disconnecting from the lesson, you can make it more interactive! You can add yourself as an on-screen presenter using XSplit Presenter.

The software features a virtual green screen, allowing you to appear in front of whatever media you are using during your lesson. Whether it is videos, images, slides, or documents. This means that you can record your lessons in real-time, with full control over all of your sources, instead of having to record yourself speaking and then edit your footage with the lesson materials. What if you have more than one teacher? XSplit Presenter has the ability to add more presenters through video call services such as Skype, Webex, or Zoom.

Another great tool that XSplit Presenter has is a virtual pointer. Just as a teacher in a classroom may have a laser pointer, this allows you to draw attention to specific items. For example, you could pause a video and draw a circle around a point of interest, or underline a section of text you want your students to focus on. When it comes to creating an online course, XSplit Presenter is the complete package!

How to structure an online course

You have the camera and software to record your online class, but how should it be structured? Shaping an online course is very similar to any other form of learning design. While there will be differences depending on the subject and teaching style, you can apply a general structure and then tweak it to fit the content.

People who take your online course will be doing so for a reason, which is to learn a specific new skill. By the end of your course, they will have gone through some form of transformation. Ideally, each section within the course will be an identifiable step towards that transformation. These modules may need to be in a specific order depending on what you are teaching. This should see your course plan naturally begin to take shape.

Within these modules, there may be smaller, bite-size lessons. An online course is not the same as a university degree. People are taking an online course in order to learn something quickly and most likely in their spare time. So, break the lessons up into small components that they can tackle easily. If you have a long video, can you break this up into five-minute sections, with each section covering a core idea. For each aspect, consider it from a student’s point of view. They want to know what they are going to learn, how it fits the overall aim, and why they need to learn it.

A person sat at a desk with headphones on in a cafe watching a video on a laptop the person who made the video knew how to make an online course.
Photo by Wes Hicks on Unsplash

How to organize and sell your classes

Once you’ve planned your content into a loose structure, you can then tighten that up and move lessons around. One way to do that is to see if you have any similar lessons that could be grouped into a teaching module. One thing to keep in mind is that modules do not need to be the same length. This will depend on the step you are teaching. One module may only have one or two core concepts that are required, while another may have five or six. Allow the subject to breathe and guide you as to how many lessons each module has.

When you feel your online course structure is ready, you can formalize your plan to make sure that it meets your original aims and takes the student on a transformative journey. This will make it easier to film and also spot any potential duplication that has happened while you’ve been writing and organizing.

Also, consider what your modules and lessons are called. You may have been referring to them simply as the skill or sub-skill that is being taught, but this might not sell it to a potential student browsing your lesson plan. Instead, come up with creative and enticing lesson titles that will make students want to take your course. Think of it less as a descriptive title and more like a marketing one.

A person in front of large bits of paper pinned to a wall with graphs and post-it notes on them planning out how to make an online course.
Photo by Christina @ wocintechchat.com on Unsplash

Where can you share your online course?

With the boom in online courses being produced, there are now several platforms where you can sell or share your courses for free including:

  • Udemy
  • Skillshare
  • Thinkific

Udemy was one of the earliest platforms and it’s certainly the biggest. With over 155,000 online video courses, many focusing on programming skills and software. Offering thousands of courses suitable for both individuals and businesses, Udemy uses real-life instructors. They will share their knowledge and skills with more than 40 million students around the world!

Skillshare is similar to Udemy, but the lessons here lean more towards creative skills. The site is very user-friendly, and also features the Skillshare Help Center which guides you through how to make a Skillshare course.

If you struggled with building your online course, then Thinkific may be the platform for you. It has a series of easy-to-use templates that you can use to make a simple lesson plan.

Now that you know how to create an online course, you can take those skills and apply them to other areas. Check out how better online presentations can help you stand out to see how you can utilize other tools within XSplit Presenter to make your online presentations engaging.

Working 9-5: Why a Schedule Makes the Best Work From Home Routine

How has working from home worked out for you? You may have embraced the commute-free world of Zoom and pyjama days, or do you feel that you no longer have time to yourself? After a year of working remotely, it’s time to give WFH an annual review. This year’s key question is: how are you balancing your business and leisure hours? Let’s consider some ways to improve your work from home routine.

Can you improve your work from home routine?

So you’ve stumbled into the kitchen. Ambition duly poured, now what? Rookie home workers have broadly taken two approaches: trying to replicate the nine-to-five routine, or throwing that out of the window and being flexible in their work schedule. If you’re not having to stick to schedules, the idea of working to your circadian rhythms or spending the day in the park and the night on your laptop can seem appealing.

However, research into working from home shows that a routine can be the best approach for your mental health. One of the hardest things about working from home is finding those essential boundaries between work and leisure. Time is your greatest ally here, and having a set schedule prevents your work/life balance from becoming too blurred.

A person sat at a small desk at home using a laptop with a cactus on their desk deploying the best work from home routine.
Photo by Surface on Unsplash

Timetabling your day

Now, we hate to sound like strict, old-school teachers here, but a timetable is key. If your work has been a bit more free-flow so far, try creating a more fixed structure. You don’t have to go for the full, colour-coded timetable or spreadsheet here (although many of us would love that). You can eventually build in slots for things like admin and phone calls, but start simply with your working hours: start time, breaks and finish.

From a wider employment perspective, it means that you and your team or clients are all there for each other at the same time. This makes work both more efficient and enjoyable, and if you do end up back in the workplace, it won’t be such a shock to the system. And the real Holy Grail? Finishing by five and making the commute to the living room.

Plenty of rewards for the best work from home routine

While we’ve all been skipping lunch to impress the bosses, it turns out that if we go without breaks, we become less productive. Bear that thought in mind when you’re planning your day, and build in plenty of breaktimes. We’ve even heard of work teams who meet on Zoom for a coffee break every morning, which is a great way of staying connected with colleagues. Going for a run at lunchtime is far easier when you can just hop into your own shower afterwards, or you might even like to spend an hour gardening.

It’s also more important than ever to take screen breaks. In the typical work environment, we have plenty of natural opportunities to leave our desks. Many seasoned working-from-homers use approaches like the Pomodoro Technique, which helps you build in small, regular breaks.

A person sat on their bed using a laptop searching for the best work from home routine.
Photo by Jornada Produtora on Unsplash

Extra WFH treats

Of course, a routine doesn’t take away those extra little benefits of working from home. You have the cat on your knee, the radio’s playing and nobody will steal your biscuits. Download our own XSplit VCam and nobody will be able to judge your workspace either (although we can’t replace your onesie. Sorry).

If we’ve learned anything over the last 12 months, it’s that life’s small pleasures are essential. These smaller WFH benefits can really help make working from home more enjoyable; however, try not to slide back into a vague approach to time management. Following a work-from-home routine helps you find more time for the things you love, and creates a firm barrier between business and leisure. When the lid’s closed, it’s closed.

How did your own annual review of your WFH routine go? We hope it’s given you some focus on planning your future schedule. To find out more about developing a healthy work-life balance, take a look at our blog.

Is Multistreaming Worth It? Why You Should Multistream Your Content!

The definition of multistreaming has become a little bit elastic over the last couple of years. Traditionally, restreaming was a synonym for multistreaming to different platforms simultaneously but it has also come to mean a variation on rebroadcasting. Here, we will discuss the different types of restreaming, how to do it, and why you should multistream your content.

Multistreaming your content

You may or may not have heard of sites like restream.io, a service we have seamlessly integrated into XSplit Broadcaster, which will take in a single stream feed and then multistream it to multiple sites. This is handy if you’re working for a client or brand that wants to get their live stream to as many platforms as possible. Or, if you’re a new streamer looking to multistream your content by trying to figure out what platform works best for your audience or even where you can find an audience.

This also helps with encoding and bandwidth resources as it’s a single feed instead of requiring your encoding PC to do multiple encoding processes and the bitrate required for each encoding. XSplit Broadcaster can actually do multistreaming as well, but each channel you go live to will require an additional encoding process which is great if you have a more recent PC as it saves paying extra for another service.

A person sat in front of their mic with headphones on wondering if you should multistream your content.
Photo by Higor Hanschen on Unsplash

Rebroadcasting other content

The next type of multistreaming of your content has risen in popularity over the last couple of years which is rebroadcasting of content.  Basically, special events like E3 or press conferences give broadcasters permission to rebroadcast their content on their channel as long as they add their own commentary on top of the rebroadcast and usually follow some guidelines.

Many esports events will even offer clean feeds without original commentary for broadcasters to commentate over. Usually, there are two ways to add these feeds to your broadcast. The first method is the easiest and most straightforward, you just screen capture the original stream or you add the streaming site as a web source URL. This web source method is usually pretty useful if you have limited screen real estate. 

Now for taking in special feeds without the original commentary, usually you will be given an RTMP URL. This will have the RTMP stream source and a stream name or key. You can use the RTMP stream source in XSplit Broadcaster to receive this feed. Usually, this is a private URL, but sometimes you’ll be given an unlisted youtube stream that you can screen capture as well.

Why should you multistream?

So why should you multistream your content? Or why should you allow restreams of your content? If you’re going to rebroadcast, be sure you have approval, copyright strikes are something you don’t want to get on your channel. Now if you have permission, rebroadcasting is just good, easy content.

If your channel is focused on a certain industry, like gaming, or camera hardware, it’s highly likely that people follow your content for your opinions and thoughts on big industry events, and most platform’s algorithms reward posting videos with the latest stories and trending topics. 

Now for those producing the content, especially esports events, it’s a great practice to allow people to multistream your content. It’s a great way to open up access to new audiences if people restream your event in different languages since localization can become quite expensive. Just try to get the streamers to share their analytics after the broadcast to help with your post-event report. 

A streaming PC setup with speakers, a monitor, and moody lighting setup. Should you multistream your content?
Photo by Omar Prestwich on Unsplash

When it comes to multistreaming, as we mentioned it is a great way to find out where your content is going to get the most traction. It is worth mentioning, however, that a lot of sites like Twitch will have in any affiliate level contract that you are sometimes not allowed to do this. So, be sure to check before you sign up for anything. However, as we mentioned, if you’re just starting out, multistreaming your content is a great idea.

But to summarize, multi-streaming is great for client work and to find your audience as a streamer, and rebroadcasting is a great tool for growing the audience for your content or having a good source for your own content. Have you tried multistreaming? Did you get good results? Be sure to let us know in the comments section below!

Want to Save Time at Work? Pre-record Your Presentations

Meetings, someone once said, are where minutes are kept but hours are lost. We’ve got a suggestion that can streamline your meetings and save time at work: pre-record your presentation.

The latest presentation software can help you keep meetings on track, helping to save time at work for everyone involved. XSplit suite of apps lets you pre-record a pro-quality presentation, which can be sent out to the right people at a time that best suits everyone. You can even replace longer emails and memos with snappily short films. Here’s how pre-recording your presentation makes meetings more efficient.

More effective meetings

Meetings aren’t always the most efficient of events, something Linkedin agrees with. The good news is that you can make them more streamlined by pre-recording your presentation. While pre-recording might seem like a bigger effort, to begin with, it gives you a lot of flexibility and lets you have more control over your content. Pre-recording means your presentation can be exactly as you want it to be: polished, confident, and with zero technical hitches (giving you peace of mind and really helping you save time at work!). With XSplit Presenter, you can easily record your presentations for later use. Also, all of this ease of use applies when you use Presenter to give a live presentation!

Secondly, there are no interruptions. Discussion is always great; however, if that takes the topic off-track, it can be hard for the presenter to steer the meeting back. Introduce a pre-recorded section, and the Q&A time will have to be at the end of the session. You can even be in the live chat with participants while the recording is playing, engaging with them and encouraging discussion. 

Thirdly, if you really want to save time at work, email out a link to your presentation with the joining instructions, asking all attendees to watch the film before the meeting. This means that when you do get together, everyone already has the information they need for a useful discussion.

A person sat outside a cafe using a laptop to watch a pre recorded meeting to save time at work.
Photo by Kaleidico on Unsplash

Save time at work with no diarising

One of the most time-consuming things about organizing a meeting is getting it into everyone’s diary. Finding a mutually suitable time can be a huge task, whether you’re arranging a Zoom or room-based meeting. It’s especially hard work if you’re organizing a large meeting across multiple departments or even organizations, where everyone’s scheduled day looks different. This inability to bring everyone together can put real pressure on deadlines and decision-making.

Pre-recording a meeting and emailing out a link saves you all that diarising time and makes life far easier for all involved. The team can watch the meeting in their own time and don’t have to find a specific window. It also enables you to deliver the information in a far more timely manner than if you’d had to organize a live event. This in turn will help save time at work! 

Top tip: set a viewing deadline, and keep on top of who has and who hasn’t engaged with the presentation. Make sure that the viewers can reach out after they’ve watched it: finish with an email address for follow-up questions, for example.

Pre-recording a presentation using XSplit Presenter can really help make meetings more effective. Once you get into the habit of pre-recording messages as short films, you could even use this technique for the monthly de-brief or to replace extra-long emails. Find out more about online presentations in our blog.

Online Meetings: How You Can Help Them Run Smoothly

With online meetings being so easy to organize and add people to, there’s a risk of them being called unnecessarily and wasting time. However, not everything can be conveyed in an email, so meetings are often essential. With that being said, they need to be an effective use of everyone’s time. In this blog, we’ll show you how to have better meetings.

Plan in advance

If you’re organizing an online meeting, it’s useful to know in advance what it’s going to be about, and producing and distributing an agenda listing the topics to be discussed is a good way of making sure everyone is on track. This tells your invitees what to expect and allows them to do research beforehand so they can participate more effectively and give better answers to any questions you have. In some cases, they may even be able to solve the problem in advance, meaning that part of the meeting can be removed. More streamlined meetings are better meetings!

If the meeting involves you sharing information with others, make sure you know not only what you want to pass on, but details around the topic as well so you can be sure to answer any questions. If you’re asking other people to teach you about the topic, have a list of questions you want answers to, and again, good background knowledge of the topic is ideal as well.

Someone on an online call to someone on their laptop which is on their desk with a small printer and other items looking to have better online meetings.
Photo by LinkedIn Sales Solutions on Unsplash

Include media in your online meetings

Since you’re likely to know your agenda in advance, you can put together some slides with a summary of the points that need to be discussed. If you’re presenting, these should include pictures to add some visuals to your discussion and to keep your audience engaged by giving them something to look at while you’re talking.

Using slides will help to keep the meeting on topic and reduce the risk of attendees discussing something that only really affects them, while everyone else waits for them to finish. If this does happen, however, politely encourage them to make a note and discuss it after the call, or to call an additional online meeting with only the people the topic is relevant to.

XSplit Presenter is an excellent way to organize the media for your presentation. It allows you to put slides from places like Google and Microsoft Powerpoint, images, videos, websites, and other content together into a single place, making it easy to use during the presentation. You can also use it to manage your webcam, placing you on the screen as a part of your slide content.

A person sat in a large office area on a zoom call with a whiteboard in the background behind the large desk they are sat at looking to have better online meetings.
Photo by LinkedIn Sales Solutions on Unsplash

Set the schedule

When you send out your meeting invitations, your calendar software will ask for a meeting duration. This isn’t just a formality – it’s important to choose an accurate time slot so that people can schedule their other meetings appropriately around yours. By extension, you also need to make sure that your meeting sticks to its schedule. If you realize partway through the meeting that you are falling behind, you can try to speed up a little bit, perhaps by discouraging discussion or by summarising some of the less important points in your notes.

Getting derailed is a common cause of an online meeting over-running, perhaps due to idle chat between attendees, unrelated discussion, or even too much relevant discussion. Don’t worry – as you get more experience running meetings, you’ll start to get a better feel for how much time to allow, and how much material you can get through in a given time.

The main takeaway from this is that running better meetings shouldn’t be too difficult. They just require some pre-planning and time management. As long as you have an agenda and stick to it, the meeting should run smoothly and on time.

How To Secure Your Privacy While Streaming to Twitch

Streaming is a fun way to meet new people and put yourself out there in the world, both literally and figuratively. But as you know, the internet isn’t always the safest place to be so it’s important to secure your privacy while streaming to sites like Twitch. As we’ve seen recently, especially with IRL streamers, they are subject to stream snipers and dangerous SWAT raids. So, we’re going to give some tips on maintaining your privacy online while you’re streaming.

So what things do you want to keep secure? Well, the most important thing is your location. Next are vital details, like your full name, birthday, email address, and phone number. People can use these details to hack into your various online accounts. Finally, you may want to keep certain accounts private, like your steam accounts, discord accounts, basically anything where someone could report your account and get it banned for illegitimate reasons.

Secure your Web Browser while Streaming to Twitch

If you’re doing a just chatting stream or watching some youtube videos, anything where you’d be showing a web browser on screen, be very careful. Many times, when you’ve signed in to your browser it will track your location data and show nearby restaurants when you search different terms, this is an easy way for people to find out your location.

Your address may also be auto-saved so it may pop up when you input some numbers your browser thinks is a text field. The best solution is to use private or incognito browsing on a separate browser. So if you’re always using Chrome, jump over to Edge or Firefox and don’t save any passwords there when you’re streaming. Also, be sure to turn off any location tracking or auto-fill to avoid revealing your location. Doing simple things like this can be key to securing your privacy while streaming to sites like Twitch.

A smartphone in a selfie stick pointing downwards it's important to secure your online privacy when IRL streaming to Twitch.
Photo by Steve Gale on Unsplash

IRL Stream Safety

If you think you’ll be IRL streaming, make sure to start your stream far away from where you live or are staying and end your stream before you are close to home. Also if you’re using a streaming backpack, add a stream delay to the cloud PC that’s running your streaming relay. 

Make sure to stream in public places if you anticipate that you might encounter stream snipers (people trying to find where you are can then track you down while you’re live). If you will be IRL streaming with others, be sure to let them know not to reveal any information about you or themselves, such as phone numbers, location, etc while you’re live or on social media.

Keeping Yourself Secure While Streaming Audio and Video

Always be aware when your webcam and microphone are on. If you’re ordering a pizza and leave your mic on, there’s your address given out on a stream. Fortunately, there are some handy tools in XSplit Broadcaster to help with this. For your microphone, you can enable a hotkey to toggle your microphone on and off.

For your webcam, use it with XSplit VCam. In XSplit VCam you can pause your camera feed and if you use the background replacement feature, once you’re out of frame, whatever you do in the background will be hidden, helping you secure your privacy while streaming to sites like Twitch.

Hide your screen to secure your privacy on Twitch!

Ideally, you never want to show your desktop on stream, and with XSplit Broadcaster just grabbing your gameplay source or Capture card alone is easy. If you’re using an intermission just chatting kind of scene, make sure it’s only your facecam with some graphics rather than just capturing your desktop so people see it when you quit out of a game

If you don’t like to switch scenes, set up a source you can toggle on and off with a macro that will cover your scene. This is mostly an issue for dual PC setups, but it’s good to take heed of this as well if you have to use desktop capture for a certain program or beta of a game that Broadcaster can’t capture yet but this is a rare instance.

A dual PC streaming setup with a microphone on a desk next to the monitor which can help you secure your privacy while streaming to Twitch.
Photo by Andre Tan on Unsplash

Disable Notifications While Streaming

Turning off as many notifications as possible is pretty important if you don’t want to have the first few lines of an email or text come up on screen while you’re streaming. This can also apply to other people’s privacy, for example, Steam will let you know when someone has come online and what they’re playing. This also applies to consoles where you may not want everyone watching to know the usernames of all of your friends that you’re playing with. This can honestly be a big part of the day-to-day when it comes to securing your privacy for streaming to sites like Twitch.

Most instances of this can be combated by going into the Steam or console settings but there are a lot of games that have a streamer mode now which can remove a lot of these issues. Speaking of streamer mode, Apps like Discord are great for having one of these where they can detect if a streaming app is open and hide personal or sensitive information in the app. 

Finally, make sure to check what your streaming account is connected to. If you’ve been using your Twitch account to login into various websites, it’s good to double-check those sites and revoke access from time to time, as sometimes they lapse in security and your data can be exposed.

As always, it’s not fun to read the fine print, but it’s important if you value your privacy and want to maintain an online presence. Secure your online privacy on sites like Twitch and it will be one less thing you need to think about when you next go live! We hope you found this article helpful and if there is anything else you would like us to discuss, the comments section below is the place to let us know!

유튜브 실시간 방송과 활용할 수 있는 기능

인터넷 방송 기술과 문화는 그 어느때보다 더 발전되었습니다. 방송 화면에서는 팔로워 알림등을 실시간으로 표기하거나 실내가 아닌 야외에서도 스마트폰만 있으면 어디서나 인터넷 방송이 가능한 시대에 살고 있습니다. 이러한 현대인들의 요구에 해소를 해주는것 마냥, 다양한 온라인 서비스들이 동영상을 업로드 하거나 실시간으로 송출해주는 플랫폼으로 생겨나고 있습니다. 가장 대표적인 플랫폼은 유튜브이자 세계에서 가장 큰 동영상 플랫폼입니다. 유튜브로 실시간 방송을 선택하시길 원하신다면 유튜브의 경쟁사와의 비교 및 유튜브 자체 기능들에 대해서 알아보도록 하겠습니다.

유튜브에서의 수익 실현

유튜브에서 지속적인 활동을 하면 동영상들로 수익을 벌 수 있는 시스템이 존재합니다. 유튜브 파트너십에 승인을 받아야 하는데 여기서 유튜브 파트너가 되는 조건을 먼저 확인 해보세요. 간단하게 풀어보자면 12개월 안에 1,000명의 구독자와 4,000시간의 동영상 시청 시간이 필요로합니다. 파트너십을 달성하게 되었다면 다양한 기능을 활용하여 수익 실현에 도움을 줄 수 있습니다.

일단 광고를 영상에 삽입할 수 있습니다. 광고의 종류는 동영상 재생 전, 그리고 동영상 재생 중간을 선택하여 삽입할 수 있습니다. 더 나아가서는 채널에 멤버십을 활성화 할 수 있는데, 이 기능은 트위치의 구독 시스템과 비슷한 유료 회원 서비스 같은 개념입니다. 유료 멤버십을 활용하면 멤버 전용 영상을 만들거나 멤버들만이 참여할 수 있는 실시간 방송을 송출할 수도 있습니다. 다만 이를 통하여 불법적인 활동을 하면 제재를 당하게 되니 주의하셔야 합니다.

마지막으로 슈퍼챗, 슈퍼 스티커 기능이 있는데, 슈퍼챗은 자신들의 글귀가 잘 보이도록 눈에 띄는 색상으로 채팅창에 표기되는 것이고 후원한 금액에 따라 다른 효과들이 표기됩니다. 슈퍼 스티커도 비슷한 형식이지만 글귀가 아닌 이모티콘 같은 이미지가 표기 됩니다. 이러한 슈퍼챗, 슈퍼 스티커, 멤버십과 팔로워 알림 등은 모두 게임캐스터 방송 프로그램을 통해 커스터마이징 및 관리가 가능합니다.

한가지 중요한 요점이라하면 시청자들이 애드블락 같은 광고 차단 플러그인을 쓴다면 광고가 표기되지 않아 수익에 영향을 줄 수 있으니 애드블락에 확고한 분들이 따로 멤버십 가입을 하도록 하면 시청자들과의 타협을 볼 수도 있습니다. 슈퍼챗이나 슈퍼 스티커를 후원할 때의 특정 금액에 따라 다른 보상을 적용하는것도 바람직합니다. 일정 금액에는 특별한 인사나 춤을 보이거나 또는 공약을 내세워서 봉사활동이나 야외 방송을 하는 콘텐츠로도 뻗어나갈 수 있습니다. 이러한 기능들을 활용하여 콘텐츠의 범위도 늘리고 시청자와의 소통도 활발하게 진행할 수 있습니다.

A streaming setup, PC multiple monitors, lights on a desk with a keyboard and mouse which could be used to stream to find out the best features of YouTube Live
Photo by Roberto Nickson on Unsplash

방송 장비 준비 및 점검

유튜브에서 방송 기술이 굉장히 유연하고 커스터마이징 면에서 최고인 부분은 바로 현재 가지고 있는 컴퓨터로도 얼마든지 인터넷 방송이 가능하다는 것 입니다. 제한된 콘텐츠의 범위가 없으며 원하는 콘텐츠를 원하는 시간과 장소에서 할 수 있다는 것이 가장 큰 장점입니다. 하나의 채널에서 꾸준히 방송을 하려면 동영상의 제목이자 대문과 같은 눈에 띄는 썸네일 제작을 하는 것으로 시청자들의 눈길을 사로잡을 수 있습니다.

이제 방송을 일정하게 하려고 마음 먹게된다면 시간표를 정하여 방송 활동을 정교하게 진행할 수 있습니다. 캘린더 기능이 있는 서비스를 활용하여 특정 날짜에만 방송을 하거나 방송을 쉬는 날짜를 정하면 시청자들도 미리 알아볼 수 있고 기대감을 높일 수 있습니다. 유튜브 방송을 비밀로 지정하여 특정 회원들에게만 보여지려면 이메일로 방송 주소를 통보할 수도 있습니다.

유튜브 라이브 스트리밍 기술

일단 가장 처음 확인해볼 기능은 레이턴시 (딜레이) 설정입니다. 최대 고품질의 영상을 원한다면 ‘보통’ 으로 설정하시면 됩니다. 만약 화질을 조금 감안하더라도 시청자들과 신속한 소통을 원한다면 ‘낮은’ 혹은 아주 낮음’으로 설정하면 됩니다.

다음은 자동 시작 및 종료 설정입니다. 각자의 유튜브 실시간 방송은 서로 다른 방송 주소 URL을 지니게 됩니다. 이제 방송 프로그램으로 송출을 시작하여도 유튜브 설정에서도 송출 시작을 선택해줘야 합니다. 자동 시작 및 종료 설정을 하면 해당 부분을 자동으로 실행시켜줍니다. 자동 종료는 조심하여야 할 것이, 원하지 않을때 갑작스럽게 방송이 종료될 수 있으니 주의해야 합니다.

다음은 DVR 설정입니다. DVR 설정을 하면 실시간 방송의 지난 4시간 가량은 자동 녹화되어 유튜브 채널에 기록으로 남게 됩니다. 다만 방송 지연을 ‘가장 낮게’로 설정했다면 이 설정을 활성화 할 수 없습니다. 360도 동영상 촬영을 방송으로도 설정 가능하며 이 설정 역시 엑스플릿 브로드캐스터에서 활성화 할 수 있습니다. 만약 실시간으로 경쟁하는 이스포츠 대회같은 방송을 할 땐, 상대방의 부정 행위를 방지하기 위해 일부러 방송 지연 (딜레이)를 설정하는 것도 하나의 방법입니다. 참고로 ‘가장 낮게’ 설정된 방송 딜레이에서는 1080p 해상도룰 지원하지 않습니다.

유튜브 방송에서만 가능한 실시간 자막 기능도 추가할 수 있습니다. 이것은 일부 사용자들에게만 주어진 특권이지만, 미리 대본이 있는 방송일 경우, 대본을 영상에 표기되도록 추가하거나 대본이 있는 다른 웹페이지로 링크를 입력하면 됩니다.

A minimal streaming setup using a gaming laptop on a desk connected to a monitor looking for the best YouTube live features.
Photo by Ahmed Sekmani on Unsplash

XSplit Broadcaster & 유튜브

유튜브 설정에서 방송에 필요한 기능들을 모두 확인하셨다면 XSplit Broadcaster (엑스플릿 브로드캐스터)를 설치하여 방송을 직접 제어하고 송출의 시작과 종료를 할 수 있습니다. 유튜브 스튜디오 대시보드에서 라이브 관련 메뉴를 확인하면 RTMP 연결 관련 자료들을 복사 후 붙여넣기 하여 채널을 연결하거나 유튜브 아이디와 비밀번호를 사용해서 로그인 하는 방식으로 연결해도 됩니다.

그 후 브로드캐스터에서 자동 설정 설치 마법사를 통해 해상도, 프레임율을 본인의 컴퓨터 사양과 인터넷 속도에 따라 알맞게 맞춰줍니다. 방송을 시작하는 버튼을 누르면 새로운 창이 생성되어 유튜브에서 새로운 이벤트 (전 과는 다른 URL로 방송) 또는 저번에 했던 URL을 유지하여 방송할지 선택해줘야 합니다. 이제 엑스플릿 브로드캐스터에서 다양한 소스와 위젯을 활용해 채팅창이나 구독자, 팔로워 알림을 실시간으로 확인할 수 있습니다.

유튜브 라이브의 시청자 관리

유튜브 라이브 자체 플랫폼에서 시청자들을 관리하고 내 콘텐츠를 보호하는 기능에 대해서 살펴보겠습니다. 유튜브 라이브의 미리보기 화면 및 제어판에서는 채팅을 활성화 하거나 아예 비활성화 할 수도 있으며 이를 통해 시청자들이 콘텐츠에만 집중할 것인지 아니면 서로 소통하거나 심지어 관리자와도 소통할 수 있을지 결정할 수 있습니다.

슬로우 모드를 하면 일정 기간 안에 한 번의 채팅만 가능하도록 할 수 있으며 다른 사용자들을 관리자로 설정하여 여러명이서 채팅창을 관리할 수도 있습니다.

유튜브에서의 방송은 트위치보다는 약간 더 손이 가고 까다로울 수 있습니다. 하지만 동영상 노출의 알고리즘이 워낙 여러가지 조건이 들어가므로 다양한 시청자층에게 소개될 가능성이 더 높습니다. 트위치처럼 다른 시청자들에게 구독권을 선물할 수 있는 여유로움은 없지만 방송 후 녹화된 영상들을 모두 같이 관리할 수 있다는 장점이 있어서 추후에도 영상을 관리하고 검토할 수 있습니다. 물론 직접 다양한 SNS 플랫폼으로 공유하는 것 역시 더 쉽게 관리할 수 있습니다.

게다가 유튜브에서는 방송을 비밀로 진행할 수도 있어서 특정 모임, 회의, 발표회 같은 행사에서는 모두 공개된 것이 아닌 특정 인사들에게만 초대장을 URL 형식으로 보내어 진행할 수도 있습니다. 즉, 유튜브 라이브를 사용할 수 있는 범위가 일상과 취미 그 이상인 개인 프로젝트 및 상업적 목적으로도 충분이 활용할 수 있습니다.

유튜브에서도 라이브 방송을 시작해보시려면 여러번 시행착오를 거쳐서 경험을 쌓는것이 중요합니다. 친구와 가족들에게도 확인해볼 수 있고 여러가지 장비와 도구를 활용하여 유튜브 라이브를 실험 삼아 연습해보면 나중엔 대중을 위한 행사를 본인 유튜브 채널에서도 선사할 수 있을것입니다.

Remote Meetings: How To Be Effective and Get The Most Out Of Them!

The last couple of years have seen a huge rise in remote meetings and so a lot of us have been trying to learn how to best contribute to them. Fortunately, modern technology has lots of ways to help and can in some ways even beat a traditional meeting – it just needs approaching from a slightly different angle.

Microphone etiquette in remote meetings

Microphones come in many shapes, sizes, costs, and qualities, so it’s important to find the right one for you. First things first – the most important thing is to make sure you can be clearly heard and that you’re not transmitting unwanted noise. Make sure that you’re not picking up any interference from other electronics by making a test recording and playing it back, listening for the hum of static. Sometimes this can be fixed by moving cables around, but sometimes it might just be a bad microphone! Typically, microphones built into webcams are low-quality, but this isn’t always the case (the Logitech C922 has a very solid microphone, for example) and most office laptops are designed with online meetings in mind and so have perfectly acceptable built-in microphones.

If your workspace is noisy, try closing doors or using a headset microphone – if the microphone is closer to your face, it will be less sensitive to background noise. If you still can’t eliminate noise, consider muting your microphone when you’re not talking. This will spare your colleagues from any unexpected interruptions, however, there’s not much you can do about background noise when you’re actually talking. Just don’t forget to unmute.

A person laying on a bed taking part in a remote meeting.
Photo by Surface on Unsplash

Make your presentations pop

Give your audience something to look at during your presentation – don’t just leave them looking at your webcam feed, especially as you’ll be concentrating on what you’re saying. XSplit Presenter allows you to easily put together slides, videos, or window sharing, and camera feeds on top of your slides, as well as letting you organize all of these in advance, so you won’t be left scrambling to find that video clip you wanted to share.

By sharing specific windows, you can ensure that you don’t accidentally show sensitive data in a different application or on your desktop, helping with security as well. You can make annotations on your slides in real-time, which means you can highlight the specific areas you’re talking about, or add notes as you go. It’s even possible to bring in video or audio feeds from other presenters, right to your broadcast, putting you both on-screen at once.

A person sat at a desk using a laptop to take part in a remote meeting.
Photo by LinkedIn Sales Solutions on Unsplash

Make everyone feel included in remote meetings

With online meetings, it’s important to be aware of the limitations of the technology. There’s a slight delay between you speaking and everyone else hearing it, which means that our instincts around interrupting feel slightly off, so try to be sensitive to when other people start talking. Additionally, you can’t have a side conversation or comment with another person as you could in real life – all conversations have to involve everyone because there’s only one audio channel. This can be especially awkward before or after the main part of the meeting, where people would naturally split off and chat amongst themselves.

It’s also worth trying to make sure your microphone volume is set to a reasonable level; if you’re significantly louder or quieter than everyone else it can feel awkward. You can ask a colleague if your volume level sounds right to them or with XSplit Presenter you can do a quick test recording before you go live to check everything is set up correctly! (It’s also not a terrible idea to practice your presentation beforehand, pre-recording it in XSplit Presenter and watching it back to see where you could improve before the big day!)

Remote meetings don’t have to be a worry – there are many ways to ensure you can still give effective presentations and everyone feels like they are contributing. We’ve touched on using XSplit Presenter and other meeting tips several times before, but there are always new things to try. Let us know what you’re using in the comments below!

The Best Features of YouTube Live Streaming: Should You Stream There?

As live streaming has gotten more sophisticated, from sub alerts to IRL backpacks to surreal visual experiences, so have the platforms that host the content. YouTube, despite being the biggest video platform in the world, has still been playing catchup with its live streaming features. It does however still offer some key advantages and features over its rivals. So we’re going to talk about the important features YouTube Live Streaming has, and how and when you should use them.

Monetization features on YouTube Live

First things first let’s get to the part everyone cares about, making money! In order to monetize your content on YouTube, you need to be a part of the YouTube partner program. You can find out what is required to join the YouTube partner program right here, but basically, you’ll need at least 1,000 subscribers and 4,000 watch hours in the last 12 months. Once you’ve gotten your partnership, then you have access to all sorts of monetization tools for your stream.

First is the standard pre-roll and mid-roll ads, all you need to do to make use of these is enable monetization for your stream. Next is memberships which are similar to Twitch subscriptions where members unlock special badges and emotes. You can also add perks like member-only videos and live streams. Just make sure you don’t offer things like raffles or other services that would violate their policies or you will get your membership access removed. 

Finally, there are super chats and super stickers. Super chats allow people to have their messages pinned to the top of the chat, the length they stay there will be determined by the amount they’ve contributed. Super stickers work in a similar fashion but are an animated image instead. Super chats, stickers, and memberships all work with web-based alert services like those built into Gamecaster so you can display customized alerts whenever your viewers activate these. 

To summarize, make sure your viewers don’t have ad-block on and give incentives for them to join as members and send in super chats or stickers. Maybe make goals like X super chat amount will unlock a special cosplay or a big enough super sticker and you’ll do a backflip, whatever you think will entertain your audience! We don’t advise doing a backflip unless you’re a trained backflip pro – Ed

A streaming setup, PC multiple monitors, lights on a desk with a keyboard and mouse which could be used to stream to find out the best features of YouTube Live
Photo by Roberto Nickson on Unsplash

Customizing your Streaming Setup

One of the best aspects of YouTube is the amount of customization you can do with your streaming setup. You can set up a static stream key and just go live with whatever content you wish to. This is great if you’ll be streaming consistently on your channel. One recommendation is to add a thumbnail that stands out, so people will click on your live stream from the YouTube home page. 

Now you can also schedule your live streams. This is handy if you’re an event organizer as people can see the scheduled stream on their YouYube feeds and enable reminders. You also can set your YouTube streams to private and give people access via email. They will, however, need to have YouTube accounts for the emails you send them to but these are pretty easy to set up. Next, let’s take a look at some of the features YouTube has for its live streams.

YouTube Live Streaming Tech Features

First is the stream latency setting. This will affect the latency from when you encode the stream to when the viewer sees it. It also affects some of the settings we’ll cover in a bit. For the highest video quality and stream stability, set it to normal, but if your stream requires more viewer interaction, set it to low or ultra-low.

Next is the auto start and stop feature. Now each YouTube live stream is its own distinct event or URL. Generally, when you start streaming with your live streaming software, you also have to start the stream on YouTube. Auto starts and stops mean this is done automatically, but you may not want to enable this because if you don’t end your YouTube live steam, you can still keep streaming to it! Yes, if for some reason your encoding has stopped, you can still stream to that same stream key, and as long as the event hasn’t ended, the stream will continue where it left off. 

Next is DVR, and it’s pretty much in the name, you can scrub between the last four hours of a stream. You can’t enable DVR for ultra-low latency streaming. You can enable 360 videos, just make sure this is enabled for your source as well in XSplit Broadcaster. You can also add additional delay to your stream which can be useful if you’re taking part in a tournament.

You can also add captions to your stream, this can either be the embedded captions in your stream, or you can send them to a specific URL. Some YouTube accounts will have access to automatic captions as well, but this will require normal latency streaming. Finally, ultra-low latency does not allow for streams above 1080p.

A minimal streaming setup using a gaming laptop on a desk connected to a monitor looking for the best YouTube live features.
Photo by Ahmed Sekmani on Unsplash

XSplit Broadcaster & YouTube

After you’ve configured your live stream, broadcasting is easy with XSplit Broadcaster. You could simply copy the stream key and RTMP URL to a custom RTMP output, however, XSplit has a more streamlined integration. Add a YouTube live output and then log in to your YouTube account, make sure to select the right channel if you have access to multiple YouTube pages.

Broadcaster will automatically configure your streaming settings depending on your resolution and frame rate. Once you go live a window will pop up, here you have the choice to go live to a new event or select the event you have already set up. Then just hit start! XSplit Broadcaster also has sources for alerts built-in for new members, super chats, subscribers, and a live chat display so it’s all there in one package!

Moderation features of YouTube Live

One thing that is important to know is the moderation tools you have available to you on YouTube Live. First, in the live control room, click edit and go to the customization tab. Here you can enable/disable chat and if you want the chat replay to appear on the archive. This basically means that you can decide if you want people to see a replay, as if it were live, of the chat window when people watch you VOD or not.

You can also limit messages to channel subscribers, you can enable a slow mode and set the interval in which people can send messages. Much like other streaming sites, you can add moderators for your chat, hide/ban users, blacklist words, and block links from appearing. 

Streaming to YouTube can be a bit more involved than something like Twitch, but the algorithm is more advanced which means getting people to see your content can be easier, even if the monetization options don’t have something as enticing as free subscriptions with Twitch Prime. It could more valuable for your brand to centralize your VOD and live streaming audiences into one channel, just as long as you don’t forget to spread your content to other social media platforms.

YouTube’s event-focused tools for scheduling and private access make it a very useful platform for event broadcasters for things like corporate events, webinars, product launches, and sporting events. This means that you could hold your all-hands meeting and host a private link, that is scheduled, that only people within your company can see!

Have you tried streaming on YouTube? What do you think of the experience? Let me know in the comments and let me know if this guide is helpful and you’d like similar guides for other platforms, the comment section below is the best place to do that!