Twitch IRC Chat and Hitbox Chat Viewer Plugins

One of the most requested features in XSplit Broadcaster is the ability to pull chat feeds from streaming services such as Twitch and Hitbox so it can be easily shown on the stream without needing to use screen capture. There are various workarounds to achieve this but they are definitely not ideal.

That’s why we’re excited to announce that the Twitch and Hitbox chat viewer plugins are finally now available in XSplit Broadcaster.

Installing the Chat Viewer Plugins

To install both plugins, click on ‘Add Source’ >> ‘Get more plugins from the plugin store’. Find the plugins and hit the Install button.
Twitch IRC Chat for XSplit

Hitbox chat

Adding the chat viewer source to your scene

Now that you’ve installed them, it’s time to add the source on your scene. To add, simply click on ‘Add Sources’ >> ‘Other’ >> Hitbox Chat Viewer / Twitch IRC Chat Viewer. After adding it, right click the source and authorize it first. When done authorizing your account, hit the ‘Connect’ button and you’re done!
Chat viewer for XSplit

Take note that for this version of the Twitch IRC Chat Viewer, we currently do not support connecting to group and event chats. We shall be adding this in an update in the near future.

XSplit Broadcaster v2.4 is Here

When we released version 2.4 of XSplit Gamecaster last Thursday, a lot of you have naturally asked us for when XSplit Broadcaster v2.4 will become available. We’re happy to announce that XSplit Broadcaster v2.4 is now also here!

XSplit Broadcaster v2.4 now available

Windows 10 compliance, YouTube Gaming compatibility, Azubu 3.0 support and tweaked user interface are the same new features and improvements that are included in version 2.4 of XSplit Broadcaster so that’s something that you can try out immediately.

Another new feature that we’re really excited about is the adaptive bitrate technology which automatically adjusts your bitrate according to your network conditions. This means you no longer need to manually reconfigure your steam if you experience bandwidth starvation as the adjustment will be done for you automatically. We’ve written more details about adaptive bitrate here.

We’ve also implemented the ability to freely resize the main window which has been requested by a lot of you (Thanks to Gunrun for giving us an extra push on this one). This is just a small glimpse of many user interface changes that will enhance your XSplit experience in the coming near future so stay tuned!

Finally, we have other improvements and plenty of bug fixes that we cannot simply write all in this blog post so make sure to check out the full release notes here. You can update via the application (Help >> Check for Updates…) or by getting it from xsplit.com/download

Let us know what you think of this new version in the comments!

How to Specify Extra Encoder Parameters

It is possible to override or add new encoder parameters using the syntax &ex:key:value. It is definitely NOT recommended for everyone to use this functionality – in the matter of fact, unless you are very technical and have a very good reason to fiddle with this  (and you probably do not) then leave the settings alone. (NOTE: We do not provide support assistance for extra encoder parameters)

For x264:

Most parameters supported by the x264 encoder can be found here:

X264 Settings

Simply apply the &ex: syntax instead of — syntax.

For example, “&ex:profile:main” will apply main profile restrictions. “&ex:profile:main&ex:tune:animation” will add tuning for animation content.

Not all x264 options may be supported and please note that any settings you make will override settings from the GUI. So for example if you set “&ex:keyint:60” then you will have a max GOP interval of 60 frames no matter what setting you may have set in the GUI. 

For Intel Quick Sync:

What follows are the parameters that we currently support for Quick Sync. Take note that some parameters behave differently or are ignored depending on the Rate Control Method set.

H264 Profile

Param Name: profile
Values:
66 – Baseline
77 – Main
88 – Extended
100 – High

Example: &ex:profile:100

GOP Pic Size (Key Frame Interval)

Param Name: goppicsize
Usage: The number of frames in a group of pictures which also indicates how often a key frame is inserted.

Example: &ex:goppicsize:120

Rate Control Method

Param Name: rc_method
Values:
1 – Constant Bitrate (CBR)
2 – Variable Bitrate (VBR)
3 – Constant Quality Parameter (CQP)

Example: &ex:rc_method:3

Target Kbps

Param Name: targetkbps
Usage:
In CBR – The bitrate used
In VBR – The target bitrate

Example: &ex:targetkbps:3000

Max Kbps

Param Name: maxkbps
Usage:
In VBR: The max bitrate allowed

Constant Quality Parameter Settings

Usage: Only for CQP
Param Names:
qpi – target quality for i-frames
qpp – target quality for p-frames
qpb – target quality for b-frames

Usage:
Should normally be set to have the same values for simplicity. Value provided will approximate the quality of x264’s crf setting but with a bigger file size.

Example: &ex:qpi:23&ex:qpp:23&ex:qpb:23

XSplit Broadcaster did not shut down properly

If XSplit Broadcaster was shut down improperly or unexpectedly, you can use the Select Presentation window for some basic troubleshooting. If the shut down occurred after adding a new source to a scene, it is recommended to load a backed up presentation, a previously saved presentation, or to create a new presentation. 

If the error occurs after adding the source another time, please make sure to document any error messages and immediately seek out assistance from our support team at support.xsplit.com.

Introducing Adaptive CBR in XSplit Broadcaster V2

This blog post will introduce you to the newest XSplit Broadcaster V2 feature, adaptive bitrate!

Adaptive Bitrate is a new feature in XSplit Broadcaster 2.4+ available for CBR streams (currently only for x264 codec). If enabled, the bitrate will automatically change when network conditions fluctuate. For example if your upstream bandwidth changes midstream, XSplit Broadcaster will try to match the current available upstream bandwidth to prevent constant frame drops, and if more bandwidth becomes available later, then the system will readjust to target your set CBR bitrate.

Hopefully this feature will be able to address bandwidth fluctuation problems often experienced by user on ADSL connections.

What does it mean to “drop frames”?

When the bitrate output by the encoder is higher than your actual upstream bandwidth, frame dropping is a common known technique to temporarily lower the bitrate and avoid building up a long queue/delay. In technical terms we often talk about dropping frames before or after the encoder. If CBR bitrate settings is applied to the encoder then dropping frames before the encoder does not help much, so instead we drop frames by dropping parts of the encoded bitstream in the RTMP send/output queue. By doing it in this way we also ensure that local recordings of a live broadcast remain intact.

Hence, if your CBR bitrate settings is higher than your actual upstream bandwidth at any time, then we will allow the send queue to grow, but will eventually cut part of the bitstream corresponding to a full GOP (group of pictures) – this is the time when you will see dropped frames (in bulk) corresponding to the number of frames that we cut.

This process will continue until your upstream bandwidth can again keep up, but unfortunately there may be prolonged periods where frame drops will continue. The experience for viewers will look like small stop/resume with pieces of your stream missing. Depending on the streaming service/server and how ingest and buffering is handled, you may never see the actual stops, but there will still be small pieces missing, – gaps if you will.

What is adaptive CBR?

Adaptive CBR is one of our newest features in XSplit Broadcaster 2.4+ that we hope will improve and streamline your streaming experience. Previously, you were allowed to change your bitrate manually while streaming if you saw you were dropping too many frames and suspected that your bandwidth had decreased. Since this can be hard to monitor and even harder to change during intense broadcasting sessions, we have developed adaptive bitrate to deal with this issue before you suffer  stream drops at an inopportune moment.

What does adaptive CBR do?

Adaptive CBR monitors the delay of the send queue and if the queue grows above a certain threshold then the adaptive CBR function will decrease the bitrate to slightly below the last known bitrate. Once the stable bitrate is found, adaptive CBR will continuously check to see if the bitrate can be increased back closer to the original setting or if the bitrate need to be further lowered. This loop function continues during your broadcasting and will help to ensure that you do not experience dropped frames.

Needless to say that lowering the bitrate also lowers the quality, and large changes in upstream bandwidth over short periods of time can still result in dropped frames or very decreased quality of your stream. Magic can only take you so far -:), so your internet provider need to take you the rest of the way.

How to enable Adaptive Bitrate

  1. Go to your Broadcast Plugin. For example Twitch, head to Twitch Properties.
  2. Under Video Encoding Section, click on the Gear Icon to open Video Encoding Setup WindowXSplit Broadcaster Twitch Properties
  3. Make sure to enable ‘Strict CBR’ first and then check on Adaptive CBR.XSplit Broadcaster Video Encoding Setup
  4. Click OK to save the Settings.

Now you can broadcast without having to restart your stream or manually having to reconfigure settings when the going gets tough.

It’s still an experimental feature but please give us your feedback in the comments below!

XSplit Broadcaster Memory Usage

XSplit Broadcaster is currently only available as a 32 bit application, but on both 32 and 64 bit Windows 7+ operating systems. We do have a 64 bit version in the pipeline, but before we publish this, we want to make sure that it is compatible with all 3rd party integrations. For example, several capture cards’ integrations lack 64 bit support and we are working with manufacturers to extend 64 bit support. One of the limitations of 32 bit applications is the amount of OS memory that each 32 bit process can use. If LARGEADDRESS space aware manifest is not used, then the limit for an application is 2GB. If LARGEADDRESS space aware manifest is used, then the limit is extended to 3GB on a 32 bit OS and 4GB on a 64 bit OS.

The default configuration of XSplit Broadcaster (as of version 2.2) is to only address up to 2 GB (please note this is different than the memory usage reported by task manager). This can cause issues for users who have very complex presentations. If you are encountering such issues, then it is advisable to reconfigure XSplit Broadcaster to run with the LARGEADDRESS space aware manifest is used, or the 3GB-aware version of XSplit Broadcaster. The following guide will direct you on how to set this up.   
To run XSplit Broadcaster using the 3GB-aware exe, please follow the instructions below:
 
1. Open the XSplit Broadcaster application folder. This is normally located in C:\Program Files (x86)\SplitmediaLabs\XSplit Broadcaster\
2.  Backup XSplit.Core.exe by renaming it to XSplit.Core.exe.bak
3. Go to the folder labeled “3GB-aware” and move the XSplit.Core exe into the main program folder.
4. Run XSplit.Core.exe.
Starting with XSplit Broadcaster 2.3, LARGEADDRESS space configuration will be the default and users will no longer have to perform the above workaround. So far we have found no problem in using LARGEADDRESS space configuration, but it is still considered experimental so please report any issues you encounter to xsplit.com/support

Improved Stream Delay in XSplit Broadcaster 2.0

If you are setting up an ambush in Counter-Strike or just drew a potentially game changing card in Hearthstone, then you don’t want your opponent to know what is coming next.

That is why it is useful to set a stream delay, and with XSplit Broadcaster 2.0 we’ve made it easier than ever! Please note that stream delay is only available to Premium license holders.

Stream delay can be configured from within your broadcast plugin window (and no longer requires the use of Java). Simply mark the check box and enter your delay time in seconds as shown below.

XSplit Broadcaster Enable Stream Delay

We hope you enjoy this simplified stream delay setup. Please note that this stream delay setting does not determine the exact delay of those viewing your broadcast. Viewers will also experience delay from transcoding, transportation delay,etc that the stream delay set in XSplit adds to. You can find the latest XSplit Broadcaster 2.0 beta version here and we hope to see your feedback in the comments.

New Audio Features in XSplit Broadcaster 2.0

Note: If you’re looking for information on how to add an audio device (such as a microphone) as a scene source, then you can check out this tutorial instead.

One of the most common forms of feedback we receive from users is for more control over audio. In XSplit Broadcaster 2.0, we give you that control with expanded audio features!

When you install XSplit Broadcaster 2.0, you may notice that you are now prompted to install an audio device know as “XSplit Audio”. This is a virtual audio device that will give you new audio routing options for camera sources, audio device sources, and media files with audio.

New Audio Features Overview

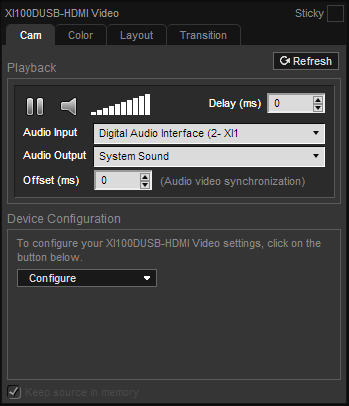
When you add an audio device, camera, or media file with audio, right click on that item in the source list and click on the first tab of that source to see the new audio options.

Camera/Audio Device Source Media file with audio

camera sourcesmedia file sources
As you can see, the options differ between audio devices/camera sources and media file sources.

Audio Input: Unless a special implementation has been developed, many capture cards have their video and audio inputs treated as separate sources within XSplit Broadcaster. If you have one of these capture cards, you can use the Audio Input dropdown menu to select the complimentary audio source for your capture card device. This will eliminate the need to add a capture card’s audio input as a separate source within a scene.

Audio Output: This option will let you choose the destination of your source’s audio output. You are given two choices, system sound and stream only. System sound is the traditional XSplit setting, where the device audio is routed to the default playback device. XSplit Broadcaster picks up audio from the default playback device and mixes it with the live stream or recording. . With the Stream Only option selected, the source’s audio will only be heard on local recordings or live streams and not through the default playback device. The diagrams below show the routing options offered with each audio output option.

audio output option diagram system soundaudio output option diagram stream only

This feature is extremely useful for users of all capture devices, especially for USB 2.0 capture cards. Most USB 2.0 capture cards require stream compression (encoding) to be performed on the card prior to sending the audio and video feed to XSplit. The encoded audio and video from the USB 2.0 capture card appears as delayed audio in the default playback device and delayed video in XSplit Broadcaster. The delayed audio being sent to the default playback device can be distracting to users. By using the “stream only” option the delayed audio is routed to only appear on the live stream or local recording and not in the default playback device. This configuration is detailed in the diagram below.

stream only configuration diagram
This is only one of the many possible uses for the audio out feature. We encourage users to experiment with the different sources that contain audio in XSplit Broadcaster 2.0

Offset: The offset allows you to insure the selected audio input is synced with the video on the camera source. This differs from delay, as delay is used to sync various sources on the viewport.

Warning Note: Make sure “XSplit Stream audio” is not set as the windows default device. If it is set as the Windows default device, you will likely not hear any audio at all, including sound from Windows, games, browsers etc.

We hope you enjoy the new audio routing flexibility offered by the XSplit Broadcaster 2.0 beta. You can grab the latest copy of the beta here. If you have any questions about the new audio system please leave them in the comments!

Azubu TV is now supported in XSplit Broadcaster 2.0

We’re happy to announce that Azubu TV is now officially a live streaming partner of XSplit Broadcaster 2.0.

Azubu TV is a premiere eSports network delivering live and on-demand eSports action, programming, news and analysis. The new streaming plugin will make it easier for you to stream to their service. Here’s a quick tutorial on how to go live on Azubu TV.

You can apply to be an Azubu broadcast partner here.

  1. First, go to Broadcast > Add channel… and click on more servicesXSplit Broadcaster Azubu
  2. You will now be in the Broadcast Plugin store. Scroll down to the Azubu plugin and click install.Install Azubu Plugin
  3. You will now be in the Channel Properties windowXSplit Broadcaster Channel Properties Window
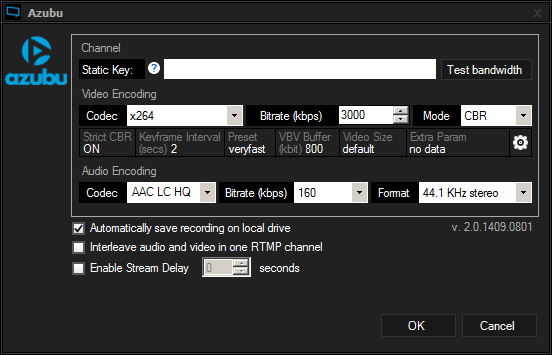
a. You can find your Static Key in your Azubu dashboard under the settings tab.Static Broadcast Key
  4. For Video Encoding, it is recommended to use the “x264” Codec. The codec produces a high image quality with less bandwidth requirements.The Bitrate you choose will depend on your selected resolution, computer hardware and internet connection. If you want to use a high resolution you will need to have powerful computer hardware and high internet upload bandwidth.To simplify things when choosing your Resolution and Video Encoding Bitrate, you can start by setting your Resolution to 360p (View > Resolution > 640 x 360 (16:9)) and your bitrate to 700. Do a test stream and see how your computer handles it. If CPU usage is low and your gameplay isn’t affected, then try the next highest resolution and bitrate. Once your performance starts to suffer, simply go back to the last resolution and bitrate that worked well for you.Please see the table below for the suggested Video Encoding Bitrate based on your desired Resolution:

    Resolution and Bitrate Table
    Note: These values are based on using a frame rate of 30.

  5. The extra encoding parameters do not need to be changed unless you wish to stream at a lower resolution than you’ve set XSplit to. This can be changed in the video size drop down menu.
    Video Encoding Setup
  6. For the Audio Encoding settings, set the Audio Encoding Codec to AAC LC HQ, the Bitrate to 128, and the Format to 44.1KHz Stereo:Audio Encoding
  7. Congratulations! You’ve now configured your Azubu channel! Click OK to exit the Channel Properties window. To start a broadcast, click on your channel in the Broadcast menu. You’ll see the top of the XSplit Broadcaster window begin to display encoding information.
    Streaming Live AzubuTV

We would like to thank the cool folks over at Azubu for making it easy for us to optimize XSplit Broadcaster for their amazing service.

If you have any questions or feedback, then please let us know in the comments section.

XSplit V2 to be Launched on November 17 2014

#XSplitV2 is now out! You can read more details about it in this blog post

With the Holiday season rapidly approaching, it is fitting that we announce that XSplit V2 will be launching on November 17, 2014. XSplit V2 reflects the XSplit products gaining exciting new features and phenomenal improvements available for all of our users.

XSplit V2

Over the next few days, we will be giving you a sneak peek of what to expect in XSplit V2 by posting images and videos of the new features. These will be posted on our Twitter, Facebook and Google+ with a hashtag #XSplitV2. Feel free to help us spread the word by sharing it with the said hashtag.

We want to mention that these new features, improvements and bug fixes are your contributions. It is you who helped us improve our products through your feedback on our website, social media and forum. We’re very thankful for all your support and we hope to return the favor with XSplit V2. 🙂