Setting Video and Audio Delays on Camera Sources

Welcome to the XSplit Workshop, a feature series where we provide handy tips to help you get the most out of your broadcast. This week we have put together a guide that will teach you how to set video and audio delay.

For those who prefer more visual learning, the video below will cover most of the points in this post.

USB 2.0 capture cards have built-in delay!

Some of the most popular capture cards on the market are USB 2.0 based capture cards. There are the Elgato Game Capture HD, the Hauppauge PVR series, the Roxio Game Capture HD, and the Avermedia Live Gamer Portable. These cards are great for gamers who wish to start recording or live streaming their console gameplay in high quality.

Due to the limitations of USB 2.0 bandwidth, these capture cards are forced to compress (encode) the video stream – before it is passed through the USB cable and into the computer.

This inevitably leads to a delay between the capture card feed from the real-time video feed on your gameplay monitor and when it reaches XSplit Broadcaster. To compensate for the delay, XSpit Broadcaster allows you to set the delay on secondary video and audio sources, like your web camera and microphone.

Determine the duration of the capture card delay

Before settings a delay on a source, you must find out what the delay between the capture card feed and the live feed is. Some manufacturers advertise what the delay is in the instruction manual. Otherwise, you will have to measure it manually and make fine adjustments on the fly. One useful method is using a stopwatch to time the difference between the live feed and the capture card feed. Once you’ve measured the delay, you will need to convert the number in milliseconds – that is how the delay is set in XSplit Broadcaster.

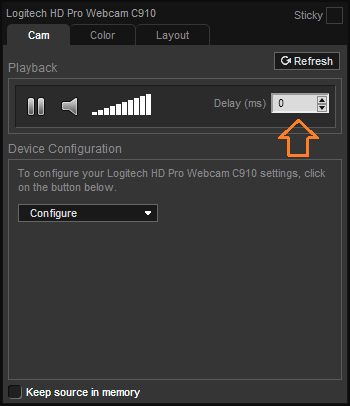
Setting the webcam delay

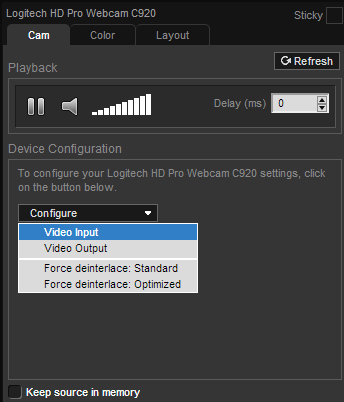
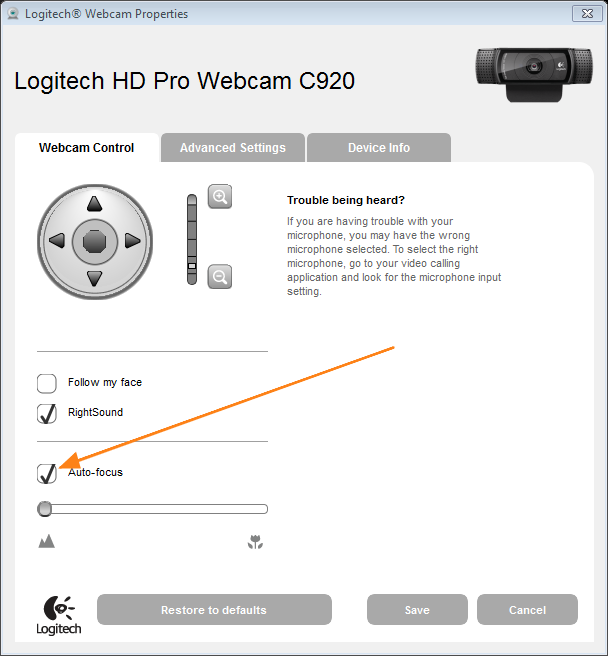
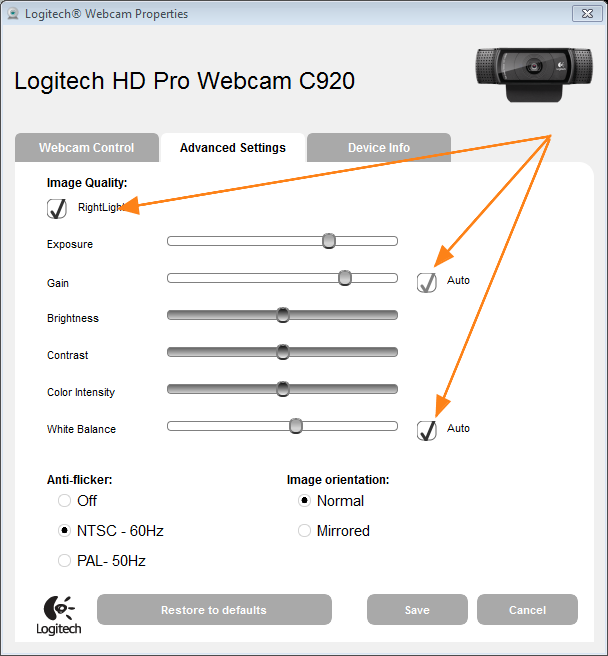
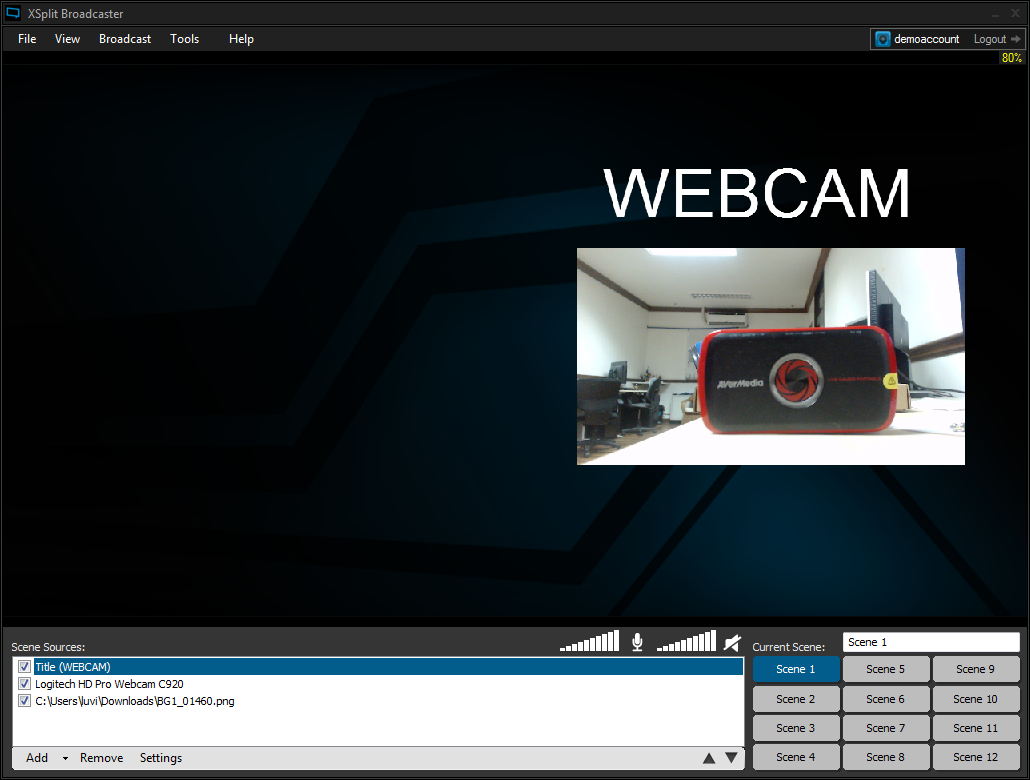
To set video delay, you need to add a video source like a webcam. After adding the webcam and is set up to your liking, right-click on the camera in the source list. On the first tab, you will see a box where you can enter the video delay for the webcam. In this box, you will enter the delay amount that you measured earlier.

Logitech HD Pro Webcam C910 Settings

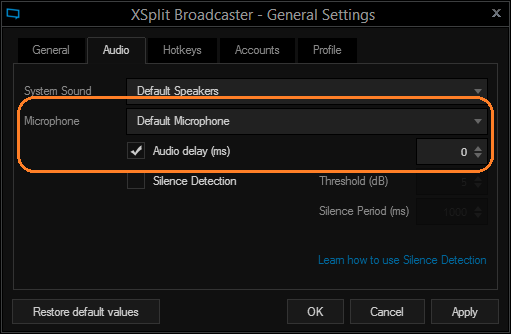
Setting the mic delay

To set the audio delay, click on the Tools tab and then on the general settings option. In the audio section, mark the check box next to audio delay. From there, you can access the box to enter the audio delay time. Enter the same value as you did for your webcam video delay. Click ok to exit this window.

XSplit Broadcaster General Settings Microphone

Test the settings

Now that you’ve set your delay, it is time to test the settings to see if they are correct. Start a local recording by going to broadcast then clicking on the local recording. Spend at least 30 seconds doing some gameplay with commentary and then stop the broadcast by once again clicking on the local recording button in the broadcast menu. You can review your local recording by clicking on the Tools tab then on my recordings option. When reviewing your recording, make sure your microphone audio and webcam audio is in sync. Please also check if these are in sync with your capture card feed. Once the settings and other customized delays are in place, then you are ready. Congratulations you are now ready to record and/or stream with your USB 2.0 capture card!

New XSplit Gamecaster feature: Image Overlay

One of the most highly requested features of XSplit Gamecaster is the ability to add image overlays. Many users have been wanting to add their own custom logos or gameplay skins to personalize their streams or recordings. Well, that day has finally come and now you can add image overlays!

This blog post will be your guide on how to get started with the image overlay feature. The feature is available for all users to try, but to use a custom image you need to have an XSplit license.

How to use Image Overlays

First, you need to update to the latest version of XSplit Gamecaster v. 1.7. The feature will not be available in old versions of XSplit Gamecaster. Look on the Start tab of XSplit Gamecaster and you will be prompted if you are not on the latest version.

Once you have updated XSplit Gamecaster, launch your PC game (or open the console viewer) and open the XSplit Gamecaster overlay. You will notice that there is a new icon in the overlay menu. Click this icon to activate Image Overlay.

image icon to activate Image Overlay

Once activated, your image will initially be the XSplit Gamecaster logo:

XSplit Gamecaster logo is the default image overlay

In the next section, we will show you how to change and adjust the image. Now that you have activated the Image Overlay, hover over it with your mouse to see the image toolbar (it will appear either above or below the image). The icon on the far right (shown in the image below) lets you change the image.

image icon to change and adjust the image

Click on this icon and a window will open.

replace image window

From this window, you can choose your preferred image overlay as you would when going through Windows Explorer. When you’ve selected your graphic, click on the ‘Replace Image’ button or double-click on your selected image.

Please note that you can only add one Image Overlay. If you would like to display multiple items like social media, logos, or sponsors on the image, we recommend you combine these various items into one image using image editing software.

The Image Overlay Toolbar – Adjusting the Image

When you click on your chosen image, an outline will appear with various highlighted sections that you can use to resize the image. You can re-position the image by dragging the image.

resize and re-position image sample

Let’s look at the toolbar of the Image Overlay.

image overlay toolbar

Visibility: The first option toggles visibility modes for the image. You can chose whether to show the image to your viewers and/or yourself. If you don’t wish to see the image while playing your game, toggle the “In-game HUD” to off.

Opacity: This controls the transparency of the image. A value of 100% means no transparency.

Aspect Ratio Lock: The third option (the arrow) toggles image aspect ratio lock on/off. Usually you want to keep this ‘on’.

Congratulations! Now you’ve setup your image overlay! You can easily turn off/on the Image Overlay using the button on the main XSplit HUD. We hope you enjoy this new feature and the continued evolution of XSplit Gamecaster!

If you have a cool image overlay, why not leave a comment below and share it with others.

How To Add Custom RTMP in XSplit Broadcaster

Adding your own custom RTMP is very easy using XSplit Broadcaster. All you have to do is click on Broadcast >> Edit Channels >> Add >> Custom RTMP.  You will be shown with this interface.

Custom RTMP XSplit

If you are using 3rd party streaming service, the service provider will typically have information on how to set up your broadcast using a predefined RTMP URL and stream name for channels assigned to you.

See it in action!

Using XSplit Broadcaster with Other Applications

Here’s an interesting question that we got from our suggestion box.

Djwheat asks:

“Is it possible for me to pass the XSplit “signal” to another broadcasting device like for example Flash Media Encoder or VidBlaster?”

The answer is a big YES. XSplit Broadcaster has the ability to encode and perform RTMP streaming directly within the application.  It’s also possible to see every instance of XSplit Broadcaster as a virtual camera device which will allow you to use Broadcaster with FMLE,VidBlaster or Skype.

See this in action!

Using Webcams with XSplit Broadcaster

Welcome to the XSplit Workshop, a feature series where we provide tips to help you get the most out of XSplit. To begin the series, we’ll start with one of the most common hardware devices used with XSplit Broadcaster. This is a web camera more familiarly known as a webcam.

Whether you are vlogging or casting an epic run-through the arena in Hearthstone, adding a webcam is a sure-fire way to improve interaction with your audience. This blog will help you ensure you are getting the best quality and performance out of your web camera!

Update: We have since released a new app called XSplit VCam which helps you blur, remove, or replace your webcam background with ease. While all the suggestions mentioned below are still valid, we highly recommend you to check out VCam for its added functionalities.

FPS-related issues with webcams

Most web cameras come with drivers and software. The problem is that the web camera software, in general, tends to suggest that ‘automatic’ modes are always the best. This is rarely the case.

Most webcams in the sub $100 USD range, cannot keep stable frame rates if the exposure settings are too high (it can also affect CPU usage). The automatic mode does not acknowledge this, as it is mostly concerned about image visibility and not about maintaining a steady frame rate. Therefore, in a dark room, automatic mode will keep you visible, but at a lowered frame rate.

Even in a bright room, it is still not advisable to use automatic mode because your environment can change to a setup the auto mode can’t handle. This is especially true if there is a possibility your lighting settings could change drastically over the course of your broadcast (i.e. daylight to evening).

Turn auto mode off

When using your webcam with XSplit, we distinctly recommend disabling all automatic modes on your web cameras. If you’re adamant about a high quality, you need to take charge of and control your environment through good lighting, and you need to set your devices to their optimum settings.

If you’re using automatic modes, you rely on “average fits all” logic and your camera will behave quite differently when there’s a cloud passing by your window or the reflective brightness from your monitor changes during streaming.

Another potential issue is auto-focus on chroma key setups. If the camera shifts focus, your chroma key will likely change the shade of color, and this can cause a blurry edge around your figure.

While the following information focuses on a Logitech web camera, much of the information can translate to other types of web cameras. Generally speaking, you will want to turn off automatic settings for exposure, gain, and auto-focus.

Webcam source properties

In XSplit right-click your web camera, choose “Configure” and click “Video Input”.

On the driver window, in the first tab: Disable “Auto-focus”. You will have to do some manual adjustment after. Make sure you adjust while seated in the position you intend to stream from.

Logitech camera settings
Logitech webcam settings

On the second tab: Disable “RightLight”, “Gain” and “White Balance”. After disabling these auto modes, adjust the sliders to your liking. Please note, if you set the exposure slider too high, you will encounter low frame rates.

Click Save.

General camera settings

general web camera settings

In XSplit right-click your camera source, choose “Configure” and click “Video output”. This menu is where you will configure what the web camera output is. While the output size and frame rate are fairly self-explanatory, one important thing to note is the color space/compression. USB 2.0 web cameras (and capture card devices) cannot send a lossless full colorspace spectrum in 1080p picture through USB2. The camera needs to compress the data stream. Where available we recommend the compression formats MJPG and YUY2 as they have the least visible deterioration.

No need to capture 1080p!

Also, please consider what resolution you need for your shot. Unless you’re doing a full-size shot of the web camera, there’s no need to capture it in 1080p. Consider setting the camera resolution relative to the size of your source.

xsplit camera source

Example: Here’s using a webcam in XSplit that is set to record in 720p at 30 fps. There’s no point in capturing your web camera in 1080p. But what size should you capture? My web camera is sized to a specific portion of the scene. Try to guess the pixel height of the web camera source…

It’s 272 pixels. Hence the ideal capture resolution for this shot is 360p. If I set the resolution of the web camera higher, then I’m basically wasting USB2 bandwidth and the resized image would not look different. Note: The exception to this is if the camera is bad at resizing due to hardware limitations. In this case, you will want to let XSplit resize it (because it uses a sophisticated software algorithm) to achieve a better image quality.

Also, if your recording or live stream is in 720p, all sources at higher resolutions are generally just a waste of resources on CPU, GPU, memory, and external hardware. Always set your source resolutions and frame rates to something relative to the resolution you’ve set in XSplit Broadcaster in order to use your computer’s resources optimally.

Another reason why we generally don’t recommend doing 1080p capture on web cameras is that you would not safely be able to add more than one camera per USB controller, because it would use up all the USB2 bandwidth. Your keyboard and mouse might even be affected if there’s congestion.

Warning on RGB24

We advise against using RGB24 (uncompressed) as a color space setting! The camera frame rate is typically severely limited with this setting (exactly how much depends on the web camera model and driver of the web camera).

web camera frame rate setting

Now that you’ve optimized your webcam in XSplit Broadcaster, have fun live streaming or recording! If you have any questions about this blog post or with XSplit Broadcaster in general, please let us know in the comments section below!

Using Chroma Key in XSplit Broadcaster

Update: We have released XSplit VCam sometime last year which makes background removal and replacement easier than ever. All the tips and information in the guide below are still correct however we highly highly recommend you to check out XSplit VCam at xsplit.com/vcam.


Welcome to the XSplit Workshop, a series where we provide tips to help you get the most out of your broadcast.

This edition will focus on one of tools that can enhance your production in a variety of ways, chroma key!  We’ve also prepared a video that goes over the various topics in this blog, which you can see below.

Chroma keying is a technique commonly used in video production that involves compositing two images or video streams together based on color hues. In other words, it is used to place an object in the foreground into a new background.

Before Applying Chroma Key
screen without chroma key

After Applying Chroma Key
screen with chroma key

Chroma Key with Camera Sources

The most common use of chroma key is to place a camera source (via webcam or captured camcorder) into the game play feed. In other words, you can immerse yourself into the game!

A few prerequisites and tips for chroma key:

  • You will need a backdrop that is a solid color, preferably one that is one of the commonly used chroma key colors (red, blue, or green).
  • Wear clothing that is a different hue than the backdrop color. If it is a similar color, then your clothing will likely blend into the background as well. Unless that is an effect you are going for!
  • Make sure that your backdrop is well lit and is as smooth as possible (wrinkle-free) to help improve your chroma key results.
  • Turn off your webcam’s auto adjustment of focus, exposure, white balance, and gain.

After setting your hardware up, you’ll need to do the following to activate chroma key in XSplit Broadcaster:

  1. Add your game play source to the scene.
  2. Add your camera source.
  3. When your camera source is adjusted, place it on a higher layer than the game play source (you can adjust this in the source list in the bottom left corner of XSplit Broadcaster).
  4. Right click on your camera source and, in the menu that appears, click on the color tab and then click on the chroma key option to activate it.

guide on how to activate chroma key in XSplit Broadcaster

Chroma Key Settings

When you activate chroma key, you will receive access to a variety of options:

basic and advanced chroma key settings

  • Basic settings: The primary setting you will have to adjust is the threshold setting. The threshold sets the level in which the selected key color is removed. Setting the threshold too low may result in jagged edges around the keyed object, while setting it too high may let too much of the key color show through an create a distorted looking chroma key effect.
  • Advanced settings: These settings are only for advanced users who need very specific tweaking on their chroma key settings. Key color is changed to match the color of your back drop. Anti-aliasing levels help smooth out the edges around the object that is being composited into the new background. The exposure slider can help minimize noise or distortion in the chroma key output. Activating legacy mode opens the chroma key menu from XSplit Broadcaster version 1.2, which offers another variety of options to fine tune your chroma key settings. Please note that we only recommend using legacy mode if you absolutely can’t get your desired chroma key results with the standard options.

Chroma Key with Other Sources

One of the hidden features of XSplit Broadcaster is its ability to apply chroma key to a variety of sources. One example is to use chroma key on specially designed videos to turn them into a video overlay. Currently, a variety of Twitch broadcasters are using notifications that pop up whenever someone follows, donates, or subscribes to their channel.

Twitch broadcasters subscription notification

Subscriber notifications are added by using a variety of tools such as Nightdev’s subscriber alert, tnotifier, twitchalerts, etc. These tools open a browser or process window when activated. This window is added to XSplit via screen region or window capture.

window capture via screen region source and browser window where alert is displayed

After this is complete, enable chroma key by right clicking on screen region in the source list, click on the color tab, and activate chroma key. The good part about using chroma key with other sources like Twitch alerts is that they are usually designed to work easily with chroma key.

That’s it for this edition of the XSplit workshop. Hopefully you’ve learned a lot about chroma key and have some interesting ideas of your own on how to use chroma key. We’d love to see how you use chroma key or helpful tips in the comments!

XSplit Workshop: A Guide to Hardware Encoders

With a variety of hardware encoders now available, it can be a bit confusing to know if you have the appropriate components to use these encoders, and how they are used with XSplit products. The following guide will give details on each hardware encoder and how they each interacts with XSplit products. As of now XSplit has support for all publicly and commonly available HW encoders counting Nvidia NVENC, Intel Quick Sync, AMD VCE and of course AVerMedia’s Liver Gamer HD (C985) and Game Broadcaster (C127). All hardware encoders are available for use with a free XSplit license.

As a side note, hardware encoders enable users to record high quality videos with virtually no performance hit. For streaming however, it is recommended to use x264 as this will generally provide much better quality for the same bit rate versus hardware encoders. In the event of an undesired performance hit when streaming using x264, hardware encoders are available at the expense of some image quality (and larger filesizes).

Intel logo

Intel Quick Sync hardware encoder

Quick Sync is Intel’s hardware implementation of H.264 and is available on most Intel® Core™ processors starting from second generation Sandy Bridge processors. On laptops with Intel processors and a single discrete graphics card, Intel Quick Sync will always be enabled and ready. On desktops, it may require additional settings. Below is a short video that can be used to check if Quick Sync is available and how to activate it on desktops.

Hardware requirements: Intel CPU, Sandy Bridge compatible motherboard with x68 or z67 chipset, or newer. p67 chipsets are not compatible. Also, always install the latest Intel HD3xxx or HD4xxxx GPU driver from Intel’s driver page.

Intel Quick Sync support

XSplit Gamecaster

Supported for local recordings and live streaming

XSplit Broadcaster

v.2.x only

NVIDIA logo

NVIDIA NVENC hardware encoder

NVENC (aka NVidia ENCoder) is Nvidia’s hardware implementation of H.264 and is available with all Nvidia GPUs starting from Kepler (GTX 650+).

Hardware requirements: NVIDIA GPU (see list above), latest GeForce drivers (min. v. 334)

Nvidia NVENC support

XSplit Gamecaster

Supported for local recordings and live streaming

XSplit Broadcaster

v2.x and above only

AMD logo

AMD VCE hardware encoder

VCE (Video Codec Engine) is AMD’s hardware implementation of H.264 and is available in Trinity APUs, Tahiti XT GPUs (79XX, 7870 XT), Cape Verde GPUs (77XX) and the newer RX 200 series GPUs.

Hardware requirements: AMD APU/GPU (see list above), latest Radeon drivers and Catalyst Control Center

AMD VCE support

XSplit Gamecaster

Supported for local recordings and live streaming.  30 FPS is the maximum supported frame rate

XSplit Broadcaster

Supported for local recordings  in the latest 1.3 version. Supported for streaming in v2.x only.  1080p30FPS and 720p60FPS are supported

Avermedia logo

Avermedia H.264 hardware encoder

Avermedia’s H.264 hardware encoder is available on the Live Gamer HD and Live Gamer HD Lite.

Hardware requirements: AVerMedia capture card (see list above), latest drivers. Note the capture cards cannot function as capture card and encoder at the same time. You need two cards to capture and encode in pure hardware, or combine capture mode with another available HW encoder.

AVerMedia support

XSplit Gamecaster

Supported for local recordings and live streaming

XSplit Broadcaster

Supported for local recordings and live streaming to supported platforms

Different Bug Priorities

What follows are the different bug priorities and how the bugs in the known issues page are classified into the different priorities.

Critical

“Critical” bugs are the most prioritized bugs to be fixed. This includes bugs that cause crashes, loss of data, and severe memory leaks involving key processes, components, and use cases.

Major

“Major” bugs constitute the second priority level. Major bugs are those that lead to a severe loss of functionality or erroneous behavior that affect a sizable amount of users.

Normal

“Normal” bugs are those that cause a loss of function which may or may not affect the regular use of the software. These bugs are to be done as soon as possible in relation to pending Critical or Major issues.

Minor

“Minor” bugs are those that lead to a negligible loss of function or other problems where an easy workaround is present.

Trivial

“Trivial” bugs are those that are cosmetic in nature such as misspelled words, misaligned text, or cropped user interface.

Intel RealSense with XSplit

System Requirements:

  1. Operating System 
    F200: Windows 8.1 or later (64-bit)
    SR300: Windows 10 or later (64-bit)
  2. Intel RealSense SDK – XSplit 3.x uses 2016 R3 RSSDK. Essentials and User Background Segmentation individual components must be installed.
  3. Intel RealSense camera DCM – Download the latest camera driver.

What to do when Intel RealSense background removal option is still not working even after installing the SDK and DCM?

  1. Make sure that the camera driver or DCM is installed – Different Intel RealSense SDK versions should be compatible with different camera DCM’s, so it is recommended to always install the latest DCM. (We are going to follow up with Intel to check for any possible incompatibilities between SDK versions and DCM versions)
  2. Restart the camera DCM service – This may be necessary after RealSense SDK installation or DCM update. Run services.msc and look for Intel RealSense Depth Camera Manager or Intel RealSense SR300 Depth Camera Manager and restart the service. It is also recommended to restart the XSplit application if it was running while executing the steps above.