The Beginner Streaming Setup: It doesn’t have to cost a lot!

As a streamer, you can easily fall into a trap of buying more and more gear. “I’ve got to stream with a high-end DSLR camera, right? Nobody will watch my stream if I don’t have a $1000 microphone, right?!” If you’ve seen any of our YouTube output lately you’ll know that I’ve got a fancy camera and a big microphone but to get streaming, did I need it? Did it make my streams any better? Spoilers, no, it did not. Let’s look at what you really need for a beginner streaming setup that isn’t going to cost you lots!

Do I need a PC?

You might think you 100% need a PC to get started streaming but honestly? You don’t have to. If you have a PlayStation or Xbox console you can get streaming from there to see if you enjoy it. It’s all built right into the system and if you have a headset already, you have a microphone. The PS5 even has a microphone built into the controller so if you’re one of the seven people who managed to get one, you’re already set!

The Xbox Series S|X lets you stream directly to Twitch using the Twitch app, you can even add overlays and alerts using Lightstream for a monthly fee directly from the console!

What a PC can bring to the party is getting more complicated with scenes, graphics, and easily adding upgrades to your camera, etc. So let’s say you have a fairly decent PC (we’ve got some minimum specs we recommend here), what do you need for a beginner streaming setup to get going?

A PlayStation 5 on a desk with its controller on top of it. Having a modern console is, in itself, a beginner streaming setup.
Photo by Kerde Severin on Unsplash

Software

If this is the first time you have ever streamed I’d recommend checking out Gamecaster, it’s an all-in-one app that lets you stream, make use of overlays, and other stuff for free with an insanely easy setup process. They even have a Discovery Platform that streamers and viewers alike can make use of to help grow their channel and find an audience.

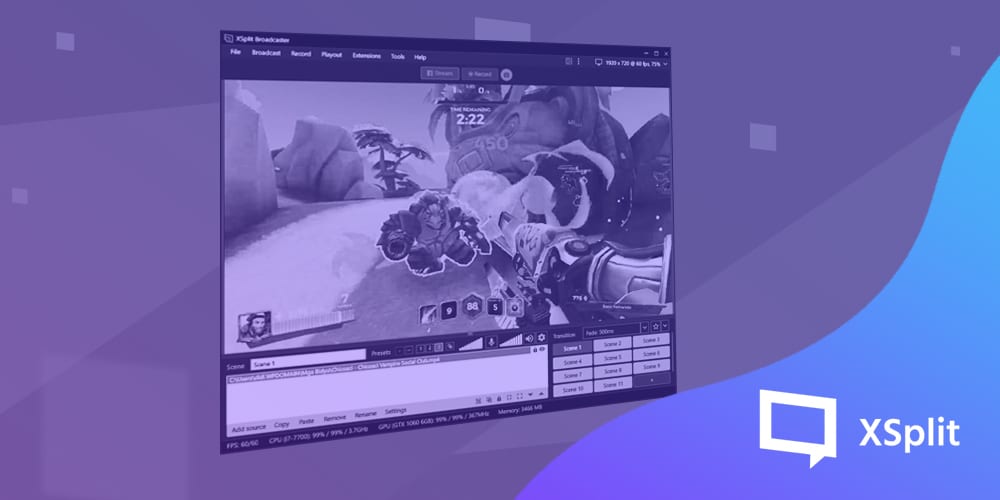
When you’re looking to add more customization, XSplit Broadcaster, used to broadcast some of the world’s biggest gaming and esports events, is ready and waiting and you can try it all out for free! XSplit Broadcaster offers next-level features like multi-platform streaming, custom transitions, noise suppression, drag and drop media additions, high-end recording, and much more!

Camera

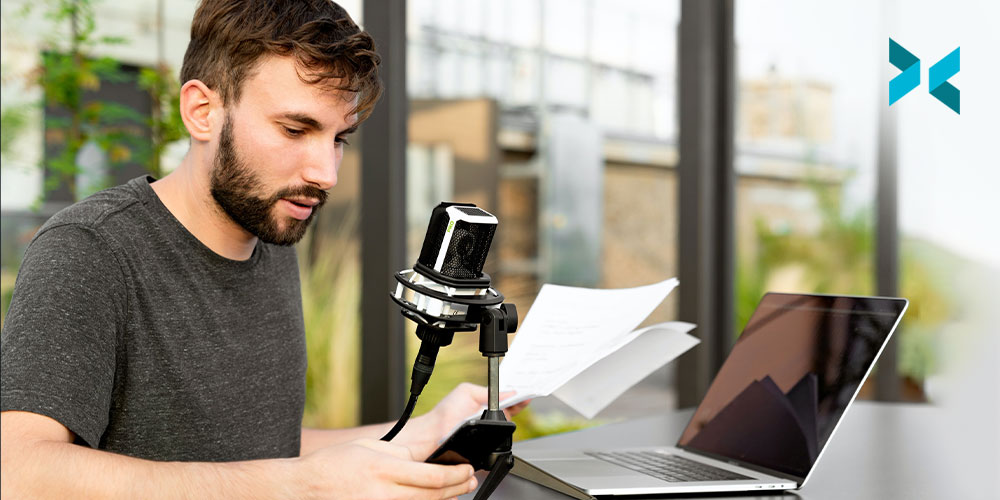
When it comes to cameras for content creation, something we’ve discussed before, you can spend a lot of money to achieve that perfect look. For a beginner streaming setup though? There are a few things you can look at. First of all, you could use a camera you probably already have, your smartphone camera!

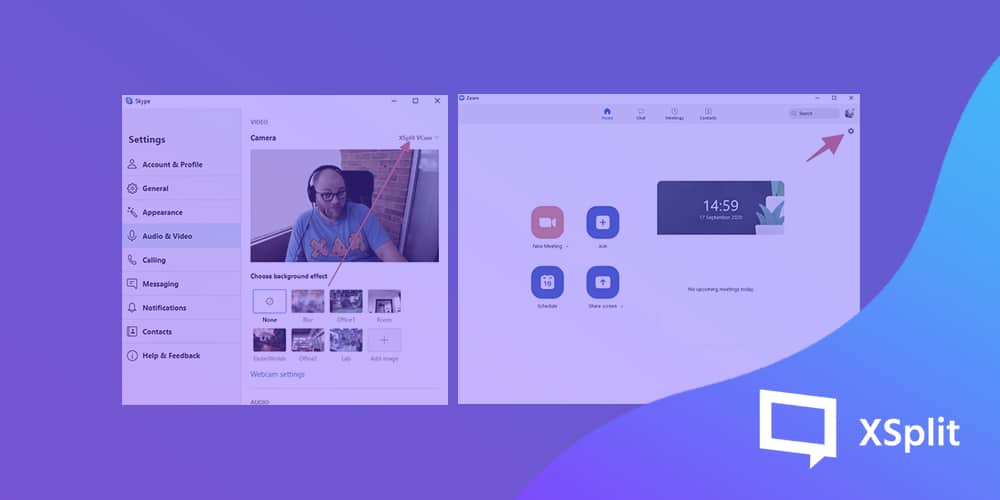
With XSplit Connect: Webcam you can connect your iOS or Android smartphone easily to your PC via XSplit VCam and you’re good to go really! It also uses all the power of VCam to change, blur or completely remove your background! Smartphone cameras can be some of the easiest to use high-end cameras available so it’s worth checking out if you want a good shot with the equipment you may already have!

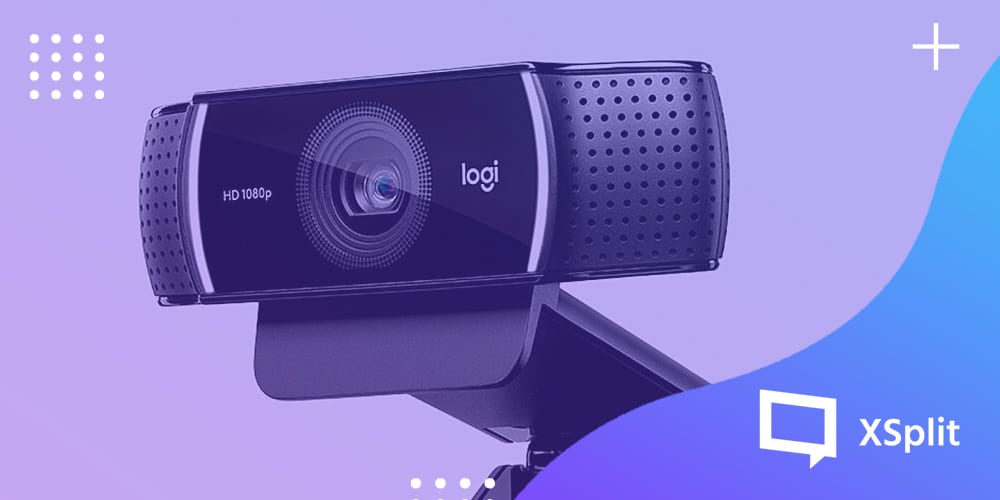
Or you could use a webcam, and everyone will tell you this but the first port of call should be the Logitech C922. There’s a reason this is the default camera for streamers, it’s relatively inexpensive and has great resolution options at 1080p or 60fps. Also, as a bonus, you’ll get a 3 Month XSplit Premium license!
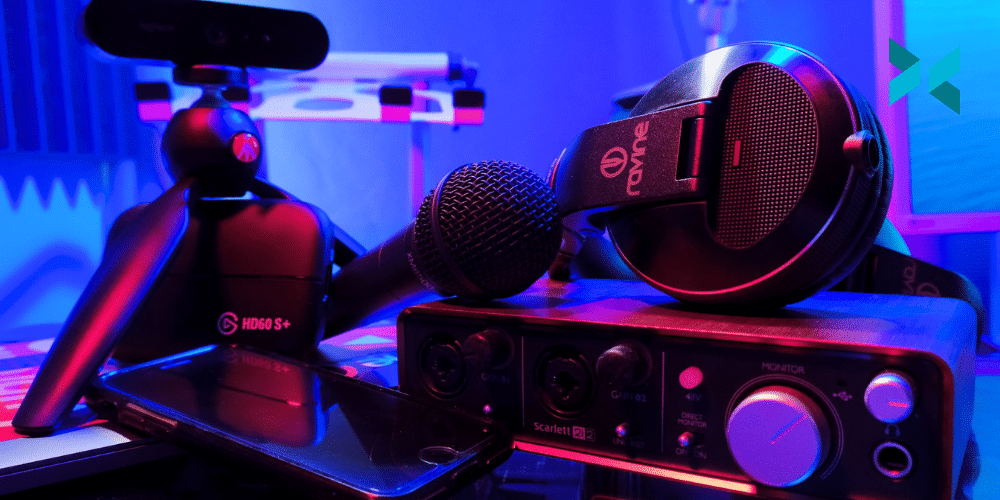
Three iPhones shown next to eachother, standing veritcally so you can see their cameras. Using your phone as a camera is great beginner streaming setup!
Photo by Denis Cherkashin on Unsplash

Microphone

Now, if you’re using the Logitech C922, the microphone built into it is honestly pretty good. You can see some examples of how this sounds in the video version of this article linked below!

However, if you’re using your smartphone or just want to get an external microphone a great piece of gear for the beginner streaming setup is the Blue Snowball. Blue Microphones make, in my opinion, some of the best USB Microphones, and the Snowball is relatively inexpensive and sounds great for what it is!

Another option is your gaming headset if you’re using one with your PC already. That’ll work just fine for chat and talking to your audience, plus you’re probably going to have a headset on to hear the game anyway, right? So, if it has a microphone built into it it’s worth trying out!

Honestly, that’s really all you need to get going, particularly if you’re streaming PC games. Now, if you’re planning to stream console games you’re going to need a capture card, I’d recommend the Elgato HD60s which can do full 1080p and 60fps. However, we do discuss a free alternative in another video on our YouTube channel.

You can invest in other things over time, but as far as beginner streaming gear goes? You really don’t need to. Start small, see if you enjoy it and only buy more expensive things if you want to, not because you feel you have to!

How to Host A Live Talkshow or Podcast: Actionable Tips

Hosting a podcast or a live talk show is something I have a bit of experience with and honestly, the live element is probably the most exciting part for me! I’ve hosted TV shows, live stages, interviewed a bunch of people in a live environment, and been a part of a number of podcasts. With all this, I have developed some hosting tips and experience that I think will help make your life easier when it comes to doing it yourself!

Research!

This is probably one of the biggest elements a lot of people tend to skip and the thing that can make your life easier! The first thing I like to know if I have a guest is what are the key points they’re going to be discussing? By this, I mean what are you talking to them about. In my case, a lot of the time I was talking to game developers about a game that had either just come out or was set to be released so. So, key points there would be the name of the game, its release date, the platforms it’s releasing on, etc. There would also be other larger themes like a specific gameplay mechanic or theme they wish to highlight. Ideally, I’d find all this out long before the interview took place over emails with the person or a PR representative. Be sure to ask for this information, however, as it’s going to inform the run of show, something we’re going to discuss later in these hosting tips!

A person sat at their desk with headphones on and a microphone pointed at them on a boom arm. Hosting tips could be useful here!
Photo by ConvertKit on Unsplash

If the subject you’re going to be discussing is a piece of media, my hosting tip would be to make sure you consume that media! As I said, a lot of my guests were game developers so, ideally, make sure you play the game before you talk to the developer! Or you know, watch the film, listen to the album, read the book, etc. If you can’t, for whatever reason (it’s not released yet, it’s not even finished, etc) then be sure to tailor your interview to that and ask the appropriate questions based on your genre knowledge. Now, you won’t always have that depth of knowledge already on the subject you’re discussing but this is something you can research as well so you are at least grounded in the terminology you’re going to need to conduct your interview.

This, to me, is a key point because one of the two main jobs I believe you have as an interviewer is to inform the audience about the subject your interviewee is discussing. Most of the time, the person you are interviewing is perfectly capable of doing that themselves, but I believe when you’re dealing with a complicated subject it can be important for you to break down the answers people give. A classic example would be to say “So, you’re saying..” and quickly summarise what they’ve just said. I wouldn’t, however, do only that, try to say that and at least ask another question in relation to that, saving you from repeating the same point for those who did understand the answer given. Also, again, your own depth of knowledge is what is going to mean you knowing when something might be complicated and require that kind of explanation.

A person sits at a desk infront of a laptop and microphone with headphones on hosting a podcast after getting some hosting tips.
Photo by Soundtrap on Unsplash

Run of show

The run of show is one of the most important documents you can get and something I advise you make use of in these hosting tips! If you’re working with a producer, they may make this for you but if you’re pulling double duty you really should make one for yourself! The run of show is essentially a long list with some expanded details. Not only the interviewees’ name and social handles/websites want to go in there but so do the key points you’re going to want to hit. Another key thing you’ll want to have in here is timings.

So, for example, when I would host the Indie[dot]XSplit showcase stage at places like PAX we would have multiple guests on over the course of a day to discuss their different games. Everything would be timed out as we are only allowed in the convention center halls for a set time and the guests were also showing their games on other stages and at their own booths. Knowing how long your guest is booked to be there is important because you have to make sure everything sticks to these times, not only for your own show but as a courtesy to the guest. They don’t want to be late for everything they have to do that day because you let the interview run over.

One hosting tip that can be useful, if you’re working with a producer, is to have them display some of this information, as well as a clock, using XSplit Broadcasters projector mode. This is something we used to do for our shows, just a simple scene with this information on “finish at 14:30” and a clock so I can see how close to that time I am. This is then projected to a monitor which is being displayed in front of me on the stage! It saves having too much info in the form of notes and keeps you able to stay ahead of time. It’s also a great way for the producer to communicate anything to you live during an interview!

Two people sat across from eachother with microphones on a coffee table connected to a laptop as they sit on the floor. Hosting tips can help both people on a podcast!
Photo by Kate Oseen on Unsplash

Keep it positive and comfortable

So once you get to the day of your interview there are still a couple of hosting tips I can give you before you go live. Once your guest arrives, make sure you say hello to them and set the tone right from the start. You’re relaxed, positive and you know what’s going on and what’s going to be coming up in the interview. This is not only a professional courtesy but it will help someone who might be a little nervous getting interviewed in a live situation, possibly for the first time. Find out how they are doing, how the day is going, and double-check if there are any other key points than the ones you already have written down that they would like to make sure you hit in the interview.

Now when you get into the interview itself, you should introduce your guest so something to do before the interview is ask how to pronounce their name and what their pronouns are. You may think you know how to pronounce someone’s name, and you could well be right, but starting an interview off with the wrong name isn’t the best way to start. I’ve been guilty of saying a name wrong, I’ve even been guilty of the worse “introduce yourself”. This is, for you, easier, but for your interviewee, it’s putting them on the spot and not really giving them enough of a brief as to how much information they should be giving at that point. Always introduce the guest!

For me, keeping the tone conversational is the ideal way to go. I think an interview should feel a bit like a chat more than a prescribed set of questions going one after another. This, to me, means not holding yourself to where you think the interview should go, if everyone is having fun discussing something and it’s still serving the point of the interview, follow that! If something funny is said and your guests are having fun, stick with it! Don’t forget your key points, however, as you need to keep the conversation on track and hitting the key points we discussed earlier.

A person sat facing their desktop computer with a microphone and boom arm attached to the desk, hosting tips could help level up their podcast!
Photo by ConvertKit on Unsplash

Keep the conversation going.

If the conversation does take too far of a shift away from the key points you’re there to discuss it’s your job to steer the conversation back. Ideally, you want to find a way to do that with what they’re saying but honestly, sometimes you just need to change the subject. Keeping that shift fun is important and it takes some experience but you’d be doing your interviewee a disservice by not doing that. Remember, everything you say should, ideally, be in service to what you’re there to discuss. Leave room for people to speak! Unless you’re telling an anecdote to relax the person you’re interviewing or to let them know “fun times are cool!”, it’s not your time to shine, it’s theirs!

It’s easy to try and fill time with a funny thing you want to say or going off on tangents purely because you’re enjoying them, but do remember why the person you’re talking to is there. And, why you’re there, which is as I said before to inform the audience but the second part of that is to get the best of the person you are interviewing. I truly believe that a big part of what an interviewer is there to do is show the person they are interviewing in their best light and leave the viewer/listener with the best impression possible.

One final, bonus hosting tip, from me, would be to always watch the people who inspire you or admire you in the interviewing field. To me, Graham Norton is one of the best in the world so I will always watch his chat show and listen to his radio show to get a sense of how he does what he does. Figure out what it is you really like about how they are interviewing people and then how you can incorporate that into your own personal style. I wouldn’t say it’s a great idea to emulate them but this kind of knowledge can help define your own style.

The Importance Of Agendas For Meetings

Setting agendas can make or break a meeting, especially at the moment when all our meetings are remote. An agenda adds structure, purpose and helps keep everyone aligned towards a common goal. You don’t want to spend a quarter of your meeting discussing what it is you’re about to talk about, this is the magic of Agendas! So, let’s discuss the importance of Agendas and some practical tips to help you prepare and execute your next remote meeting!

Photo by Daniel Bosse on Unsplash

Account for your time

The first thing to think about is how much your team will want to chat to each other about how they are doing and you should take account of that! The little conversations people used to have around the office have mostly been happening in text form over Slack or Teams. One thing you could do is set aside 5 minutes when setting an agenda for people to say hello and check-in with each other. Another idea, and one that could save you even more time if it’s a short meeting, set aside work time (and that part is important, don’t make it unpaid out of work time!) out of the meeting for your team to do this if they want. After all, team cohesion is important!

There are a few ways you can set up and track meetings, I recommend using Google Workspace. You can go directly to your calendar to set the meeting time, add a conference call link that will go out with the meeting invite, and add guests easily so it goes into their calendar as well. You can also add a description which is where I tend to put the meeting agenda. You can also use Google Documents for your agenda if you prefer having a larger place for all these notes to go, you can then create a link that is only visible to people attending the meeting, and that link can be put into the calendar description. I prefer to put my agenda in the description, however, as it is one less step for people to follow and everything is nice and centralized. Also, you can set it so anyone can edit the event meaning people can add their own notes, links, or attachments to the agenda!

One thing to keep in mind is agendas should be live documents, meaning they not only keep things on track but also act as a good record of what everyone said they would or wouldn’t do so you can review it in the next meeting with the same team. This is why having someone in the meeting in charge of taking notes can be vital! This would ideally be someone who doesn’t have a presentation to give in the meeting and can sit back, taking in all the information being given that isn’t already on the agenda. You can share these notes with the company at large if needed, creating a Slack or Teams channel exclusively for meeting notes can be a very useful tool to keep cohesion across teams within a company.

Photo by Surface on Unsplash

Set expectations

One thing that can be helpful is adding guidelines to your meeting notes, for example how the meeting will be lead and by who, if people should mute their mics when others are speaking, and use the “raise hand” tool if they have an immediate question or if not when questions can be taken. When typing up your agenda add expectations, for example, “Sarah will include the KPI report for Live Team”, this gives everyone a chance to prepare their part of the meeting and more importantly, know exactly what they are expected to contribute.

Get the agenda to people at the very least 24 hours before the meeting starts but ideally earlier than that so everyone has time to process and prepare what they want to discuss. Even 24 hours is a little short, ideally if you know the meeting is coming up give people a week to prepare, especially if people are giving presentations as a part of the meeting!

Adding timings to the agenda can also be useful. When you’re setting up your Google Calendar invite you can specify how long the meeting runs, in your agenda divide this time up between all the things that are going to be discussed “10mins, Sarah to discuss the Live team” etc.

Photo by Surface on Unsplash

A good way to give your presentations is with XSplit Presenter. When you join the meeting, set your camera to be XSplit Presenter and everyone will be able to see your presentation easily in the call without having to share your screen! You can create scenes for each meeting section with any relevant slides or information for each speaker and segment of the meeting. You can even import your slides from programs like Google Slides that your team has been collaborating on!

Agendas can honestly be one of the most powerful tools to help meetings go from a conversation that ends with another meeting being set because nothing got settled (these are the worst kind of meetings!) to knowledge being shared and goals being set. So, be sure to take your time with it and understand the importance of agendas for meetings!

Finding The Best Laptop for Live Streaming

If you’re looking for a more portable streaming setup we’re here to give you some tips to look for when you’re looking to pick one up. Now we’re mostly looking here at a second encoding machine, so for example you want to take games from another PC without having to encode on the same machine you’re streaming from. Now, we wouldn’t say that a laptop is the best solution for this, chances are you can build a desktop PC that has a bit more power and is cheaper than a laptop but this is perfect if you have a traveling setup. Say you’re streaming a tournament, or honestly if you’re just looking to save some space in your home setup.

We’ve taken most of our info here from this brilliant video from Offcast so head over there and be sure to give a like, comment, subscribe, and all the other things good people do for content creators.

What to look for in a laptop

So what are the most important things to look at when you’re buying a streaming laptop? Time was it was all about the CPU, and don’t get us wrong that’s still an important part of it but thanks to Nvidia’s NVENC encoding system the GPU can now carry the load so anything in the RTX 20 series is ideal but so long as the card supports NVENC it’s a good choice. NVENC can also do two different encoding settings at once for your recordings and streams so there are a bunch of advantages to going with an Nvidia card on your laptop.

Now when it comes to the CPU, whether you go with Intel or AMD the thing to look out for is the number of cores, honestly, it’s best not to skimp on this as the more cores you have the easier it is for the laptop to encode everything. We would recommend at least four cores, six is going to be the ideal place to be though. Anything above that is great but as we say, once you’re at six you’re going to have an easier time.

MSi GT76 Titan

The next thing to consider is the IO, the ports the laptop comes with. You’re going to want as many USB 3.0 ports as you can get when it comes to streaming as most of your components are going to hook up that way. Also, you want a good spread on both sides of the machine as these will be different hardware buses for things like your camera, microphone interface, capture cards, etc. Also, be sure to get something with a Thunderbolt 3 port, which is different from a USB-C port! The Thunderbolt 3 port enables you to attach enclosures for PCI-E cards, so you can get those 4 port capture cards that need PCI-E to work hooked up to your mobile production laptop.

Looking at storage, the size of your main drive isn’t too much of an issue. Most laptops that meet the above criteria are going to come with a solid-state drive for the operating system and you mostly just want to use it for that. Your secondary storage, however, is more than likely where you’re going to store your recordings so in that respect the bigger the better. If you can get one with a 1TB you’re going to be in a good spot to not have to worry about a day worth of tournament not getting captured.

ACER PREDATOR HELIOS

RAM isn’t as much of an issue but 16GB is about where you want to be. Anything lower than that you might start hitting performance issues, if you’re looking to do more tasks like video editing bumping up the RAM might not be a bad idea but for a streaming station, 16GB is a sweet spot.

The only other thing to consider is the size and weight of the laptop. Now, this might seem cut and dry, thinner and lighter are better for taking this laptop places. Well, be careful with that, thinner laptops with the sorts of specs we have been discussing can mean you’re going to get thermal issues in those thin and light laptops. And as Yoda once sort of said, bad thermals lead to performance issues, performance issues lead to stream stutters, stutters leads to “F”’s in the chat! It’s never a bad idea to get a laptop that has a bit more chunk to it and more fans.

Following this advance should get you that second encoding station you’re after and leave you free to worry about everything else running an event or a stream can leave you.

Be sure to check out the original video from Offcast and, again, give him a like, comment, AND subscribe! 

The Best Webcams for Video Conferencing

Webcams have become a vital tool for remote work with everyone checking in for meetings over Teams or Zoom. Let’s not forget the family quiz or just a catch-up call with a friend, but what are the best webcams for video conferencing out there? Well, that’s what we’re here for right? Let’s take a look!

The All-Rounder

Logitech C922

The Logitech C922 is an easy recommendation as a step-up from a built-in webcam. A lot of versions of the webcam come with a handy tripod and can capture video in full HD at 1080p 30 frames per second. It can also do 60 frames per second at 720p so you can get that smooth video, as with most Logitech webcams it also includes a decent built-in microphone. And hey, bonus, most versions of the C922 come with three months of XSplit Premium so you can use our AI Background removal software, VCam, along with it!

The Step – Up

Logitech Brio

If you want a higher quality video, the Brio is the place to go. Able to capture 4K, for recording video this one is up there when it comes to a USB webcam. One of the big features, in our opinion, however, is the ability to do 1080p and 60 frames per second, which translates to high quality, smooth images when you’re on a zoom call. Also, that 4K sensor means the Brio can capture a wider image, meaning you can still sit at your desk like normal and not have the image be filled with your face alone. Get a nice wide shot of your room with you in it!

The Bright One

Razer Kiyo

A lot of camera advice will tell you, it isn’t so much the quality of the camera it’s the lighting. This camera combines both! With a small ring light built right into the Razer Kiyo this 1080p /  30 frames per second or 720p with 60 frames per second offers a pretty compelling package. The small ring light can make a big difference to image quality and can actually help improve the performance of background removal software like XSplit VCam.

The Content Creator

Logitech StreamCam

The Logitech Streamcam not only offers full HD with 1080p and 60 frames per second but you can capture footage in both landscape and portrait, which is very useful for creating video for social platforms like Instagram! Also, the StreamCam benefits from a USB-C connection, which a lot of newer devices like Apple MacBook’s or Microsoft’s Surface 7 take advantage of.

The Privacy Seeker

AVerMedia Live Stream USB Camera

The AVerMedia Live Stream Camera offers the usual 1080p video at 30fps and a decent built-in microphone solution but one nice feature that gets it on this list is its built-in webcam cover. Now for the security conscious, you can opt to buy one of these separately, or unplug the webcam, but the AverMedia Live Stream Camera makes this a whole lot easier with its built-in hardware solution. It also helps that the camera itself is a very solid one! 

Your Smartphone

XSplit Connect: Webcam

That’s right, you might already have an amazing webcam! One of our latest apps, XSplit Connect: Webcam lets your iOS or Android smartphone act as your webcam! Simply download the app from your providers’ store of choice and then download and install XSplit VCam on your computer! So long as you’re on the same WiFi network on both your computer and your smartphone, VCam will detect your smartphone as a source! From here, you can now add VCam as your source in any program that uses webcams, like Zoom, Skype, Microsoft Teams, and more! You can learn more about our newest app here.

Whatever webcam you end up going with none of them can help with the space you’re in, that’s where XSplit VCam comes in! All of these will work great with VCam, which is the industry-leading AI-powered background removal and replacement program. Now you can be situated wherever you want, or just blur what’s already behind you with ease! You can try VCam for free today right here.

Discussing Remote Work with XSplit’s CMO John Howe-Marshall

Marketing any product is a science, throw remote work into the mix, with your team all working from home, and it could be made even harder! We sat down (over a video call) with and spoke to our Chief Marketing Officer, John Howe-Marshall, about the challenges and unexpected benefits remote work has bought to him and his team.

Hi John, what do you do at SplitmediaLabs?

As CMO it is my responsibility to define the overall marketing plan for all of our consumer products. This includes XSplit and Player.me. This requires me to work directly with our global marketing team, as well as coordinate closely with our product, web, and development teams on the promotion and communications around all of our applications.

How long have you been a Chief Marketing Officer?
I was SplitmediaLabs’ first dedicated marketing hire back in 2013 and was promoted to the role of Chief Marketing Officer in 2016.

What changes have your team had to make working from home?
The adjustment has been relatively smooth since our organization already uses a suite of tools that accommodate remote work (such as Slack, Microsoft Teams & Zoom). Prior to lockdown, and our entire team transitioning to a work from home schedule, we also had remote employees across the world, so in a way, we were well prepared for this transition.

What challenges have your team seen working from home?
Overall the team has adapted well to these changes, of course, everyone’s home situation is slightly different so some team members are facing additional challenges if they also have small children or dependents.

Have there been any unexpected benefits?
Since our company offers flexi-time, I think in general some of the benefits I have noticed is better accountability across teams. There is a lot more focus on ensuring plans and strategies are defined and executed in writing as opposed to just ad-hoc meetings, which allow for team members with slightly different work schedules to still feel in the loop of developing projects. 

Has this affected your approach to marketing the products?
Because of these huge global changes, many of our team are now encouraged to use our applications for all manners of work. This keeps the team constantly thinking about how better to market our products as well as provide crucial insights to the product development team. I think some of these changes will become more apparent over the next few months. 

How do you think live streaming can be added to a company’s workflow?
For many companies (ourselves included), streaming and conference calls have become essential tools for team members to organize and coordinate. In particular, we use streaming to host our end-of-month company updates which are attended by all employees from around the world. These types of initiatives help bridge the distance and keep camaraderie and team morale high, not to mention it’s fun just to catch up with everyone too. In general, though I believe live streaming, as well as video-based communication and collaboration, is already defining the future of how we work.

How does VCam fit into this?
XSplit VCam in particular is a fantastic tool for improving the quality of presentations and conference calls whether among small groups or large teams. The added options for background removal ensure privacy, as well as providing a general increase to the production quality of your broadcast without the need for complex lighting and camera setups.

Thanks for talking with us today, John!

As you can tell, remote work and marketing can be tough, but with team cohesion and the right tools, you can find new systems to help guide your team and you through it. You can find John Marshall on the internet at johnhowemarshall.com

Adding XSplit VCam 2.0 to Zoom, Microsoft Teams, Skype, and more

XSplit VCam 2.0 is the revolutionary, best in class AI-powered background removal and replacement tool but you already know that! You’re here because you want to know how to add it to various programs and honestly, it couldn’t be easier!

Zoom

Adding VCam into Zoom is as simple (as we’re going to find out with a lot of these) as adding any webcam!

First up, once you have opened Zoom click the settings cog in the top right.

Next up, select Video.

Finally, from the drop-down menu select XSplit VCam!

And there you have it, you can go into the VCam program and set up your video however you like and it will be reflected in Zoom!

Microsoft Teams

Once you have opened Microsoft Teams click on your profile picture in the top right.

Next up, click the gear icon to enter the settings menu.

Once in the settings menu, select Devices

Finally select XSplit VCam from the drop-down, menu in the Camera section.

Now you’re all set up and ready to use XSplit VCam 2.0 in Microsoft Teams. Setting your camera to remove or replace the background is still done in the VCam app and you’ll see all the changes you make reflected immediately in Microsoft Teams!

Skype

First up, after we open Skype you’re going to want to open the three-dot menu and click “settings”.

Then you’re going to want to click “Audio and Video”

Finally, select XSplit VCam from the drop-down menu and you’re ready to go!

Getting everything set up how you’d like in the VCam app itself is the same and any changes you make are immediately reflected in Skype!

Now for the “anything else” part of the title! XSplit VCam 2.0 works as an embedded camera on Windows 10 so really, any program that can detect any use a webcam could use XSplit VCam 2.0. The process is similar for a lot of programs, find where you can add your webcam and select XSplit VCam and you’ll be ready to go!

XSplit Broadcaster 4.0 is Here

XSplit Broadcaster 4.0 is here and we couldn’t be more excited to share this big update with you! We have been focusing on creating the best live streaming software available for the last ten years and we feel with this update we’re a step closer to making streaming more powerful, more accessible, and more sophisticated than ever before!

What’s new?

  • Updated UI – We’re on the road to update the user interface you interact with on a daily basis. We’ve included an easy to access stream and record button and provided the ability to resize the scenes and sources list.
  • Audio Effects (DSP) – Our ongoing effort to improve audio in XSplit Broadcaster introduces compression, EQ effects, and more with a brand new UI to manage them. Find out more info here!
  • Multiple Recording Profiles – Set up multiple recording profiles to record multiple scenes or different encoding settings. This can make recording raw gameplay while streaming a full broadcast, for example, easy! Find out more here!
  • Improved Extensions – With several extensions such as macros becoming staples of many broadcasts, it was a pain to remember to launch them every time you opened XSplit Broadcaster. Now, extensions will restore to their last state before closing Broadcaster and can also run in the background.  
  • Playout Improvements –  Specify which scenes you want to playout to NDI or Decklink devices with additional transparency performance options for NDI.
  • Stream Only in Audio Mixer – You can now monitor and adjust the levels of any source outputting to Stream Only. 
  • Macros Extension – Import and export macros! Added triggers for outputs, audio sensitivity, and leaving scenes. New actions for cue points, recordings, and more. Additional improvements have been made for custom actions that allow you to make them user friendly with variables.
  • Per Scene Lighting – Using Elgato Keylights with XSplit Broadcaster 4.0 can level up your stream as the lighting in the room changes as you change your scene! Find out more here!

There’s a whole lot more than just that! If you love seeing the nitty-gritty stuff, here’s the full release notes for version 4.0 that also contains all the bug fixes and minor improvements.

This is an ongoing process for us and we’re nowhere near done with regular updates from our development team. Combined with our 24/7 customer support, XSplit Broadcaster 4.0 is an ever-evolving package for content creators. Have something you’d like to see in future updates? Suggest it over on our feature upvote page, we love to hear from our community!

We hope you enjoy XSplit Broadcaster 4.0! Head over to xsplit.com/broadcaster and download the update today!  

Common Mistakes Streamers Make Pt. 2

Streaming is easier than ever but there are still many pitfalls but, as I discussed in Part One, there are still some common mistakes with easy fixes that can help make your broadcast better. 

Audio Quality

Audio quality is, debatably, even more important than the quality of the visuals. You might have noticed this yourself, but most people will accept lower quality visuals a lot more than they will low quality audio when it comes to a live stream. Spending money wisely on the type of microphone that’s right for your content, something we discussed here, is important but little tweaks can make a cheaper sounding microphone sing! With XSplit Broadcaster 4.0 we have introduced Audio Effects DSP. What this means is you can go in, tweak the EQ to add the right amount of bass, treble or mids to your voice to make it sounds exactly the way you’d want it to. Want that Radio Broadcast voice? It’s doable! The best thing to do is play with these settings as everyone’s voice is different and you’ll find what sounds right as you need.

Want to stop blowing out your audio levels? Add an audio gate, a compressor, and more with XSplit Broadcaster 4.0’s Audio Effects DSP! 

Lighting

Got a fancy camera but it doesn’t seem to look as nice as some of the other streams you see? A lot of the time, getting your lighting right is key! Even a cheaper webcam can benefit greatly from getting your lighting setup right, something XSplit alumni Offcast discusses in this video.

Something as simple as removing a light source from behind you can make a huge difference in the quality of your camera on stream so be sure to set up your lighting right!

Play what you enjoy.

It might seem like a good idea to always play the games that have just come out or have shot up in popularity but if you’re not enjoying them it’s not going to benefit anyone. Firstly, a lot of the time there is more competition in new releases and popular games and with discoverability always being an issue on sites like Twitch it’s just going to be even worse. The most important parts though are the enjoyment of you and your audience, which are very much linked. If you’re playing a game you’re not that in to, I don’t know about you, but it doesn’t make very interesting streams from me! I tend to get bored, or worse fed up. This is normal unless you’re a great actor, pretty obvious to people watching you, and most of the time if people aren’t watching streamers for great gameplay they’re watching to hang out so setting yourself up to have a bad time is also setting your audience up to have a bad time.

Sure, looking into analytics and metrics to find out what the optimum games are can be helpful but ultimately why are you streaming in the first place? To have fun and connect with an audience! Playing the games you enjoy is going to bring out the best in you and the people who connect with you at your best are the people you want hanging around! 

Don’t stream all the time.

“Getting on that grind” doesn’t work anymore. Really, that used to be the advice “stream for 7 or 8 hours, people will come and watch”, while there used to be some truth to that five or six years ago now more and more people are streaming while the discoverability tools haven’t got that much better. More than anything though, streaming for so long you end up exhausted is a terrible idea! Much like we discussed above, people mostly want to hang out and have fun so if you’re cranky, tired, and fed up because this is hour nine you’re unlikely to have many folks stick around. The most important take away though is if you’re not in the mood to perform and be “on” today, don’t. While that’s simple enough to say, and for some creators, this is their job and they have to work, for most of us streaming is a hobby. If your hobby is wearing you down, or if you’re just not in the mood today, don’t. Take time off, as much as you need, until you feel like you want to do it again.

Both you and your audience will have a better experience in the long run and ultimately that’s why a lot of us got into streaming in the first place. 

Implementing some, or all, of this advice, should from a tech standpoint and a personal one make your streaming experience a little better for both you and your audience! Let me know in the comments what things you have noticed that might help your fellow streamers and content creators out! 

Catching up with Tanya De Pass; Streaming, Tabletop, and Inspiration.

Tanya De Pass has been a shining light in the streaming and gaming world for a while now and we have gone from fans to working together on a few projects. In this interview, we got to sit down and talk with Tanya not long after her XSplit 101 stream, where she ran down how she uses XSplit Broadcaster and it’s benefits.

Hi Tanya! Tell us a little about yourself and how you started streaming!

I was born on a chilly spring night in Chicago. Seriously though, I’ve been a lifelong gamer, from D&D to arcades, pong and more to today. I started streaming because I wanted to share Dragon Age: Inquisition with friends and because I discovered I could stream directly of my PS4 without a fancy set up. So once the game came out, I set it all up and that was my first streaming experience! I found I enjoyed it (despite the trolls, harassers and then stalkers) and haven’t looked back. 

Did anyone inspire you to start streaming?

I found SimplyUndrea (who no longer streams) and iambrandon (known as UGRGaming at the time) via someone hosting their streams. They were some of the first black streamers I’d seen on the platform, showed I wouldn’t be alone if I started streaming. 

Tabletop seems to have been a big interest of yours for a while now, where did you first get introduced to it?

Funnily enough I was trying to remember my first D&D session and couldn’t. I played in my early teens onward, and had to hide my gaming from my mother, who fell to the Satanic Panic of the time. She thought it was demonic, and well it was easier just to not say exactly what I was doing with friends. I do remember it was friends that introduced me to it, and knowing how much I love storytelling and fantasy; I was hooked.

Rivals of Waterdeep, the Tabletop D&D show on the official Dungeons & Dragons Twitch channel has gone from success to success, how did it get started?

Rivals came about due to Greg Tito over at WotC. He had been following my work on I Need Diverse Games for a while, and had invited me on to Dragon Talk about inclusion in tabletop & my history with D&D and other RPG’s. We kept in touch, often chatting about our shared favorite game Dragon Age II. Earlier in 2018 he reached out and asked if I’d be interested and if I knew anyone who’d want to do an actual play D&D show. The reason for our show being put together was to show anyone can play learn to play D&D. We also are a unique show in that we have an all Black and POC cast, and we change up DM’s (Dungeon Master) every season. 

Can you tell us about I Need Diverse Games?

INDG came about because I was mad about video games in October 2014. It was very much a lightning in a bottle moment of right time, right topic and the hashtag I was adding to tweets about my displeasure with aspects of the games I loved, #INeedDiverseGames being shared by folks in the industry.

Out of those conversations happening, a community slowly grew out of those. I got invited to podcasts, was interviewed and eventually INDG became it’s own entity. In December 2015 I was let go from my day job, so I decided to see if I could make INDG my main thing until unemployment ran out. So between freelance, Patreon and other small gigs here and there; I’ve been able to do this as my full time job ever since. 

You’ve been using XSplit Broadcaster for a while now on your streams, why is that?

I found it pretty user friendly, easy to set up and get going without feeling like I needed an advanced CS degree to just get my stream added into it. It let me add a bunch of scenes, and more importantly profiles into one installation rather than having to have more than one instance installed if say, I wanted to stream on the I Need Diverse Games channel instead of my channel. Updates are clear and I can’t wait for what’s in the PTR client to come to the production version. So many quality of life improvements as a broadcaster are in the pipeline. 

You recently ran an XSplit 101 stream, but what advice would you give to someone inspired by you looking to start streaming today?

Make sure you’re not in it to get rich immediately, or ever honestly. Stream whatever content you enjoy and don’t obsess over numbers. Also, make sure you like streaming before you go all in and buy a bunch of expensive equipment then it turns out you don’t actually like it. Try Gamecaster for free, then upgrade to Broadcaster if you continue to stream. Lastly, be patient. Building an audience and community will take time. There is no one game that will make you an overnight sensation in the streaming world. 

Thank you for your time, Tanya, where can people find you on the internet?

You’re so welcome Chris! Thanks for chatting and for the chance to show off why I love using XSplit to my community! I can be found on the internet as cypheroftyr everywhere like; instagramtwitterPatreonTwitchFacebook page and right here on cypheroftyr.com!