Louis Vigil has been working on live stream productions for a variety of gaming events for over 10 years! When not broadcasting an event somewhere in the world, Louis also produces educational content for people looking to get into broadcasting on his Offcast YouTube channel.
XSplit Presenter, our latest software, lets you give professional presentations with personality and flair. Today, we want to talk about how you can easily get started sharing your presentations online or in person!
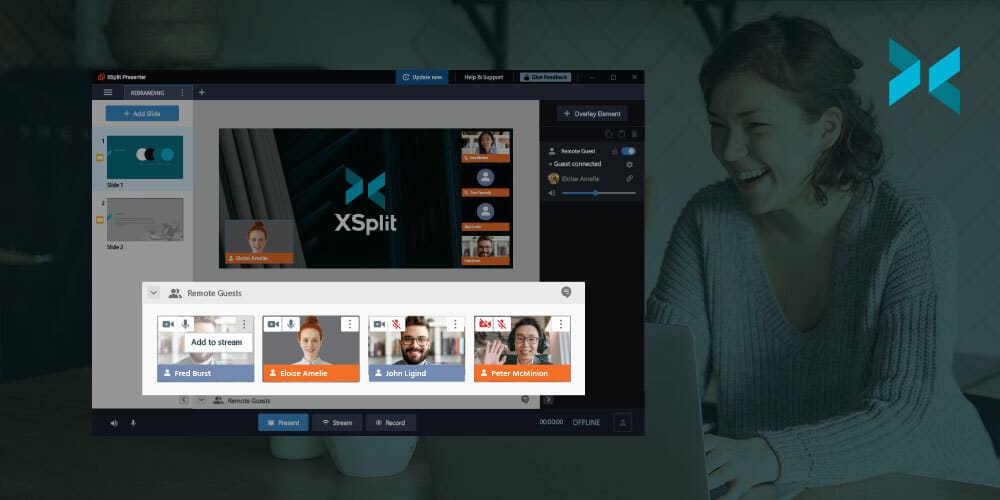
First up, once you have downloaded, installed, and opened XSplit Presenter for the first time you’ll be prompted to load a presentation into Presenter. You can also click “Connect Presentation” to get started on a new project if you are returning.
You can load a PowerPoint, Google Slides, or PDF Presentation, just open the browser and find your file. You can also load online or local PDF files as well!
For your Google Slides presentation, you will need to create a link that is viewable to anyone. To do this click “share” on your presentation and in the “Get link” area click “restricted” and change this to “Anyone with the link” then click “copy link” and you have the URL you need to paste into Presenter!
Once your slides have loaded in you can easily add more slides to your Presentation in XSplit Presenter by clicking “Add Slide”.
These slides can be your webcam, media files, or even capturing your desktop. These sources can also be added as elements of your presentation slides! You can use the presenter preview window to position your sources easily by simply clicking on them and moving them or use the source menu for additional controls for audio and cropping! Also, if you have a webcam, you can easily remove the background!
If you have added more slides or notes to your original presentation, you can resync everything so it is saved to the original presentation.
In each slide, you can easily add annotations by using the tools below the main presentation, this way you can add arrows, highlights, and more. You can even do this while you’re live so if someone asks a question you can point directly to what you want to highlight!
You can also select how you want each slide to transition between each other, like how a scene in a movie or TV show changes from one to another!
For online presentations, adding XSplit Presenter to your call couldn’t be easier! If you’re using, for example, Google Meet, simply select XSplit Presenter as your camera source. This is, in fact, true for any calling platform! XSplit Presenter acts as a “virtual camera” so it’s easy to use anywhere! Simply hit “Present” when you’re ready to go!
For an offline presentation, connect your PC to a monitor source and hit “Present”. Whichever output you’re using, online or offline, XSplit Presenter will guide you through how to get set up when you press the “Present” button. Simply select the calling service you’re using or the monitor on “Project to a monitor”.
If you won’t be giving a live presentation or wish to record your presentations for practice or to send to a meeting you can’t attend, you can do so by clicking the record button. Make sure to check that you’ve selected the proper microphone device to record your voice. The speaker icon allows you to select your playback device that will record audio from your video sources or whatever audio is playing on your PC.
We hope you enjoy XSplit Presenter, if you have any questions you can reach us on social platforms @xsplit or if you have a problem contact our support team who are available 24/7. If there are any features you need, be sure to give us feedback either on our socials or here in the comments section below! Also, as a bonus fact, the screenshots in this article with arrows were easily made using XSplit Capture!
In the early days of streaming, it used to be enough to just get a stable stream up and running to attract viewers. Now you need to make a schedule, promote yourself on social media, create clips and highlights, and more. These are the things we want to talk about today, all those things you might be forgetting to do while you stream, things that could improve your viewership over time!
Creating clips
Unless you’ve been really disciplined with your phone, you know that everyone is gravitating towards short-form content these days. All the major streaming platforms have adopted a clipping or short clips type system. Why is this?
Well let’s be real, in any stream that is hours long, there’s a lot of dead air. So when you’re trying to improve your viewership, you probably don’t want to just tweet out the link and people come in when there’s nothing going on or you’re eating lunch, so it’s good to add clips to give people context about your stream.
Now clipping your stream while you are live is hard to do, but if you’ve grown an audience or have some good moderators, you can ask them to create clips of any moments they see. After the stream is over you can review these clips and make your own from the VOD. Some platforms will even let you download the clips so you can use them on your other social media accounts.
Get your social game right
Social media is a key to improving your viewership, and it’s not just posting the same clip across all the platforms and calling it a day. You need to be able to tailor your strategy to each platform and the various formats on the platforms. It’s not just a clickbaity tweet, but also making a story, fleet, or whatever form of content. Now while your phone makes this quick and easy to make, you can also use your streaming software to create this content.
We’ve made an assortment of videos for creating content for social media platforms, but the gist is, find out the resolution for the platform, set that up in your streaming software, and record some content to post on socials.
Some platforms unlock special tools when you reach a certain follower count, like being able to add links to Instagram stories, so be sure to take advantage of this as your reach grows. Take time to research how each platform’s discovery algorithm works, using things like hashtags, keywords, and descriptions to get those eyeballs you need in the beginning.
Get Up
Now depending on the kind of streaming, you’ll be doing, you may be sitting at your desk for hours on end. Now all the youngsters out there probably won’t worry about this too much, but for all us grown folk out there it’s important to get up and walk around for a few minutes every hour. This might not be something to improve your viewership, but, it’s certainly something you’re potentially forgetting to do while you’re streaming!
Now if you have a smartwatch it probably already reminds you to get up. But if not you can use macros to help remind you. Basically, all you need to do is set up a break scene that triggers every hour as a reminder to stand up and walk around. You can find out how to use Macros in XSplit Broadcasterhere.
It can be a fun activity to do with your chat. Get up and take a few IRL laps. Your doctor and back will appreciate it in the future.
Talking is the name of the game with streaming. Unless the content is actually watching paint dry, you always need to be talking about something even if no one is there. What you’re selling is you at the end of the day and the content will help improve your viewership.
If you’re having problems talking after the first 30 mins or so of the stream, then try to help yourself with a bit of prep work. Try to visit Reddit, forums, socials, or wherever you get your news and take note of whatever interests you. Copy the links or write the article headline in notepad and take a look at it when you are running out of things to talk about.
Also, keep a big jug of water nearby as it’s hard to keep the energy up when you’re dehydrated.
Check your analytics
One last tip I think a lot of people overlook when looking to improve your viewership is checking their analytics! Data is everything.
Now some platforms have more robust analytics than others, but you should be able to check at least where your viewership is coming from. Is it coming externally from your social media posts? From your followers? Does certain content perform better than others? Do you get more viewers at specific times? This is all useful data you can pull to help inform what direction you can point your content towards, so do try to take a look at it at least once a week.
As you can see, just streaming isn’t as simple as it used to be. This may seem overwhelming, but as long as you’re having fun creating stuff, it isn’t too bad! Let us know in the comments below what your pre and post-stream rituals are when it comes to improving your viewership!
I think one of the main challenges people encounter when they start streaming is the endless pursuit of stream quality. Now, stream quality can mean a few things. The quality of the content, the production quality, or the quality of the streaming feed itself. While the first two are very important, people aren’t going to stick around your stream if the video is pixelated and or lags every few seconds. So today we’re going to talk about stream quality or actually how to properly encode your stream to improve the quality of your live stream.
Encoders
What are encoders? Encoders basically take whatever you’ve put together in your streaming software, (gameplay, face cam, audio), and compress it to send it out to the internet. This compression part is what takes most of the work for XSplit Broadcaster and it’s a big factor in improving live stream quality. It is either done by your CPU via X264 and is called software encoding or your GPU via NVENC, VCE or Quicksync and is called hardware encoding.
For a long time, X264 was the absolute best at this encoding process, but now NVENC has established itself on newer NVIDIA RTX (and some GTX) GPUs it is able to go toe to toe with it. This is why in the PC Building guide (below), I recommended buying a GPU for encoding rather than an expensive CPU until you know, crypto mining ruined everything.
Resolution and Frame Rate
So you’re probably wondering, what makes the encoder work so hard? Well, the answer is the resolution and frame rate. The higher the resolution and the faster the frame rate means the encoder has to process more images at larger sizes, something that makes a difference when it comes to improving your live stream quality.
With X.264, you need to slow down the preset in order to maintain the image quality for higher resolutions and frame rates. In XSplit Broadcaster you’ll find these presets, very fast, faster, fast, medium, and slow by heading to…
Broadcast > Clicking the cog next to your stream output > Clicking the cog in the Video Encoding section > Encoder Preset
The problem is when you use these presets, CPU usage rises exponentially which will affect your gameplay drastically unless you’re using a 2 PC streaming setup or aren’t streaming gameplay at all.
Alternatively, on hardware encoders, there tend to be chips dedicated only to encoding, which will limit the amount they’ll affect things like your games’ frame rate. If you have to use your CPU for encoding, it’s recommended that you get a CPU with as many cores as possible (up to 32 cores) to try to achieve the slow preset for 1080p 60fps streaming.
The equivalent would be an NVIDIA GPU with the latest NVENC encoder found in the RTX series of GPUs, which will match X264’s medium preset or even outperform it in some instances. You can also use the older NVENC, VCE, and Quicksync for streaming, but you won’t be able to match the performance of the current NVENC or X264…. yet.
No matter the encoder you choose, what has the biggest effect on improving your live stream quality is bitrate. Bitrate is basically the internet upload budget you set for the video and audio quality output. The higher the better. Thankfully audio doesn’t require too high of an audio bitrate, leaving most of your budget to video. Now, this is where motion comes into play.
The more motion on the screen, be it from the number of frames per second or just things happening on screen, like supers from a fighting game, or rapid movement from a first-person shooter, the more your video bitrate budget is spread thin. That’s why for games with a lot of motion it’s generally recommended to set your stream resolution and/or FPS lower.
Now your bitrate is determined by two factors, your available internet bandwidth, and the streaming platform. For streaming platforms like Twitch, Twitter, or Facebook they all limit the available bandwidth, usually around 6000 Kbps. Why do they do this? Well because the larger the amount of bandwidth used, the higher their bills are.
Your available bandwidth is determined by your internet connection. You can find this by doing a simple speed test. This can vary during high traffic periods, but generally when setting your bitrate try not to use more than 70% of your available bandwidth so that you won’t have issues with your online games. Also, be sure to connect your stream machine via a wired connection if you can as it can make a huge difference in improving your live stream quality!
The general rule is to set your bitrate as high as your internet connection and the streaming platform allows. If on a limited connection, try lowering your resolution and frame to accommodate for the lower bitrate.
Lag is an interesting term, especially when it comes to streaming, but generally, there are two types of lag that can happen with encoding. The first type of lag is experienced on the viewer’s end, this is where their stream stutters or lags, sometimes even go offline and back online as well. At your end as the streamer, you can see this problem as well as dropped frames. This usually happens for two reasons.
1) The bitrate was set too high. As mentioned before, do a speed check before setting your bitrate. Now you may have set this bitrate before and it was fine, but as I mentioned, sometimes ISPs have high traffic periods or there’s some network maintenance going on that will affect your overall bandwidth. The best solution is to lower the bandwidth of your stream. If this continues to be a problem, try getting in contact with your ISP.
2) The streaming server is having issues. Main sites like Twitch have dedicated streaming servers for different regions, but sometimes these have issues. The best solution is to go offline and change servers. If this is a recurring problem, do a bandwidth check to determine if the server you plan to stream to is stable before going live.
You can easily change servers on XSplit Broadcaster by going to…
Broadcast > Clicking the cog next to your stream output > under “Server” change Automatic (or whatever server you have selected) to the next closest server to your region.
For Twitch, for example, a good way to determine this is to check here which will list the servers closest to you in order.
The next type of lag can sometimes be seen by the viewers but is usually felt or seen by the streamer if they are playing games. This is generally known as overloading your stream encoder. Basically, you are trying to encode video in a manner that your encoder can’t handle and is very common when encoding with x264. Basically, your PC is fighting for resources from the CPU, which causes frames to drop on stream and performance to be affected on programs running on the PC.
The best way to resolve this is by lowering the encoding settings as we discussed above, the main culprit is usually setting the X264 preset to higher. If that doesn’t resolve it, then lower the resolution and or frame rate.
So to wrap up, for good stream quality in terms of proper encoding, try to use hardware encoders. Know your internet and platform limitations. Lower settings if you’re having problems. We hope this helps you out but if there are any other topics you’d like us to discuss here just drop us a comment on this post!
Team building is more important than ever with many working from home or in isolation. If you’ve ever been thinking about something else to do besides a Zoom happy hour we’re going to discuss how to put together an online tournament for team building. First things first, let’s discuss some tournament basics. There are basically four types of tournaments; Swiss, Round Robin, Free for All, and Elimination so let’s take a look at each!
Types of Tournaments
Swiss is generally reserved for tournaments like Chess or card games where opponents of similar skills are matched up against each other each round. This is great if you’re planning to do an office league or playing, for example, poker, you can control how long the tournament will take by setting the number of rounds, however, you may not get a clear winner unless you have a certain amount of rounds. Also, this system isn’t ideal if you don’t have many entrants in your tournament.
Round Robin has every player entered play against each other. This is a great format if you think you’ll have a handful of players. If you think you’ll have more than eight entrants, one of the other formats would work best as the number of rounds and length of the tournament can add up quite quickly.
Free for All is a format that can vary, but basically, it is focused on the number of points earned per round and is great for battle-royale style games like Apex Legends or Fortnite.
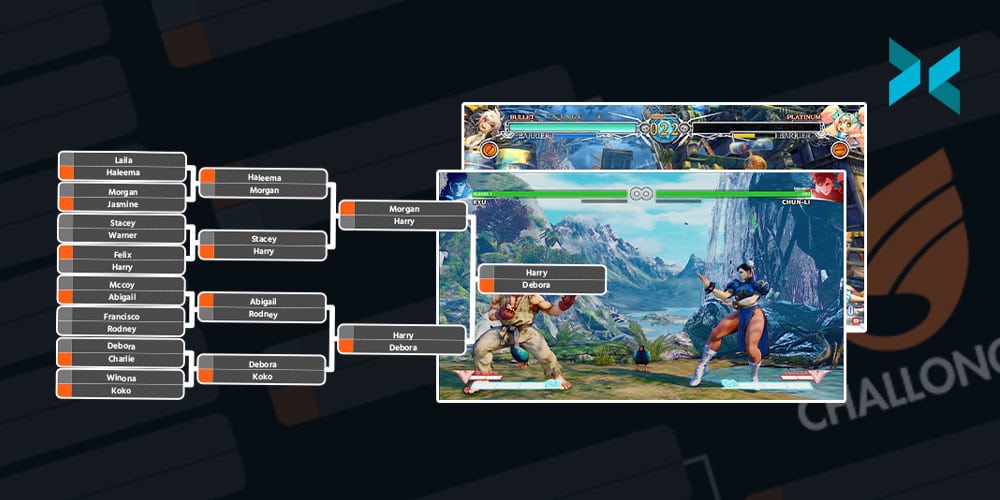
Finally, there’s elimination-style, which is the tournament format most are likely familiar with. This is a bracket-style tournament with a single elimination, which means one loss and you’re out. You could however do a double-elimination style which has an upper and a lower bracket. Once you’ve decided which kind of tournament you want to host, it’s time to use some tournament management software for your online team-building event.
For this article we’re going to be looking at Challonge and Discord, both are free and give you a bunch of tools to work with. For Challonge you just need to fill out a few fields like the tournament format, the game being played, and the date/time. Make sure you put in detailed rules and instructions on how to report scores to prevent issues popping up down the line. This is especially important if people are new to tournaments and will save you a lot of time later on if there is some sort of dispute. Seriously, setting your rules is an important step to keep everything fair and most importantly, fun!
With Challonge you can opt to create a signup page people can use to fill in their details, or enter in the participants manually later yourself. One important thing when creating a tournament signup page is to create a form to collect important registration information like in-game name, Discord number, and the participants’ email address.
Next, we recommend setting up a Discord server to facilitate setting up matches easily and for the people taking part to report their results. You’ll only need a general text chat for this and you can set up roles if you will have people helping you run the tournament. You can also set up voice channels for your contestants if they’re playing a team-based game and will need to communicate. This is also useful as you will be able to quickly dip into a team’s voice channel if you need to tell them something important during the online team-building tournament. Once you’ve configured everything simply create an invite to the server and send it out to the participants and they’ll be able to download the Discord client and get going!
Running the tournament itself is pretty straightforward! On tournament day make sure your participants have checked in, they can do this just by dropping a message in Discord. This is useful as both you and they will know they’re ready to go! Next, you need to generate the bracket, which can be easily created on Challonge like we discussed earlier and will easily map out each round until the final. Once you’ve done that it will generate a link that you can drop in the Discord general chat for everyone to see who they are up against! You participants can post screenshots of their match results inside Discord and you just need to sit back and process the results to advance the bracket.
Live Streaming
Playing with co-worders is fun and all, but it’s even better if everyone can watch along and root for their fellow co-workers! Live streaming a tournament is easy depending on the game. If you’re playing any games that have a lobby or spectator mode then all you need to do is host the match, use XSplit Broadcaster and stream the gameplay from your online team building event. You can even use a text source and color matte sources to add some players’ names and scores.
You can find out how to setup XSplit Broadcaster on our YouTube channel
If you have some co-workers willing to do some commentary, you can create a voice channel in Discord and let them spectate and commentate over the gameplay by using XSplit Broadcasters virtual camera as a video source in Discord. This is easily done by just setting your camera source in Discord to be XSplit Broadcaster when you’re setting up a video call to them.
Picking the Game
One subject we’ve danced around is what game you should pick for your tournament. Well, first you need to know what your co-workers like to play, although to be honest it can sometimes be hard to find fellow gamers in your company! If your co-workers don’t play too many games it’s good to pick team games or easier games to grasp quickly and get playing like Overwatch or Street Fighter. If you don’t think your co-workers have a gaming PC or console then it’s good to go for free to play games or mobile games like chess or PUBG. If you’re planning to stream the matches it’s best to pick a game that has a spectator mode built-in like DOTA 2 or Mobile Legends.
That’s about all you need to know to get started with hosting a tournament within your organization or friendship group! I do have one bonus tip, though! Be sure to structure your tournament in a way so you can finish the whole thing in about three to four hours. You can do this by limiting entrants or picking a format with a set number of rounds like Swiss. The main thing, however, is to have fun and you’ll not only make a fun time for the people in the online team-building tournament but you’ll put on a fun show for everyone watching on the live stream!
Streaming can be an expensive hobby, but it doesn’t have to be! From using your mobile device as a webcam, overlays, ditching capture cards, and more free live streaming tools in one article! You can’t say we don’t spoil you!
Webcam
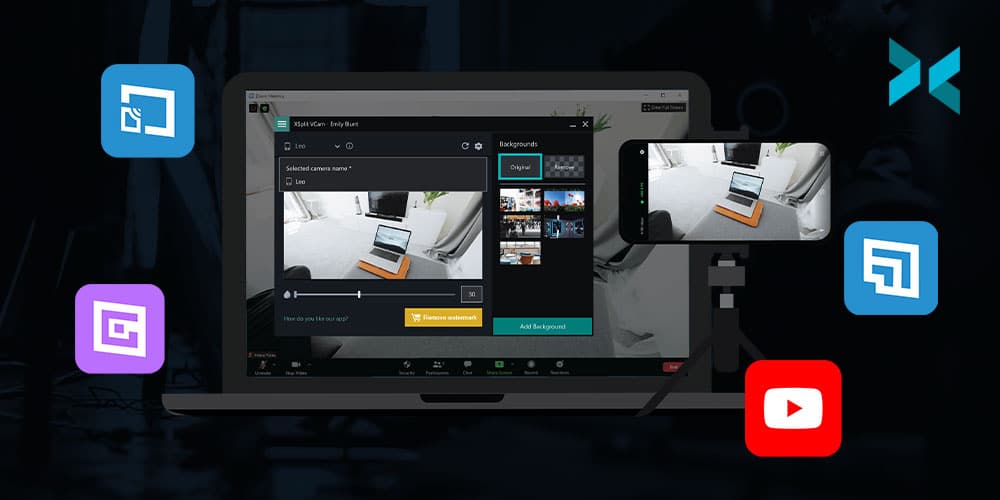
Instead of buying a webcam, just use the best camera you probably already have, your smartphone! Download XSplit VCam on your PC and XSplit Connect: Webcam on your phone. As long as your phone is connected via wifi you can connect it to XSplit VCam. In VCam you can remove or replace the background, then just add it as a source in XSplit Broadcaster which can also be used for free! Now you have a high-quality webcam and didn’t have to spend anything, you can even adjust the bitrate and switch between cameras in VCam.
The streaming community has recently had to deal with the acronym combo of the RIAA and the DMCA, basically, copyright is something to take extra seriously when you stream, lest you have your channel banned or worse! So it’s good practice to get stream safe music and thankfully there’s now a good amount of free streaming tools here. On the one hand, you have streambeats, by the stream doctor, Harris Heller. This is available on all platforms and has a ton of free tracks and genres. Simply find the playlists on YouTube, Spotify or wherever you find music and just let the music play!
Alternatively, you can dip into the free music that’s provided on your platform. Both Facebook and YouTube offer extensive libraries of free music that you can use for your streams. I personally find it funny when I stumble on a YouTube video that uses the same tracks that I do, it’s always a weird moment. Like a flashback to the editing process and in that moment myself and the video creator are connected, a whole army of us out there trying to avoid a DMCA but keep the tunes good.
If you want to find more royalty-free music, check out this deeper dive we did over on our YouTube channel.
Ditch the Capture Cards
“Capture cards are great and pretty much required for doing a two PC streaming setup, right?” I’m here to answer that question with a solid “NOPE!”. As long as your PCs are both on the same network you can use a protocol known as NDI to send Full HD 60FPS videos from one PC to another with minimal latency. How’s that for a free streaming tool? Simply install XSplit Broadcaster on your “gaming” PC, capture your desktop or gameplay, set your resolution and frame rate, then send out NDI. On your streaming PC, all you need to do is add the NDI source and you’re ready to go! Now, this uses a lot of bandwidth so make sure you don’t have too much traffic going through your router. Also, I must stress, use a wired connection for all of this!
Are you looking to start streaming games and you want everything to be both free AND easy? Well, give Gamecaster a shot! They have free overlays and you can start streaming in a matter of clicks as well as control everything from inside your game! There’s a wide variety of different overlays included with Gamecaster to suit whatever game you’re playing as well as alerts, all easy to set up and integrated on whatever platform you’re streaming to!
Automation
Automation is probably the best way you can simplify your streaming life! Setting up a chatbot is free and easy, there are tons of great options like Moobot and Nightbot. Personally, I prefer Nightbot, it doesn’t have the flashy UI of Moobot but you get many more tools in the free version, which when we’re discussing free streaming tools is pretty important! You have your standard lists of banned words and commands to trigger messages in the chat, but you can also set up timers to post things like your socials or streaming schedule. You can also reward loyal viewers with giveaways as well!
Speaking of schedules, many social media accounts will let you schedule your posts in advance like Twitter or the Creator Studio for Facebook and Instagram. So, rather than doing an ad hoc tweet when you go live, schedule them in advance! Not only does this take some pressure off it also just saves you having to remember to do it in your go-live checklist!
The hardest part of the streaming grind is getting an audience. It’s quite hard to get people to find you and follow you, so in the beginning, you need to be a content factory. This means taking clips and highlights of your streams and posting them everywhere! But what’s one to do without editing software? There has some be a free streaming tool for that, right? Well if you’re streaming to Twitch they give you an editor for free! Aside from being able to download your clips, you can also use the highlight tool to cut segments from your stream and download it for upload to YouTube, Twitter, or wherever.
It’s a pretty basic cutting tool, but quite handy nonetheless, and remember to level up your thumbnails and clickbait game, something we discussed here! Last but not least, don’t forget the best creative resource, yourself! It doesn’t take any budget to entertain people, you just need to find what niche or creative outlet works best for you!
As you can see there are plenty of ways to get your streams up to the standard you’re after without spending a lot of money! As we always say, the content is the most important thing so be sure to focus on that first and add production values second!
Sometimes when you’re producing a live stream, people want you to stream to every platform at once. Twitter, Facebook, YouTube, Instagram, some random server. “No problem!” you say, “I’ll get a restreaming server with custom RTMP access!” and it’s all going great until you go to set up the Instagram stream. “How do I…where? How? Who?” Well, fear not because right here we’re going to discuss how you can stream to Instagram from your PC!
“Why can’t I just stream directly to Instagram like other services?” is a perfectly reasonable question you might ask yourself. Well, because they want you to use their phone app and unless you’re a celebrity, you probably don’t have access to the RTMP or stream key you’ll need to broadcast to your page. For this, we will have to go the third-party route! There are a number of services out there and some of them are paid, but the easiest I’ve found is with yellowduck.tv
Setup
Before we go into how to set up Yellowduck to stream to Instagram from your PC, we’ll need to do some configuration with XSplit Broadcaster first. The first thing you’ll want to do is set your resolution to 720×1080 as this is the preferred resolution for Instagram, the recommended FPS is 30. You can do this by..
Clicking the Resolution Drop Down Menu in the Top Right > Resolution > Add Resolution > Custom Resolution > Input 720×1080.
In the same drop down menu > Frame Rate > 30FPS.
Now you’ll have to set up your sources to accommodate this resolution via cropping, which is easily done by holding the CTRL key after selecting the source in your main window. If you are still planning to produce 16:9 content you can try rotating it, but you may want to try laying it out with borders since most people are viewing Instagram in portrait mode.
Now that you have your production configured let’s get the stream output setup! First, download the Yellowduck client and install it, it will ask you to log in to your Instagram account and then generate a stream key. Don’t do that just yet as we have a few bits to do in XSplit Broadcaster first then we will come back to it! We will need to create a custom RTMP output in XSplit Broadcaster and set the bitrate for the video and audio.
Click the Broadcast drop down menu > Set Up New Output > Find More Outputs > Search and Install Custom RTMP > Select Custom RTMP from the Setup New Output menu.
Here you can name the Output Instagram or whatever works for you! On codec select NVENC h.2624 if you have an NVIDIA graphics card that supports it, if not x264. For video, the Bitrate limit is currently 2000 and for audio, under Audio Encoding, set the bitrate to 128.
Now, in the Yellowduck client click generate stream key as you were prompted to do when logging in, which will now give you the RTMP URL and Stream Key which you’ll paste into their respective boxes in XSplit Broadcaster. After this, click “okay” and you’re ready to stream to Instagram from your PC!
Conclusions
Since this is quite a unique setup for streaming to a platform, you’ll likely need to have a dedicated encoder, like a separate instance of XSplit Broadcaster for broadcasting content to Instagram, so be sure to factor this into any costs you may have with your multi-stream production. Also, be sure to note that this is more of a workaround until Instagram decides to possibly make live streaming from a PC officially supported!
Over on our YouTube channel, we also show you how to record footage for Instagram!
One of the big questions facing streaming today is, should you stream in 4K? It seems like just yesterday that 1080p Full HD was the best quality you needed, but 4K streaming and recorded content is becoming more and more present. 4K capture cards have been on the market for years now and software has allowed you to record or stream in 4K if you have a capable machine. Now, this had me curious, because I know for cameras they tend to downsample 8K and 6K sensors for a crisper 4K, so can this same principle be applied to streaming? Let’s look into 4K stream capture with some test footage for you to review!
First, let’s give you a rundown of the setup I’m using. We’re going to be running a two PC setup, one is our gaming PC with an NVIDIA 2080ti and an Intel i9-9900k. Not the most state of the art, but it should at least give us a stable 4K 60FPS on some games. On the capture side, we’re using a Ryzen 7 1700 with an NVIDIA 2060 GPU. Now we’re not streaming in 4K, we’re going to just be capturing 4K, and downsampling that into 1080p. Having said that, even this dusty old PC can handle streaming at 4K 30FPS with the RTX GPU.
For capturing the gaming PC for this 4K stream capture we’re using an Elgato 4K 60Pro, 1st Gen. I’m outputting from my GPU to a 4K monitor and to capture software, then I’m just duplicating my desktop. I didn’t want to just show PC capture, I also wanted to add a 4K camera. So I coupled this with a Magewell USB 3.0 capture card, which is capable of capturing up to 4K 30FPS. I’m using my Sony A7III, which can do 30FPS 4K output, however, it has a slight crop. For all of this, we’re using the appropriate HDMI 2.0 and high-speed cables and I’ve verified that everything is sending a 4K signal for this 4K stream capture.
Now we have our setup, how are we going to test all of this? Well, for streaming software we’re going to be using XSplit Broadcaster and we’re going to test three scenarios. In each of these scenarios we’re going to stream to a random channel, but we’re going to enable a carbon copy of the recording to review and compare. We’re also going to be using the NVENC encoder for each of these 4k stream capture tests, which you can enable in streaming settings by clicking the Broadcast drop-down menu, click the gear icon next to your output and under Video Encoding select NVENC. I’ll also be setting the max quality to 6000 bitrate, this can be changed in the same menu right next to the NVENC dropdown labeled “Bitrate”.
I’ve included links to the videos from the tests I’ve run so you can review the results, as uploading them to YouTube will add compression and this can affect your perception.
Test One: I will be setting XSplit Broadcasters’ base resolution to 4K 60FPS, but the live streaming output to 1080p 60FPS. You can view the raw file for this test, here!
Test Two: XSplit Broadcaster is set to 1080p resolution 60FPS output, which means it’s automatically scaling the 4K source on its own. The raw file for this test is here!
Test Three: is setting the sources to 1080p and then streaming. The raw file for this test is, unsurprisingly, here!
So there we have it, and honestly, it can really be in the eye of the beholder as to whether things look better enough for it to be worth upgrading parts of or even your entire setup. Capturing games at 4K and streaming at 4K, as I say, is certainly the future and one thing you can rely on to be ready is XSplit Broadcaster! Supporting many resolutions and ready to stream at the bitrate you need, XSplit Broadcaster is the ultimate solution for future-proofing your high-quality streams! Be sure to let me know what you thought looked best in the comments below as it would be great to see what you think about 4K stream capture!
Over on our YouTube page, we had previously discussed how to make your own tutorial videos, something linked below. Probably the most important element of any tutorial, however, is the script as it’s your plan for whatever it is you wish to teach. Today, I’m going to discuss three ways you can write tutorials, which kind of content works best for each method, and some additional script writing tips to find out how to write a video tutorial.
How to make Tutorial videos on your PC.
Freestyle
This is probably how a lot of people script their first videos, completely freestyle. This is where you come up with a topic and just talk about it for however long you feel and then put it together in the edit. The George Lucas approach to tutorials, if you’ll excuse the Star Wars reference. Now, if you’re going for more personality-based content or maybe more general advice, guru-type content then this is a great choice. It gives you the freedom to put out a lot of information in a way that makes sense to you and creates a more intimate feeling for the audience as if they were getting advice from a friend. There are, however, some drawbacks to using this method.
The main challenge will come when you get to the edit. If you missed something you needed to mention, you’ll need to re-record, which may be a challenge as getting the exact same lighting conditions, clothing, hairstyle, etc is always a pain. Although, you can be smart about it and make these cutaways more of an aside to the audience, which is an established aesthetic and can be useful when you’re learning how to write a video tutorial with this method.
Another challenge is if you aren’t naturally the best talker and fumble over your words it can lead to some pretty rough cuts of all your good takes together. Nobody wants to be the Tekken 3 of tutorials.
The next method of writing involves creating a brief outline of your talking points. Since this requires a bit more organization, I’d like to reiterate some things from the video at the top of the page about the importance of dividing your videos into segments. With this in mind, the workflow would become video topic, segment topic, bullet points of discussion topics
For example, say you are doing a video about how to make a sandwich. You have a segment on bread, and then each bullet point could be different types of bread and while recording you’d talk about how suitable that bread is for a sandwich.
This tends to be the preferred method for a lot of online content creators when learning how to write a video tutorial. You get to pass along accurate information while also maintaining some flexibility to inject some personality into the tutorial to keep your audience engaged. It can also be helpful by allowing you to rearrange your content in your post-production process if you don’t find the original order you recorded in makes as much sense as you’d hoped. One tip while using this method is to make sure your last take is your best take on the subject you’re discussing, as this will speed up the editing process.
The final method of writing tutorials is to fully script out each word you’ll be saying in the tutorial. Much of the advice for bullet-pointed scripts in terms of organization also applies here, but you can take it a step further during the pre and post-production stages.
Since you know exactly what you’re going to be saying, this means it’ll be easier to subtitle and translate your video, thereby opening up your content to a larger audience. You will also be better able to plan out the b-roll segments for your tutorial, which in turn will give you a better idea of how long a video will take to make. So, if you’re rigid or strict on deadlines for releasing content, it’s good to know in advance if the video you are plotting is going to require an elaborate shot.
If your content needs to be accurate and detailed, like if you’re teaching someone how to put together a model or talking about history or philosophy, then it is really important to script all this out and plan in advance. This is also helpful if you won’t be the on-screen talent for your videos, just make sure you get feedback from your talent so that you can write things that fit their natural way of speaking.
I personally use the fully scripted model for most of my videos because I find it hard not having set endpoints for whatever I’m describing or explaining. I’m susceptible to going off on tangents that aren’t related to the main topic, which can just make the editing process even longer! There are, of course, drawbacks to this method.
It can be hard for people to follow a script, especially if you have to use exact phrases. In these cases try to separate things into shorter phrases. While this can make editing a bit more difficult, it can really help you or your talent not feel exhausted at the end of a recording session. Also, if you’re reading off a script, say you’re just doing a voiceover, or happen to use a teleprompter, then it can be easy to sound robotic or lacking energy. In this case, it’s important to be present and listening to yourself or the delivery of the talent and make adjustments where needed. And hey, speaking of teleprompters, adding your script into XSplit Broadcaster or Presenter’s projector mode can make a great make-shift teleprompter on your monitor.
Now, I recommend experimenting with each method and see what works best for you. You don’t need to stick to any given method, perhaps some videos work best with a full script, especially when working with collaborators and for other short and quick videos you just need a few bullet points! Whatever the case, you’ll hopefully find writing your next video tutorial script that bit easier!
One group that has been at the forefront of the work from home experience has been artists. Many artists have begun to look into other revenue streams like live-streaming the creation and process of making their art or providing educational content teaching others the skills they have learned. How you may ask, do you stream or record your art? Well, you may have noticed it in the title but today we’re going to discuss how to live stream or record digital art!
First up, you’ll need a computer, a desktop PC or laptop are both good for this, just make sure it hits certain requirements, something you can read about here. Briefly though, make sure you have at least an NVIDIA RTX GPU or a six-core CPU. Next, if you’re doing physical art, like painting on a canvas or sculpture, you’ll need some type of camera. You can grab a webcam, a Logitech C920 is a good start, or you can even use your cellphone! Download XSplit VCam, get the XSplit Connect: Webcam App, and make sure your phone and PC are on the same WIFI network and you can use your phone as a camera!
If you’re creating digital art on something like an iPad you’ll need to be able to capture your screen to stream digital art. There are two ways to do this, one is using an HDMI adapter (HDMI to Lightning or USB-C in the case of some iPads) to connect the device to a capture card. Or you can use software like airserver to airplay your screen over WIFI. Another important thing as well is to make sure you have a microphone if you’re going to be talking to people in the chat, but especially if you are going to be creating tutorials! A lot of webcams come with built-in microphones but we would recommend a standalone one, something we’ve discussed here.
We’re going to be using XSplit Broadcaster as our streaming software. First thing, I recommend setting your resolution to 1920×1080 and a frame rate of 30fps. You’ll want to add whichever source will be displaying your art, if this is from a capture card simply use the sources menu by clicking Add Source > Devices > Video and selecting the name of the capture card you have. If you’re going to be capturing the software you use to make digital art like Adobe Photoshop on the same PC you’re streaming from again go to the sources menu, Add Source > Screen Capture and you can either select Smart Capture to capture only the software you’re using or you can select monitor capture. This will, however, mean people can see anything on your desktop so we’d advise using Smart Capture.
Adding your camera is just as easy as adding the capture card, but this time select the name of your webcam and it will go in the main XSplit Broadcaster window where you can easily move and resize everything. Then you just need to go into your audio settings (Tools > Settings > Audio) and select your microphone. Leave your system sound set to default, this is basically capturing any sound that your PC makes, such as audio from a video or music playback.
Another useful source, especially if you’re teaching people about software that uses a lot of shortcuts is the keyboard input display. This can be found by going to the plugin store, which can be found by selecting Add Source > Find More Sources and in the search bar typing Input Visualizer. Click on it and select Install and now back in the sources menu selecting Add Source > General Widgets and selecting the Input Visualiser. You’ll need to enable permissions for this, a bar will however automatically appear at the top of XSplit Broadcaster prompting you to do so. After that, all your keyboard inputs will appear visualized on the screen!
If you’re doing timed lessons, you can easily set up a text source to be a countdown timer which you can do again by heading to the source menu Add Source > Text then right-clicking on text source that appears and click the box that says “Use Custom Script” then clicking “Edit Script”. From here select in the Template drop-down menu “General Purpose Clock” and setting it up as you like. Finally, I recommend setting up a starting soon scene just so you can be sure everything is ready for your session. This is easily done in the scene menu clicking the + button, adding some of your artwork, some text that says Starting Soon, and maybe another countdown timer from the custom scripts. Or however you want it to look, honestly!
Now that you’re all set up let’s get a stream or recording going! If you’re streaming to any of the popular platforms like Twitch, Facebook, or YouTube this is pretty straightforward, just log in to your account when you first open up XSplit Broadcaster (or by going to the File dropdown menu and selecting Log in) and let the wizard set you up with all the recommended stream settings. If you’re streaming to a different platform you’ll use the custom RTMP plugin. This is found in the plugin store which you can find by going to Extensions > Add Extensions > Find More Extensions and installing it in the same manner we did with the Sources store above.
You’ll need to get the RTMP URL and the stream key from the service you’re using and put them in by heading to Broadcast > Set Up New Output and select Custom RTMP. You’ll also need to manually input your stream settings. Twitch offers some good guidelines for bitrates that are roughly applicable in most places and can be found here. The most important thing to take note of is your internet upload bandwidth, do a quick speed test to find out your upload speed. Basically, you want to set a bitrate that’s about 70% of your upload bandwidth or less.
Now, you’re ready to stream digital art! You can record while you’re streaming at the same time easily by checking the “Automatically save a recording on local drive” box in your Custom RTMP output or particular service Properties box which can be found by clicking the gear icon next to its name in the broadcast menu. To set your recording settings click the Record drop-down menu and click the gear icon. You’ll want to set the quality to Ultra High and enable multi-track audio and select Force constant frame rate if you’re going to be editing your video after the fact. From here just click okay and then hit record when you’re ready to go! Finally, it’s not a bad idea to hit the little camera symbol up the top in order to take screenshots, something that’s useful for sharing your finished work or using it to create thumbnails.
That’s all it takes to get started streaming or recording your artwork! Of course, there’s still promoting your content and getting people to watch, but that’s a subject for another day!
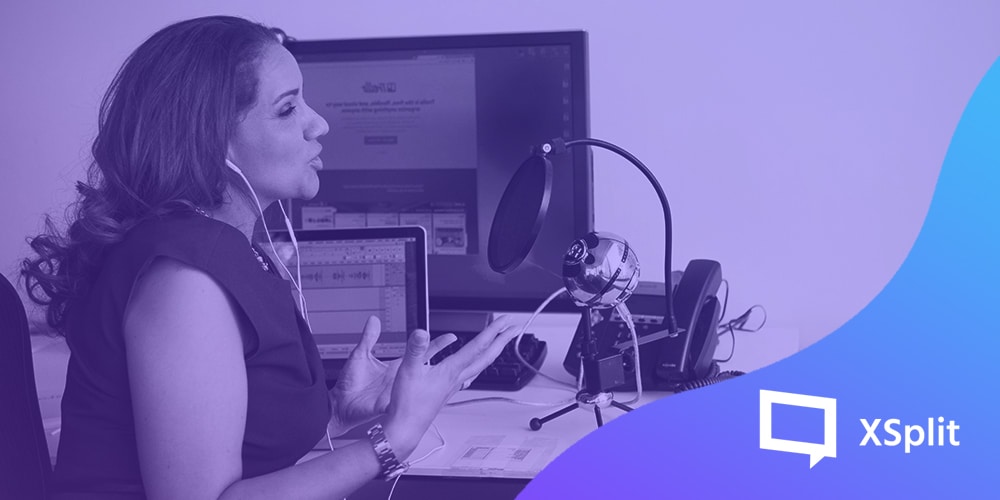
While going live is easier than ever, learning how to livestream an online podcast can still be a bit difficult. Adding a guest, especially with video can be a bit tricky depending on the platform you’re trying to use. In this article, we’re going to discuss how to produce your own talk shows or podcasts, add some production values and make your life as a host and producer easier.
We’re going to be using XSplit Broadcaster to set all this up. For the host, they just need to set the microphone device and add their webcam to the main scene. This part is pretty easy in XSplit Broadcaster, for the audio head into the Tools drop down menu > settings > Audio and select the microphone you wish to use. For your webcam, in the Sources menu select Add Source > Devices > Video > and select the webcam you wish to use.
Adding a guest really depends on the software you’re planning to use. If you’re using something like Discord, Zoom or Hangouts you’ll need to use the screen capture feature in XSplit Broadcaster to get the video feed. This is found in the Sources menu again, Add Source > Screen Capture, and either Smart Selection or Window Capture and select the program. From here you can crop and move the source around. If you have multiple monitors, I recommend dedicating one monitor to place all your video calls and be sure to set them to full screen so you can get the highest resolution from the window capture.
The only outlier to this process is Skype. With Skype you can enable NDI output, which means you can pull the video feeds of your guests as an independent NDI source. This is easily done in Skype by going into the Settings > Calling > Advanced > Allow NDI Usage, then is XSplit Broadcaster go to the Source menu > Streams > NewTek NDI stream > select the caller you’re bringing in. Also, if you’re pulling all your system audio as your main output for the stream, be sure to mute the NDI source in XSplit Broadcaster or you’ll end up with doubled up audio, this is easily done by right-clicking on the video source and hitting the “mute” button.
One pro tip, if you have an additional laptop or PC to livestream your podcast, designate that as the call laptop. You can then capture the calls from the laptop via a capture card and use an audio mixer to adjust levels. This is a bit more expensive and you should only really do this if you’re planning to invest in your online talk show.
If you want to add some production elements, here’s where you’d call on a designer to make some graphic overlays to use, but if you don’t have access to such resources there are some tools within XSplit that can help!
First, if you need a background for your cameras or a bar for a lower third, you use the color matte source. This can be found in the XSplit Plugin Store which can be found in the Source menu by clicking “Find More Sources” and once installed it will be found in the General Widgets section of the Source menu. Adding a Text Source (again, in the sources menu) will let you add names and other info on top of a color matte source to make a lower third! You can then group these sources together and add source effects like animating in and out during the scene changes. Source effects can be found by right-clicking on a source and selecting the “Effects” tab. In these same settings, you can also add a border around your video feeds like your screen capture and webcam source.
Combine all this with presents and/or scene transitions so you can dynamically add in or out guests throughout the broadcast. One particularly useful element is having a countdown timer before the show starts. You can easily create one of these using the text source we used earlier and clicking enable custom scripts. You can use the clock script and either use the count or timer function to set up a timer.
Streaming with XSplit Broadcaster is pretty straightforward. Login to your platform of choice and use the setup wizard to configure your stream settings. For recording, you want to record in the highest quality and highest audio bitrate possible which can be changed by clicking on the Record drop down menu and clicking the cog symbol next to the recording profile you’re using. Enabling multitrack audio will allow you to adjust the audio levels later in your editing software of choice.
Setting up these multiple recording profiles can also be very useful when you’re recording a talk show. Basically, you can setup multiple recordings from different scenes, so for example you could set up a scene per camera source, and then when you come to edit the talk show later for YouTube you can zoom in or crop your guests based on what’s going on. You can find out more about multiple recording profiles right here.
One important final element for livestreaming a podcast or talk show is that your guests need to be able to see what’s going on! XSplit Broadcaster can act as a virtual camera which means you can display whatever the current live scene is as your camera output in programs like Skype or Zoom. This means that your guests can easily see when they’re live, when you’re on a break, or just what the focus of the stream is. It’s good to know you’re not on camera if you need to take a sip of your coffee!
Another important feature is split view mode. This mode will give you a preview scene that you can edit before pushing live. This is really helpful for cueing up your next segment or easily adding new elements smoothly before pushing them live. So, for example, did one of your guests just mention a new trend or video? You can find it and add it to your scene then push it live in a smooth and seamless way. This can be easily accessed in the top right corner drop down menu for the resolution > work space and selecting split mode.
As with most things practice makes perfect, so don’t be dissuaded if the first few shows don’t go off perfectly, we’re all at the mercy of the internet! Just stick with it and add production elements as time goes on, remember the content is what’s most important when you livestream your podcast or talk show!